Sony HDMS-S1D Operating Instructions - Page 58
Importing photos from a computer via a network, Microsoft Windows Network]
 |
UPC - 027242714977
View all Sony HDMS-S1D manuals
Add to My Manuals
Save this manual to your list of manuals |
Page 58 highlights
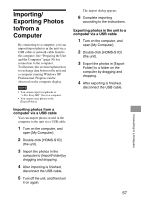
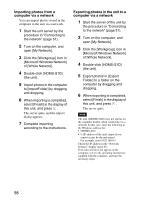
Importing photos from a computer via a network You can import photos stored in the computer to the unit via a network. 1 Start the unit server by the procedure in "Connecting to the network" (page 51). 2 Turn on the computer, and open [My Network]. 3 Click the [Workgroup] icon in [Microsoft Windows Network] of [Whole Network]. 4 Double-click [HDMS-S1D] (the unit). 5 Import photos in the computer to [ImportFolder] by dragging and dropping. 6 When importing is completed, select [Finish] in the display of this unit, and press . The server quits, and the import dialog appears. 7 Complete importing according to the instructions. Exporting photos in the unit to a computer via a network 1 Start the server of the unit by the procedure in "Connecting to the network" (page 51). 2 Turn on the computer, and open [My Network]. 3 Click the [Workgroup] icon in [Microsoft Windows Network] of [Whole Network]. 4 Double-click [HDMS-S1D] (the unit). 5 Export photos in [Export Folder] to a folder on the computer by dragging and dropping. 6 When exporting is completed, select [Finish] in the display of this unit, and press . The server quits. Note The unit ([HDMS-S1D]) may not appear on the computer display when connecting via a network. In this case, enter the following in the Windows address bar: • \\HDMS-S1D • \\ (IP address of the unit) (input if you cannot access by the unit name) For example, enter \\192.168.0.5 Check the IP address in the "Network Settings" display (page 61). If the unit still does not appear on the computer, refer to the operating instructions supplied with the computer, and take the necessary steps. 58
-
 1
1 -
2
-
3
-
4
-
5
-
6
-
7
-
8
-
9
-
10
-
11
-
12
-
13
-
14
-
15
-
16
-
17
-
18
-
19
-
20
-
21
-
22
-
23
-
24
-
25
-
26
-
27
-
28
-
29
-
30
-
31
-
32
-
33
-
34
-
35
-
36
-
37
-
38
-
39
-
40
-
41
-
42
-
43
-
44
-
45
-
46
-
47
-
48
-
49
-
50
-
51
-
52
-
 53
53 -
 54
54 -
 55
55 -
 56
56 -
 57
57 -
 58
58 -
 59
59 -
 60
60 -
 61
61 -
 62
62 -
 63
63 -
64
-
65
-
66
-
67
-
68
-
69
-
70
-
71
-
72
-
73
-
74
-
75
-
76
-
77
-
78
-
79
 |
 |