Sony HDMS-S1D Operating Instructions - Page 62
Backup/Restore, Server Startup, x-ScrapBook Backup, x-Pict Story Backup, Album Backup, Restore
 |
UPC - 027242714977
View all Sony HDMS-S1D manuals
Add to My Manuals
Save this manual to your list of manuals |
Page 62 highlights
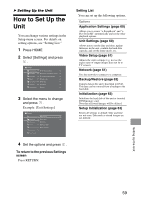
environment. 0-255 can be entered as the sequence of numbers. [MAC address] shows the unique number identifying the network interface within the network. Server Startup When you use the unit as a server by connecting the unit to a computer using a network cable, you can exchange photos between the unit and other computers within the network. See "Connecting to the network" (page 51). Backup/Restore The data stored in the hard disk of the unit can be backed up to the disc (DVD+R/DVD+RW/DVD-R/DVDRW). Should a problem occur with the hard disk, data is restorable from the backup disc. The following backup items are available. x-ScrapBook Backup Exports "x-ScrapBook" files and the photos/BGM used for scrapbooks to DVD. x-Pict Story Backup Exports "x-Pict Story HD" files and the photos/BGM used for "x-Pict Story HD" to DVD. Album Backup Exports all the photos stored in the album to DVD. Note Should trouble occur with the hard disk, consult your nearest Sony dealer or local authorized Sony service facility. 1 Press Z (open/close) and insert the blank disc for backup. 2 press HOME. 3 Select [Settings] and press . 4 Select [Backup/Restore] and press . 5 Select the item and press . 6 Select the contents and press . [Auto Select]: Automatically selects items that have not been backed up (up to the disc's capacity). 7 Select [OK] and press . 8 Select [YES] and press . Hints • In step 4, a "BackUp" mark is added to an item that has been backed up once. You can erase the marks by selecting [Erase History]. • If the content exceeds a single disc's capacity, you can back up to multiple discs. Replace the disc according to the messages on the screen. Restore 1 Press Z (open/close) and insert the backup disc. 2 Press HOME. 3 Select [Settings] and press . 4 Select [Backup/Restore] and press . 5 Select [Restore] and press . 62
-
 1
1 -
2
-
3
-
4
-
5
-
6
-
7
-
8
-
9
-
10
-
11
-
12
-
13
-
14
-
15
-
16
-
17
-
18
-
19
-
20
-
21
-
22
-
23
-
24
-
25
-
26
-
27
-
28
-
29
-
30
-
31
-
32
-
33
-
34
-
35
-
36
-
37
-
38
-
39
-
40
-
41
-
42
-
43
-
44
-
45
-
46
-
47
-
48
-
49
-
50
-
51
-
52
-
53
-
54
-
55
-
56
-
 57
57 -
 58
58 -
 59
59 -
 60
60 -
 61
61 -
 62
62 -
 63
63 -
 64
64 -
 65
65 -
 66
66 -
 67
67 -
68
-
69
-
70
-
71
-
72
-
73
-
74
-
75
-
76
-
77
-
78
-
79
 |
 |