Sony HDMS-S1D Operating Instructions - Page 59
Setting Up the Unit, How to Set Up the Unit - software update
 |
UPC - 027242714977
View all Sony HDMS-S1D manuals
Add to My Manuals
Save this manual to your list of manuals |
Page 59 highlights
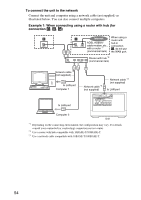
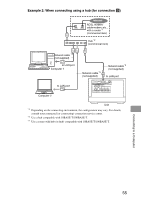
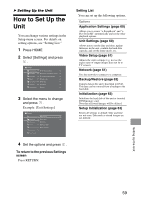
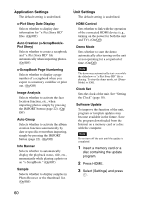
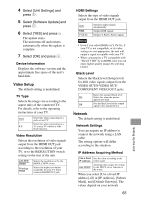
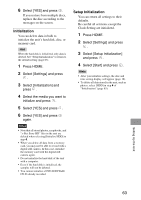
B Setting Up the Unit How to Set Up the Unit You can change various settings in the Setup menu screen. For details on setting options, see "Setting List." 1 Press HOME. 2 Select [Settings] and press . Settings Application Settings Unit Settings Video Setup Network Backup/Restore Initialization Setup Initialization x-Pict Story Date Display On Auto Creation (x-ScrapBook/x-Pict Story) On x-ScrapBook Page Numbering On Image Analysis On Auto Group On Info Banner On Sample On 3 Select the menu to change and press . Example: [Unit Settings] Settings Application Settings HDMI Control On Unit Settings Demo Mode Off Video Setup Clock Set Network Software Update Backup/Restore Device Information Initialization Setup Initialization 4 Set the options and press . To return to the previous Settings screen Press RETURN. Setting List You can set up the following options. Options Application Settings (page 60) Allows you to create "x-ScrapBook" and "xPict Story HD" automatically and set the other playback options. Unit Settings (page 60) Allows you to set the date and time, update firmware in the unit, confirm the hard disk capacity, and set the demo mode, etc. Video Setup (page 61) Adjusts the video settings (e.g. in case the aspect ratio of output images does not fit to TV screen). Network (page 61) Sets the network to connect to a computer. Backup/Restore (page 62) Exports data in the unit's hard disk to DVD. The data can be restored from a backup to the hard disk. Initialization (page 63) Initializes the hard disk of the unit or inserted DVD/memory card. Note that all stored images will be deleted. Setup Initialization (page 63) Resets all settings to default. Date and time are not reset. Data such as stored images are not deleted. Setting Up the Unit 59
-
 1
1 -
2
-
3
-
4
-
5
-
6
-
7
-
8
-
9
-
10
-
11
-
12
-
13
-
14
-
15
-
16
-
17
-
18
-
19
-
20
-
21
-
22
-
23
-
24
-
25
-
26
-
27
-
28
-
29
-
30
-
31
-
32
-
33
-
34
-
35
-
36
-
37
-
38
-
39
-
40
-
41
-
42
-
43
-
44
-
45
-
46
-
47
-
48
-
49
-
50
-
51
-
52
-
53
-
 54
54 -
 55
55 -
 56
56 -
 57
57 -
 58
58 -
 59
59 -
 60
60 -
 61
61 -
 62
62 -
 63
63 -
 64
64 -
65
-
66
-
67
-
68
-
69
-
70
-
71
-
72
-
73
-
74
-
75
-
76
-
77
-
78
-
79
 |
 |