Sony HDMS-S1D Operating Instructions - Page 61
Video Setup, Network, Device Information, TV Type, Video Resolution, HDMI Settings, Black Level
 |
UPC - 027242714977
View all Sony HDMS-S1D manuals
Add to My Manuals
Save this manual to your list of manuals |
Page 61 highlights
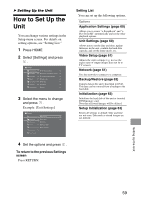
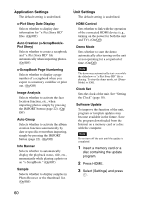
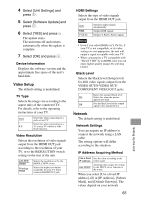
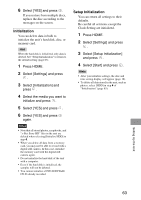
4 Select [Unit Settings] and press . 5 Select [Software Update] and press . 6 Select [YES] and press . The update starts. The unit turns off and restarts automatically when the update is complete. 7 Select [OK] and press . Device Information Displays the software version and the approximate free space of the unit's hard disk. Video Setup The default setting is underlined. TV Type Selects the image size according to the aspect ratio of the connected TV. For details, refer to the operating instructions of your TV. 16:9 Select this when connecting to a wide-screen TV. Select this when connecting to a 4:3 4:3 screen TV without a wide mode function. Video Resolution Selects the resolution of video signals output from the HDMI OUT jack according to the resolution of your TV, or to the RESOLUTION switch setting on the rear of the unit. Link With Switch Prioritize HDMI Selects the resolution set by the RESOLUTION switch. Selects the highest resolution acceptable for your TV when connected HDMI OUT jack. HDMI Settings Selects the type of video signals output from the HDMI OUT jack. Auto RGB Y Cb Cr Switches output signals automatically. Outputs RGB signals. Outputs Y, PB/CB, PR/CR signals. Notes • Even if you select [RGB] or [Y Cb Cr], if your TV is not compatible, or its video settings are not appropriate, the unit will output a signal acceptable with your TV. • When connected to a TV compatible with "PhotoTV HD" by an HDMI cord, you can enjoy higher quality images by selecting [Auto]. Black Level Selects the black level (Setup level) for 480i video signals output from the VIDEO OUT/S-VIDEO OUT/ COMPONENT VIDEO OUT jacks. Raises the standard black level. On Select this when the picture appears too dark. Off Sets the black level of the output signal to the standard level. Network The default setting is underlined. Network Settings You can acquire an IP address to connect the network using a LAN cable. The setting options will differ according to the situation. IP Address Acquiring Method Use a fixed Sets the value according to the IP address router usage. Automatically assigns the setting Use DHCP by the DHCP server function of the router. When you select [Use a fixed IP address], fill in [IP Address], [Subnet Mask], and [Default Gateway]. The values depend on your network 61 Setting Up the Unit
-
 1
1 -
2
-
3
-
4
-
5
-
6
-
7
-
8
-
9
-
10
-
11
-
12
-
13
-
14
-
15
-
16
-
17
-
18
-
19
-
20
-
21
-
22
-
23
-
24
-
25
-
26
-
27
-
28
-
29
-
30
-
31
-
32
-
33
-
34
-
35
-
36
-
37
-
38
-
39
-
40
-
41
-
42
-
43
-
44
-
45
-
46
-
47
-
48
-
49
-
50
-
51
-
52
-
53
-
54
-
55
-
 56
56 -
 57
57 -
 58
58 -
 59
59 -
 60
60 -
 61
61 -
 62
62 -
 63
63 -
 64
64 -
 65
65 -
 66
66 -
67
-
68
-
69
-
70
-
71
-
72
-
73
-
74
-
75
-
76
-
77
-
78
-
79
 |
 |
