Sony NWZ-WS613BLK Help Guide (Printable PDF) - Page 99
NWZ-WS613/WS615, Replacing the battery of the Remote Commander, CR1620 Lithium Coin Cell Battery only.
 |
View all Sony NWZ-WS613BLK manuals
Add to My Manuals
Save this manual to your list of manuals |
Page 99 highlights
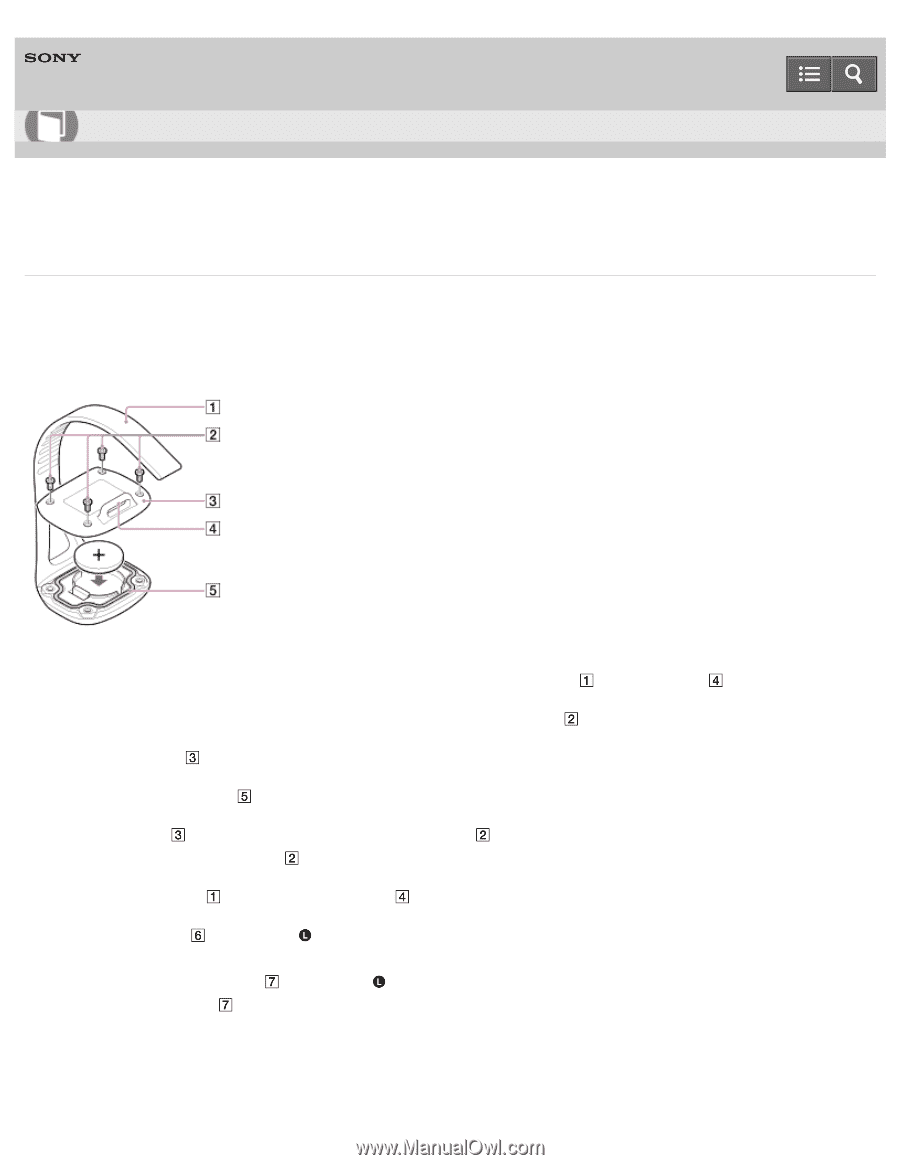
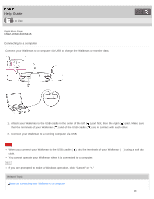
Help Guide How to Use Digital Music Player NWZ-WS613/WS615 Replacing the battery of the Remote Commander Replace the battery of the Remote Commander (supplied) when the lamp color changes to red. Be sure to use a CR1620 Lithium Coin Cell Battery only. When you open the battery cover, the waterproof performance may be impaired by dust, etc. To maintain waterproof performance, consult your nearest Sony dealer or Sony Service Center for replacement of the battery (at extra cost). 1. Make sure that the Remote Commander is turned off. Remove the band ( ) from the loop ( ). 2. Use a size 0 cross-head precision screwdriver and remove the screws ( , 4 in total). 3. Open the cover ( ), remove the battery, and insert a new CR1620 battery with correct polarity. 4. Check that the packing ( ) is in place and is clean. 5. Put the cover ( ) back into place and tighten the screws ( ) firmly to the end. Do not overtighten the screws ( ). 6. Reattach the band ( ) back through the loop ( ). 7. Press the button ( ) on the left ( ) side of your Walkman for about 7 seconds and turn the Remote Commander on. Pairing starts and the lamp ( ) on the left ( ) side of your Walkman blinks in blue and red. When the pairing is completed, the lamp ( ) blinks in blue. 95
-
 1
1 -
2
-
3
-
4
-
5
-
6
-
7
-
8
-
9
-
10
-
11
-
12
-
13
-
14
-
15
-
16
-
17
-
18
-
19
-
20
-
21
-
22
-
23
-
24
-
25
-
26
-
27
-
28
-
29
-
30
-
31
-
32
-
33
-
34
-
35
-
36
-
37
-
38
-
39
-
40
-
41
-
42
-
43
-
44
-
45
-
46
-
47
-
48
-
49
-
50
-
51
-
52
-
53
-
54
-
55
-
56
-
57
-
58
-
59
-
60
-
61
-
62
-
63
-
64
-
65
-
66
-
67
-
68
-
69
-
70
-
71
-
72
-
73
-
74
-
75
-
76
-
77
-
78
-
79
-
80
-
81
-
82
-
83
-
84
-
85
-
86
-
87
-
88
-
89
-
90
-
91
-
92
-
93
-
 94
94 -
 95
95 -
 96
96 -
 97
97 -
 98
98 -
 99
99 -
 100
100 -
 101
101 -
 102
102 -
 103
103 -
 104
104 -
105
-
106
-
107
-
108
-
109
-
110
-
111
-
112
-
113
-
114
-
115
-
116
-
117
-
118
-
119
-
120
-
121
-
122
-
123
-
124
-
125
-
126
-
127
-
128
-
129
-
130
-
131
-
132
-
133
-
134
-
135
-
136
-
137
-
138
-
139
-
140
-
141
-
142
-
143
-
144
-
145
-
146
-
147
-
148
-
149
-
150
-
151
-
152
-
153
-
154
-
155
-
156
-
157
-
158
-
159
-
160
-
161
-
162
-
163
-
164
-
165
-
166
-
167
-
168
-
169
-
170
-
171
-
172
-
173
-
174
-
175
-
176
-
177
-
178
-
179
-
180
-
181
-
182
-
183
-
184
-
185
-
186
-
187
-
188
-
189
-
190
-
191
-
192
-
193
-
194
-
195
-
196
-
197
-
198
-
199
-
200
-
201
-
202
-
203
-
204
-
205
-
206
-
207
-
208
-
209
-
210
-
211
-
212
-
213
-
214
-
215
-
216
-
217
-
218
-
219
-
220
-
221
-
222
-
223
-
224
-
225
-
226
-
227
-
228
-
229
-
230
-
231
-
232
-
233
-
234
-
235
-
236
-
237
-
238
-
239
 |
 |