Sony RDR VX500 Operating Instructions - Page 46
Changing the Name of a Recorded Program (Title Input), Select the character you want to enter, using
 |
UPC - 027242657441
View all Sony RDR VX500 manuals
Add to My Manuals
Save this manual to your list of manuals |
Page 46 highlights
Changing the Name of a Recorded Program (Title Input) +RW -RWVR -RWVideo +R -R You can label a title, disc, or program by entering characters. You can enter up to 32 characters for a title or disc name, but the actual number of characters displayed in the menus such as the Title List will vary. When the display for entering characters appears, follow the steps below. O RETURN M/m/
-
 1
1 -
2
-
3
-
4
-
5
-
6
-
7
-
8
-
9
-
10
-
11
-
12
-
13
-
14
-
15
-
16
-
17
-
18
-
19
-
20
-
21
-
22
-
23
-
24
-
25
-
26
-
27
-
28
-
29
-
30
-
31
-
32
-
33
-
34
-
35
-
36
-
37
-
38
-
39
-
40
-
 41
41 -
 42
42 -
 43
43 -
 44
44 -
 45
45 -
 46
46 -
 47
47 -
 48
48 -
 49
49 -
 50
50 -
 51
51 -
52
-
53
-
54
-
55
-
56
-
57
-
58
-
59
-
60
-
61
-
62
-
63
-
64
-
65
-
66
-
67
-
68
-
69
-
70
-
71
-
72
-
73
-
74
-
75
-
76
-
77
-
78
-
79
-
80
-
81
-
82
-
83
-
84
-
85
-
86
-
87
-
88
-
89
-
90
-
91
-
92
-
93
-
94
-
95
-
96
-
97
-
98
-
99
-
100
-
101
-
102
-
103
-
104
-
105
-
106
-
107
-
108
-
109
-
110
-
111
-
112
-
113
-
114
-
115
-
116
-
117
-
118
-
119
-
120
-
121
-
122
-
123
-
124
-
125
-
126
-
127
-
128
 |
 |

46
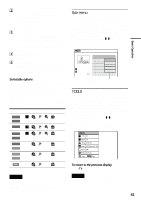
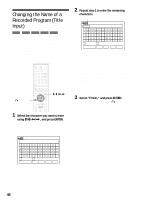
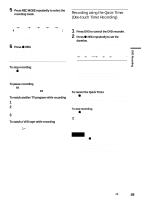
Changing the Name of a
Recorded Program (Title
Input)
You can label a title, disc, or program by entering
characters. You can enter up to 32 characters for a
title or disc name, but the actual number of
characters displayed in the menus such as the Title
List will vary. When the display for entering
characters appears, follow the steps below.
1
Select the character you want to enter
using
M
/
m
/
<
/
,
, and press ENTER.
The selected character appears at the top of
the display.
Example: Disc Name
You can only enter characters and symbols
that are displayed.
To insert a space, select “Space.”
2
Repeat step 1 to enter the remaining
characters.
To erase a character, move the cursor to the
right of the character at the input row. Select
“Backspace” and press ENTER.
To erase the character at the position of the
cursor, select “Delete” and press ENTER.
To insert a character, move the cursor to the
right of the point where you want to insert the
character. Select the character and press
ENTER.
To erase all of the characters, select “Clear”
and press ENTER.
3
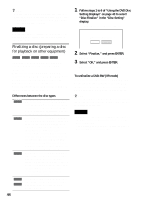
Select “Finish,” and press ENTER.
To cancel the setting, press
O
RETURN.
+
R
-
RW
VR
-
RW
Video
+
RW
-
R
M
/
m
/
<
/
,
,
ENTER
O
RETURN
Disc Name
K _
A
B
C
D
E
F
G
H
I
J
K
L
M
N
O
P
Q
R
S
T
U
V
W
X
Y
Z
a
b
c
d
e
f
g
h
i
j
k
l
m
n
o
p
q
r
s
t
u
v
w
x
y
z
1
2
3
4
5
6
7
8
9
0
-
_
+
=
•
~
!
@
#
$
%
^
&
(
)
Backspace
Space
Delete
Clear
Finish
10:10 AM
Disc Name
Kids _
A
B
C
D
E
F
G
H
I
J
K
L
M
N
O
P
Q
R
S
T
U
V
W
X
Y
Z
a
b
c
d
e
f
g
h
i
j
k
l
m
n
o
p
q
r
s
t
u
v
w
x
y
z
1
2
3
4
5
6
7
8
9
0
-
_
+
=
•
~
!
@
#
$
%
^
&
(
)
Backspace
Space
Delete
Clear
Finish
10:10 AM
Input row