TP-Link Archer D5 Archer D5 V1 User Guide - Page 124
Appendix B: Troubleshooting
 |
View all TP-Link Archer D5 manuals
Add to My Manuals
Save this manual to your list of manuals |
Page 124 highlights
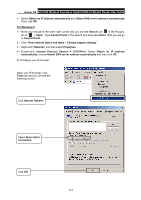
Archer D5 AC1200 Wireless Dual Band Gigabit ADSL2+ Modem Router User Guide Appendix B: Troubleshooting T1. How do I restore my modem router's configuration to its factory default settings? With the modem router powered on, press and hold the RESET button on the rear panel for 8 to 10 seconds before releasing it. Note: Once the modem router is reset, the current configuration settings will be lost and you will need to re-configure the router. T2. What can I do if I don't know or forget my password? 1) Restore the modem router's configuration to its factory default settings. If you don't know how to do that, please refer to T1. 2) Use the default user name and password: admin, admin. 3) Try to configure your modem router once again by following the instructions in 3.2 Quick Installation Guide. T3. What can I do if I cannot access the web-based configuration page? 1) Configure your computer's IP Address. For Mac OS X 1) Click the Apple icon on the upper left corner of the screen. 2) Go to "System Preferences -> Network". 3) Select Airport on the left menu bar, and then click Advanced for wireless configuration; or select Ethernet for wired configuration. 4) In the Configure IPv4 box under TCP/IP, select Using DHCP. 5) Click Apply to save the settings. For Windows 7 1) Click "Start -> Control Panel -> Network and Internet -> View network status -> Change adapter settings". 2) Right-click Wireless Network Connection (or Local Area Connection), and then click Properties. 3) Select Internet Protocol Version 4 (TCP/IPv4), and then click Properties. 4) Select Obtain an IP address automatically and Obtain DNS server address automatically. Then click OK. For Windows XP 1) Click "Start -> Control Panel -> Network and Internet Connections -> Network Connections". 2) Right-click Wireless Network Connection (or Local Area Connection), and then click Properties. 3) Select Internet Protocol (TCP/IP), and then click Properties. 113
-
 1
1 -
2
-
3
-
4
-
5
-
6
-
7
-
8
-
9
-
10
-
11
-
12
-
13
-
14
-
15
-
16
-
17
-
18
-
19
-
20
-
21
-
22
-
23
-
24
-
25
-
26
-
27
-
28
-
29
-
30
-
31
-
32
-
33
-
34
-
35
-
36
-
37
-
38
-
39
-
40
-
41
-
42
-
43
-
44
-
45
-
46
-
47
-
48
-
49
-
50
-
51
-
52
-
53
-
54
-
55
-
56
-
57
-
58
-
59
-
60
-
61
-
62
-
63
-
64
-
65
-
66
-
67
-
68
-
69
-
70
-
71
-
72
-
73
-
74
-
75
-
76
-
77
-
78
-
79
-
80
-
81
-
82
-
83
-
84
-
85
-
86
-
87
-
88
-
89
-
90
-
91
-
92
-
93
-
94
-
95
-
96
-
97
-
98
-
99
-
100
-
101
-
102
-
103
-
104
-
105
-
106
-
107
-
108
-
109
-
110
-
111
-
112
-
113
-
114
-
115
-
116
-
117
-
118
-
 119
119 -
 120
120 -
 121
121 -
 122
122 -
 123
123 -
 124
124 -
 125
125 -
 126
126 -
 127
127
 |
 |