TP-Link Archer D5 Archer D5 V1 User Guide - Page 31
WAN Settings
 |
View all TP-Link Archer D5 manuals
Add to My Manuals
Save this manual to your list of manuals |
Page 31 highlights
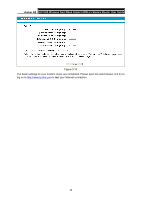
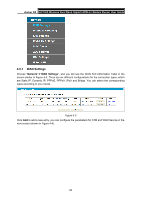
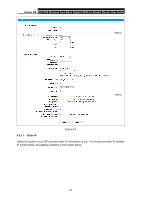
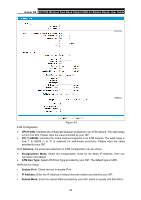
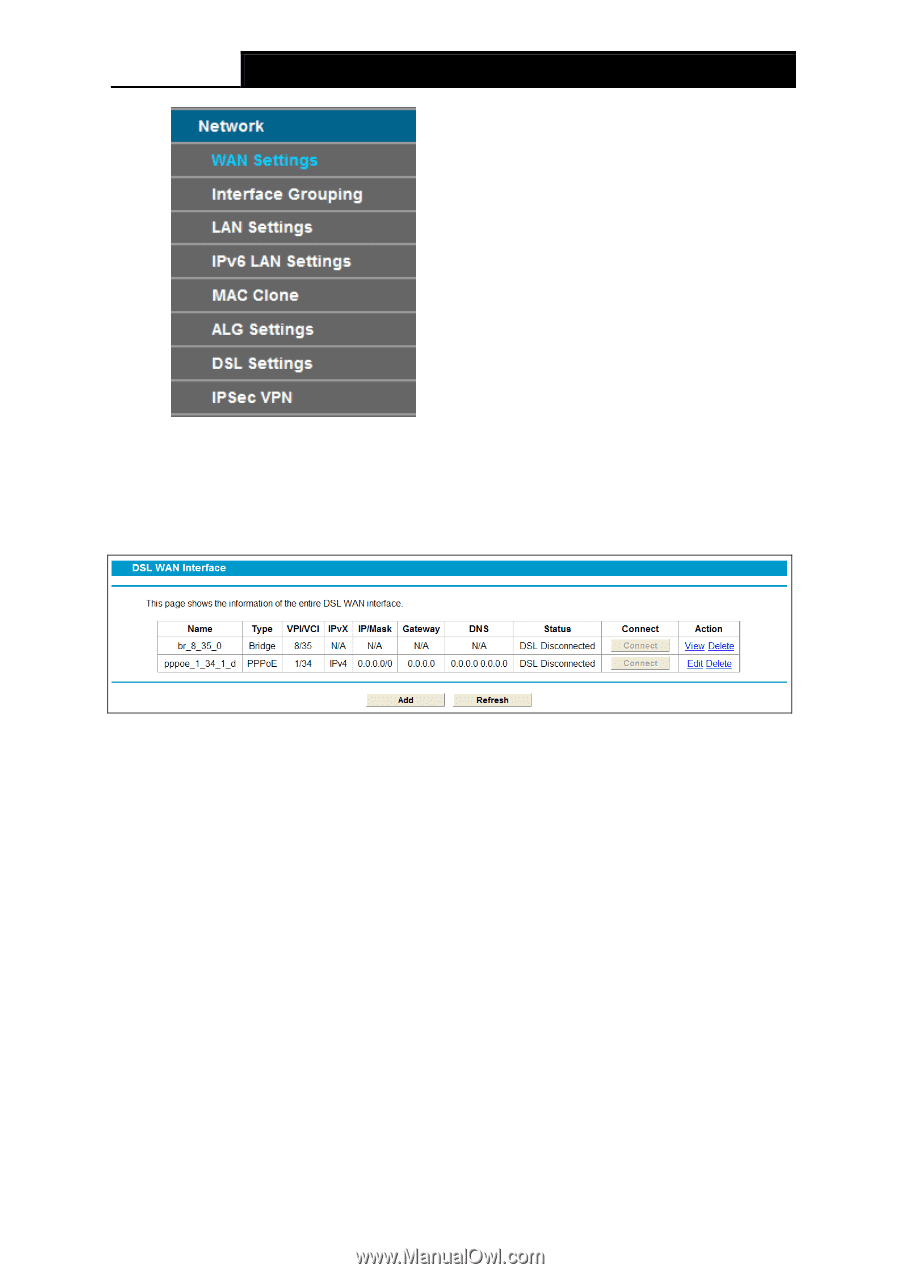
Archer D5 AC1200 Wireless Dual Band Gigabit ADSL2+ Modem Router User Guide 4.5.1 WAN Settings Choose "Network""WAN Settings", and you will see the WAN Port Information Table in the screen similar to Figure 4-3. There are six different configurations for the connection types, which are Static IP, Dynamic IP, PPPoE, PPPoA, IPoA and Bridge. You can select the corresponding types according to your needs. Figure 4-3 Click Add to add a new entry, you can configure the parameters for ATM and WAN Service in the next screen (shown in Figure 4-4). 20
-
 1
1 -
2
-
3
-
4
-
5
-
6
-
7
-
8
-
9
-
10
-
11
-
12
-
13
-
14
-
15
-
16
-
17
-
18
-
19
-
20
-
21
-
22
-
23
-
24
-
25
-
 26
26 -
 27
27 -
 28
28 -
 29
29 -
 30
30 -
 31
31 -
 32
32 -
 33
33 -
 34
34 -
 35
35 -
 36
36 -
37
-
38
-
39
-
40
-
41
-
42
-
43
-
44
-
45
-
46
-
47
-
48
-
49
-
50
-
51
-
52
-
53
-
54
-
55
-
56
-
57
-
58
-
59
-
60
-
61
-
62
-
63
-
64
-
65
-
66
-
67
-
68
-
69
-
70
-
71
-
72
-
73
-
74
-
75
-
76
-
77
-
78
-
79
-
80
-
81
-
82
-
83
-
84
-
85
-
86
-
87
-
88
-
89
-
90
-
91
-
92
-
93
-
94
-
95
-
96
-
97
-
98
-
99
-
100
-
101
-
102
-
103
-
104
-
105
-
106
-
107
-
108
-
109
-
110
-
111
-
112
-
113
-
114
-
115
-
116
-
117
-
118
-
119
-
120
-
121
-
122
-
123
-
124
-
125
-
126
-
127
 |
 |
Archer
D5
AC1200 Wireless Dual Band Gigabit ADSL2+ Modem Router User Guide
20
4.5.1
WAN Settings
Choose “
Network
”
“
WAN Settings
”, and you will see the WAN Port Information Table in the
screen similar to Figure 4-3. There are six different configurations for the connection types, which
are Static IP, Dynamic IP, PPPoE, PPPoA, IPoA and Bridge. You can select the corresponding
types according to your needs.
Figure 4-3
Click
Add
to add a new entry, you can configure the parameters for ATM and WAN Service in the
next screen (shown in Figure 4-4).