TP-Link Auranet EAP120 EAP Controller V2.2.3 User Guide - Page 52
Wireless Control > Scheduler Association, Associated with SSID, Apply, Radio Off
 |
View all TP-Link Auranet EAP120 manuals
Add to My Manuals
Save this manual to your list of manuals |
Page 52 highlights
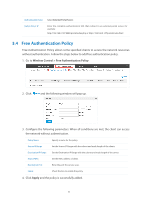
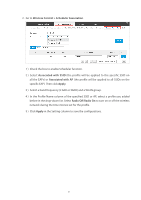
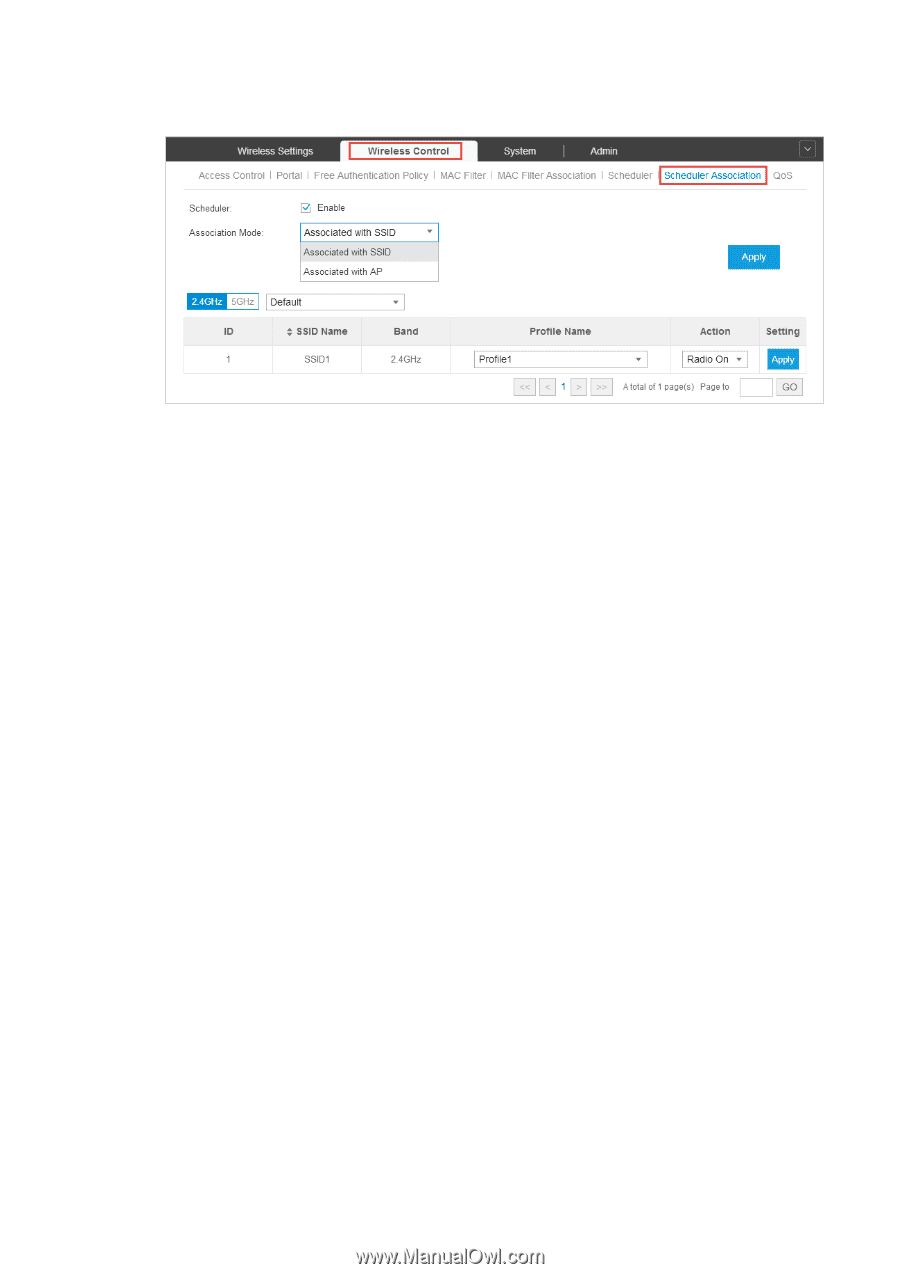
2. Go to Wireless Control > Scheduler Association. 1 ) Check the box to enable Scheduler function. 2 ) Select Associated with SSID (the profile will be applied to the specific SSID on all the EAPs) or Associated with AP (the profile will be applied to all SSIDs on the specific EAP). Then click Apply. 3 ) Select a band frequency (2.GHz or 5GHz) and a WLAN group. 4 ) In the Profile Name column of the specified SSID or AP, select a profile you added before in the drop-down list. Select Radio Off/Radio On to turn on or off the wireless network during the time interval set for the profile. 5 ) Click Apply in the Setting column to save the configurations. 47
-
 1
1 -
2
-
3
-
4
-
5
-
6
-
7
-
8
-
9
-
10
-
11
-
12
-
13
-
14
-
15
-
16
-
17
-
18
-
19
-
20
-
21
-
22
-
23
-
24
-
25
-
26
-
27
-
28
-
29
-
30
-
31
-
32
-
33
-
34
-
35
-
36
-
37
-
38
-
39
-
40
-
41
-
42
-
43
-
44
-
45
-
46
-
 47
47 -
 48
48 -
 49
49 -
 50
50 -
 51
51 -
 52
52 -
 53
53 -
 54
54 -
 55
55 -
 56
56 -
 57
57 -
58
-
59
-
60
-
61
-
62
-
63
-
64
-
65
-
66
-
67
-
68
-
69
-
70
-
71
-
72
-
73
-
74
-
75
-
76
-
77
-
78
-
79
 |
 |
47
2. Go to
Wireless Control > Scheduler Association
.
1 ) Check the box to enable Scheduler function.
2 ) Select
Associated with SSID
(the profile will be applied to the specific SSID on
all the EAPs) or
Associated with AP
(the profile will be applied to all SSIDs on the
specific EAP). Then click
Apply
.
3 ) Select a band frequency (2.GHz or 5GHz) and a WLAN group.
4 ) In the Profile Name column of the specified SSID or AP, select a profile you added
before in the drop-down list. Select
Radio Off
/
Radio On
to turn on or off the wireless
network during the time interval set for the profile.
5 ) Click
Apply
in the Setting column to save the configurations.