TP-Link TL-WR543G User Guide - Page 19
Default Gateway, Primary, Secondary DNS, Wireless, Radio, Region, Channel, 54Mbps 802.11g - user manual
 |
UPC - 845973051204
View all TP-Link TL-WR543G manuals
Add to My Manuals
Save this manual to your list of manuals |
Page 19 highlights
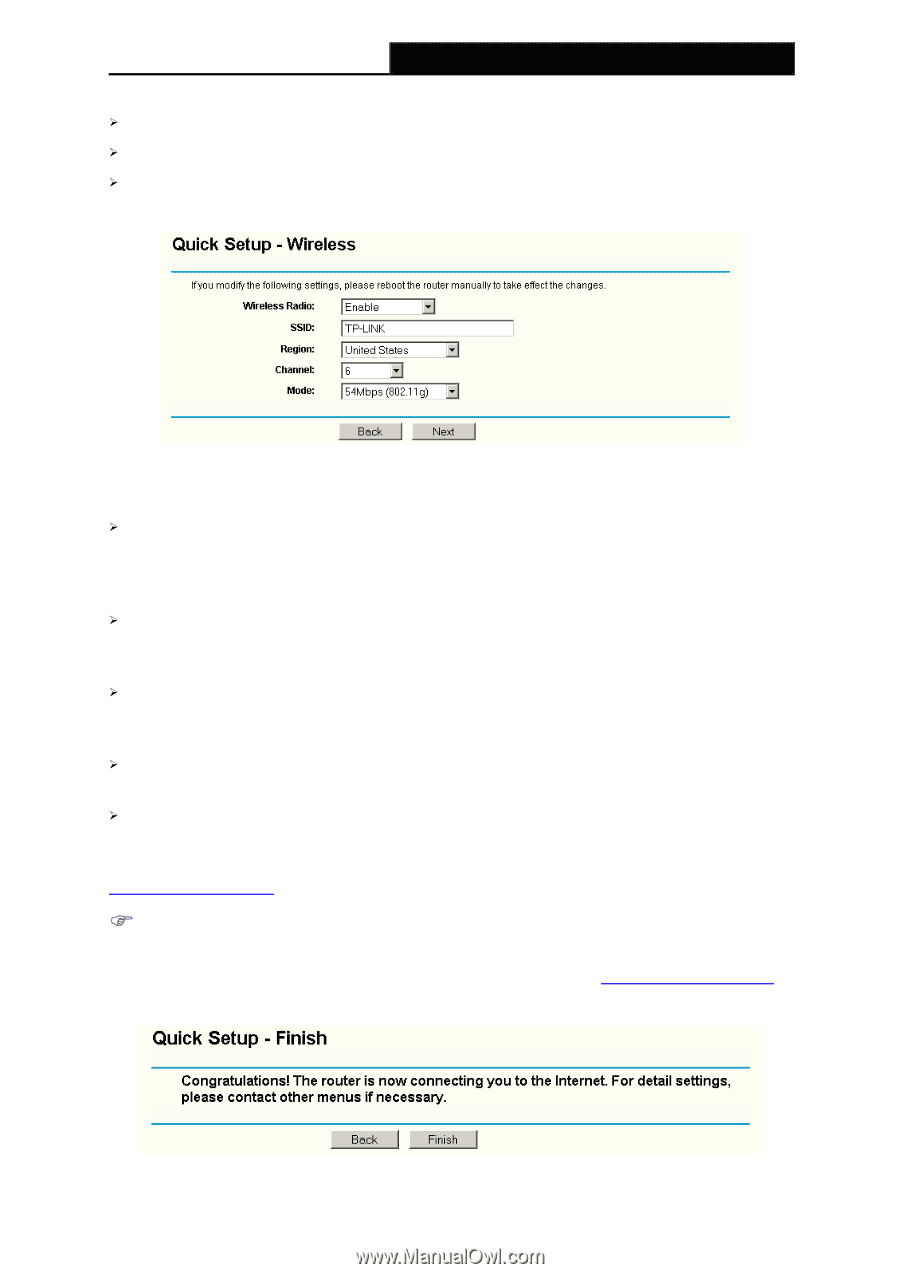
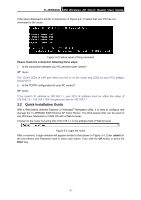
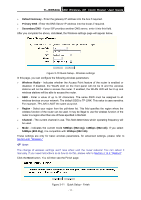
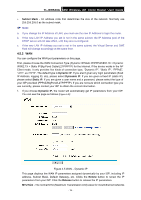
TL-WR543G 54M Wireless AP Client Router User Guide ¾ Default Gateway - Enter the gateway IP address into the box if required. ¾ Primary DNS - Enter the DNS Server IP address into the boxes if required. ¾ Secondary DNS - If your ISP provides another DNS server, enter it into this field. After you complete the above, click Next, the Wireless settings page will appear below. Figure 3-10 Quick Setup - Wireless settings In this page, you can configure the following wireless parameters: ¾ Wireless Radio - Indicates whether the Access Point feature of the router is enabled or disabled. If disabled, the WLAN LED on the front panel will not be lit and the wireless stations will not be able to access the router. If enabled, the WLAN LED will be lit up and wireless stations will be able to access the router. ¾ SSID - Enter a value of up to 32 characters. The same SSID must be assigned to all wireless devices on your network. The default SSID is TP-LINK. This value is case-sensitive. For example, TP-LINK is NOT the same as tp-link. ¾ Region - Select your region from the pull-down list. This field specifies the region where the wireless function of the router can be used. It may be illegal to use the wireless function of the router in a region other than one of those specified in this field. ¾ Channel - The current channel in use. This field determines which operating frequency will be used. ¾ Mode - Indicates the current mode 54Mbps (802.11g), 11Mbps (802.11b). If you select 54Mbps (802.11g), it is compatible with 11Mbps (802.11b). These settings are only for basic wireless parameters, for advanced settings, please refer to Section 4.6: "Wireless." ) Note: The change of wireless settings won't take effect until the router reboots! You can reboot it manually. If you need instructions as to how to do this, please refer to Section 4.13.5: "Reboot" Click the Next button. You will then see the Finish page: Figure 3-11 Quick Setup - Finish - 11 -
-
 1
1 -
2
-
3
-
4
-
5
-
6
-
7
-
8
-
9
-
10
-
11
-
12
-
13
-
 14
14 -
 15
15 -
 16
16 -
 17
17 -
 18
18 -
 19
19 -
 20
20 -
 21
21 -
 22
22 -
 23
23 -
 24
24 -
25
-
26
-
27
-
28
-
29
-
30
-
31
-
32
-
33
-
34
-
35
-
36
-
37
-
38
-
39
-
40
-
41
-
42
-
43
-
44
-
45
-
46
-
47
-
48
-
49
-
50
-
51
-
52
-
53
-
54
-
55
-
56
-
57
-
58
-
59
-
60
-
61
-
62
-
63
-
64
-
65
-
66
-
67
-
68
-
69
-
70
-
71
-
72
-
73
-
74
-
75
-
76
-
77
-
78
-
79
-
80
-
81
-
82
-
83
 |
 |