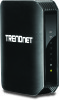
TRENDnet TEW-751DR User's Guide
TRENDnet TEW-751DR Manual
 |
View all TRENDnet TEW-751DR manuals
Add to My Manuals
Save this manual to your list of manuals |
TRENDnet TEW-751DR manual content summary:
- TRENDnet TEW-751DR | User's Guide - Page 1
TRENDnet User's Guide Cover Page - TRENDnet TEW-751DR | User's Guide - Page 2
20 Advanced wireless settings 21 Access Control Filters 22 Access control basics 22 MAC Address Filters 22 Parental Control 23 Firewall Rules ...24 Advanced Router Setup 25 Access your router management page 25 Change your router login password 25 © Copyright 2013 TRENDnet. All Rights - TRENDnet TEW-751DR | User's Guide - Page 3
TRENDnet User's Guide Backup and restore your router configuration settings 44 Reboot your router ...44 Upgrade your router firmware 45 Allow/deny ping requests to your router from the Internet 46 Wireless Client List...46 Check the router system information 47 View your router log ...50 - TRENDnet TEW-751DR | User's Guide - Page 4
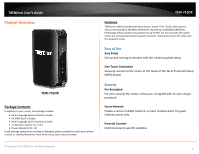
from which the product was purchased. © Copyright 2013 TRENDnet. All Rights Reserved. TEW-751DR Features TRENDnet's N600 Dual Band Wireless Router, model TEW-751DR, offers proven concurrent Dual Band 300 Mbps Wireless N networking. Embedded GREENnet technology reduces power consumption by up to - TRENDnet TEW-751DR | User's Guide - Page 5
2013 TRENDnet. All Rights Reserved. Product Hardware Features Rear View TEW-751DR Reset Button WPS Button 10/100Mbps LAN Ports 1-4 Internet Port Power Port On/Off Power Switch • Reset Button - Press and hold this button for 10 seconds to reset the router. • WPS Button (Wi-Fi Protected Setup - TRENDnet TEW-751DR | User's Guide - Page 6
TRENDnet User's Guide Front View Wireless LED LAN Ports 1-4 LEDs Power LED WPS LED TEW-751DR • LAN Ports 1-4 (Link/Activity) LED: These LED indicators are solid green when the LAN ports 1-4 are physically connected to your wired network devices (which are turned on) with a network or Ethernet - TRENDnet TEW-751DR | User's Guide - Page 7
access, you'll need: • Computers/devices with an Ethernet port (also called network port) or wireless networking capabilities. • A modem and Internet service to your home, provided by your ISP (modem typically supplied by your ISP). • A router to connect multiple devices to the Internet. TEW-751DR - TRENDnet TEW-751DR | User's Guide - Page 8
24.129) Username: _________ Password Service Name Optional) DNS Servers Address 1 (Static IP DNS Servers Address 2 (Static IP Optional) © Copyright 2013 TRENDnet. All Rights Reserved. TEW-751DR Reconnect Mode: Always / On Demand / Manual (Optional) MTU:_______ (Default: 1500, change if required - TRENDnet TEW-751DR | User's Guide - Page 9
TRENDnet User's Guide Hardware Installation 1. Verify that you have an Internet connection when connecting your computer directly to your modem. TEW-751DR 6. Connect the power adapter to the router and then to a power outlet. 7. Turn on your modem. 8. Verify that the status LED indicators on the - TRENDnet TEW-751DR | User's Guide - Page 10
can access the router management using the default IP address http://192.168.10.1. Your router will prompt you for a user name and password. Enter your user name and password and click Main > Wizard. TEW-751DR 4. Confirm your settings. This window displays your predefined router wireless settings - TRENDnet TEW-751DR | User's Guide - Page 11
TRENDnet User's Guide TEW-751DR Connect additional wired devices to your network You can connect additional computers or other network enabled devices to your network by using Ethernet cables to connect them to one of the available LAN ports labeled 1,2,3,4 on your router. Check the status of the - TRENDnet TEW-751DR | User's Guide - Page 12
. TRENDnet recommends setting your router to this encryption standard. If you find that one of your wireless network devices does not support WPA2 encryption, then set your router to either WPA or WPA-Auto encryption. Note: Check the specifications of your wireless network adapters and wireless - TRENDnet TEW-751DR | User's Guide - Page 13
TRENDnet User's Guide Secure your wireless network Wireless > Basic After you have determined which security type to use for your wireless network (see "How to choose the security type for your wireless network" on page 12), you can set up wireless security. Note: By default, your router is - TRENDnet TEW-751DR | User's Guide - Page 14
TRENDnet User's Guide Selecting WPA-Personal with Auto (WPA or WPA2)/WPA Only/WPA2 Only (WPA2 Only recommended): In the Security Mode drop-down list, select WPA-Personal. Please review the WPAPersonal settings to configure and click Save Settings to save the changes. TEW-751DR Selecting WPA- - TRENDnet TEW-751DR | User's Guide - Page 15
must refer to the User's Manual/Guide of your wireless client device to determine how to search and connect to this router's wireless network. See the "Appendix" on page 56 for general information on connecting to a wireless network. TEW-751DR Connect wireless devices using WPS WPS (Wi-Fi Protected - TRENDnet TEW-751DR | User's Guide - Page 16
page (see "Access your router management page" on page 25). 2. Click on Wireless, and click on Wi-Fi Protected Setup. 3. To add a wireless device to your network, click the Connect button in the router management page. TEW-751DR 5. Select PBC and click Connect. Then push the WPS button on the - TRENDnet TEW-751DR | User's Guide - Page 17
method. 1. Log into your router management page (see "Access your router management page" on page 25). 2. Click on Wireless, and click on Wi-Fi Protected Setup. 3. To add a wireless device to your network, click the Connect button in the router management page. TEW-751DR 5. Select PIN and enter - TRENDnet TEW-751DR | User's Guide - Page 18
network from others around you. By default, the router's wireless name is unique to the device. If you choose to change the SSID, change it to a name that you can easily remember. TEW-751DR When applying the 802.11 Mode setting, please keep in mind the following: • Wireless devices that support - TRENDnet TEW-751DR | User's Guide - Page 19
of providing higher performance only if the wireless devices support the channel bandwidth settings. Enabling 20/40MHz (Auto) typically results in substantial performance increases when connecting an 802.11n client. TEW-751DR Guest Network Access > Guest Zone Creating an isolated and separate - TRENDnet TEW-751DR | User's Guide - Page 20
TRENDnet User's Guide • Enable Routing Between Zones: If checked, allows wireless clients connected to the guest network access to your private LAN network. Choose which band to enable the Guest Network (Wireless - 2.4GHz or 5GHz): • Enable Guest Zone - Check the option to enable the guest network. - TRENDnet TEW-751DR | User's Guide - Page 21
provide information about the router's wireless network. The interval is the amount time between each beacon transmission. Default Value: 100 milliseconds (range help to decrease the error rate in wireless data transmission and receiving. © Copyright 2013 TRENDnet. All Rights Reserved. TEW-751DR 21 - TRENDnet TEW-751DR | User's Guide - Page 22
and other devices from using this router's wired or wireless network. You can enter up to 24 MAC address entries. 1. Log into your router management page (see "Access your router management page" on page 25). 2. Click on Access, click on MAC Filters. 3. Review the MAC Filter options, click Save - TRENDnet TEW-751DR | User's Guide - Page 23
TRENDnet User's Guide Parental Control Access > Parental Control You may want to block computers or devices on your network access to specific websites (e.g. www.trendnet.com, etc.), also called domains or URLs (Uniform Resource Locators). You may also enter a keyword (e.g. instead of complete URL - TRENDnet TEW-751DR | User's Guide - Page 24
apply the protocol (e.g. 192.168.10.20-192.168.10.20 or 192.168.10.20-192.168.10.30). To specify all IP address, enter an asterisk * . • Protocol - Select the protocol type to filter. TCP, UDP, ICMP, or All. © Copyright 2013 TRENDnet. All Rights Reserved. TEW-751DR • Port Range: If selecting TCP or - TRENDnet TEW-751DR | User's Guide - Page 25
User's Guide. 1. Open your web browser and go to URL/domain name http://tew-751dr or IP address http://192.168.10.1. Your router will prompt you for a user name and password. TEW-751DR Change your router login password Main > Password 1. Log into your router management page (see "Access your router - TRENDnet TEW-751DR | User's Guide - Page 26
click on Password. 3. Under the System Name section, in the Gateway Name field, enter the new device name to display on your network to identify the router. TEW-751DR Manually configure your Internet connection Main > WAN 1. Log into your router management page (see "Access your router management - TRENDnet TEW-751DR | User's Guide - Page 27
TRENDnet User's Guide IPv6 Connection Settings Main > IPv6 IPv6 (Internet Protocol Version 6) is a new about the IPv6 service. 1. Log into your router management page (see "Access your router management page" on page 25). 2. Click on Main, and click on IPv6. TEW-751DR 3. Review the IPv6 Internet - TRENDnet TEW-751DR | User's Guide - Page 28
of using the default http://192.168.10.1 your new router IP address will use the following format using your new IP address http://(new.ipaddress.here) to access your router management page. You can also use the default login URL http://tew-751dr © Copyright 2013 TRENDnet. All Rights Reserved - TRENDnet TEW-751DR | User's Guide - Page 29
page (see "Access your router management page" on page 25). 2. Click on Main, and click on LAN. 3. Next to Enable DNS Relay, check the option to enable or uncheck to disable. 4. To save changes, click Save Settings. © Copyright 2013 TRENDnet. All Rights Reserved. TEW-751DR Change your local - TRENDnet TEW-751DR | User's Guide - Page 30
also called port forwarding, see "Virtual Server" on page 36) or special applications (also called port triggering, see "Special Applications" on page 39). 1. Log into your router management page (see "Access your router management page" on page 25). 2. Click on Main, and click on LAN. 3. Review the - TRENDnet TEW-751DR | User's Guide - Page 31
TRENDnet User's Guide Click Add/Update - Saves the reservation. Note: Click Clear discards , click Don't Save Settings. TEW-751DR Enable/disable UPnP on your router Access > Advanced Network UPnP (Universal Plug and Play) allows devices connected to a network to discover each other and automatically - TRENDnet TEW-751DR | User's Guide - Page 32
video/audio conferencing calling. • SIP: Allows SIP protocol through your router typically used in VoIP applications TEW-751DR Allow/deny multicast streaming Access > Advanced Network In some cases, applications require multicast communication (also called IP multicast which is the delivery - TRENDnet TEW-751DR | User's Guide - Page 33
(e.g. www.trendnet.dyndns.biz) • User Name or Key: The user name needed to log in to your Dynamic DNS service account • Password or Key: This is the password to gain access to Dynamic DNS service for which you have signed up to. (NOT your router or wireless network password) TEW-751DR • Timeout - TRENDnet TEW-751DR | User's Guide - Page 34
saving is activated. TEW-751DR to select the appropriate zone and you can optionally change your NTP Sync period. Note: NTP servers are used for computers and other network devices to synchronize time across an entire network. • Manually set time - Set your router date and time manually in the Date - TRENDnet TEW-751DR | User's Guide - Page 35
and 5GHz) • Wireless Guest Zone • MAC Filters • Virtual Server • Firewall Rules • Application Rules • Parental Control (Website Filtering) 1. Log into your router management page (see "Access your router management page" on page 25). 2. Click on Tools and click on Schedules. TEW-751DR 3. Review the - TRENDnet TEW-751DR | User's Guide - Page 36
to "Port Forwarding" section on page 37. Since most ISPs constantly change your home IP address, to be able to access the Virtual Server port(s) from the Internet it is recommended to setup Dynamic DNS service (outlined in Identify Your Network section page 33). 1. Log into your router management - TRENDnet TEW-751DR | User's Guide - Page 37
Enter the IP address of the device to forward the port (e.g. 192.168.10.101). Note: You can also click the TEW-751DR Example: To forward TCP port 80 to your IP camera 1. Setup DynDNS service (see Identify Your Network section page 33). 2. Access TRENDnet IP Camera management page and forward Port - TRENDnet TEW-751DR | User's Guide - Page 38
recommended to setup Dynamic DNS service (see "Identify your network over the Internet" section on page 33). 1. Log into your router management page (see "Access your router management page" on page 25). 2. Click on Access, and click on Port Forwarding. 3. Review the port forwarding settings. Click - TRENDnet TEW-751DR | User's Guide - Page 39
by your router, the router will forward a single port or multiple ports (or incoming port/port range) to the device on your network. This feature is not typically used as most devices and routers currently use UPnP (Universal Plug and Play) to automatically configure your router to allow access for - TRENDnet TEW-751DR | User's Guide - Page 40
TRENDnet User's Guide Inbound Filter Access router management page (see "Access your router management page" on page 25). 2. Click on Access, and click on Inbound Filter. 3. Review 20-192.168.1.20 or 192.168.1.20-192.168.1.30). TEW-751DR Click Add to save the inbound filter. Note: Clicking Cancel - TRENDnet TEW-751DR | User's Guide - Page 41
TRENDnet User's Guide Allow remote access to your router management page Main > Password You may want to make changes to your router from a remote location such at your office or another location while away from your home. 1. Log into your router management page (see "Access your router management - TRENDnet TEW-751DR | User's Guide - Page 42
networking knowledge. 1. Log into your router management page (see "Access your router management page" on page 25). 2. Click on Routing, and click on Static. 3. Review the route. TEW-751DR You can also view the routing table under Routing > Routing Table. © Copyright 2013 TRENDnet. All Rights - TRENDnet TEW-751DR | User's Guide - Page 43
User Name Administrator Password Router Default URL Router IP Address Router Subnet Mask DHCP Server IP Range Wireless 2.4GHz & 5GHz Wireless 2.4GHz Network Name/Encryption Wireless 2.4GHz & 5GHz Guest Network admin Please refer to sticker or device label http://tew-751dr 192.168.10.1 255.255.255 - TRENDnet TEW-751DR | User's Guide - Page 44
TRENDnet User's Guide Backup and restore your router configuration settings Tools > Restart You may have added many customized settings to your router and in the case that you need to reset your router to default, all your customized settings would be lost and would require you to manually - TRENDnet TEW-751DR | User's Guide - Page 45
. • Do not upgrade the firmware using a wireless connection, only using a wired network connection. • Any interruptions during the firmware upgrade process may permanently damage your router. TEW-751DR 1. Log into your router management page (see "Access your router management page" on page 25 - TRENDnet TEW-751DR | User's Guide - Page 46
on Access, and click on Advanced Network. 3. Next to Enable WAN Ping Response, check the option to allow your router to respond to ping requests from the Internet. 4. To save changes, click Save Settings. Note: If you would like to discard the changes, click Don't Save Settings. TEW-751DR Wireless - TRENDnet TEW-751DR | User's Guide - Page 47
TRENDnet User's Guide Check the router system information Status > Device Information You may want to check the system information of your router such as WAN (Internet) connectivity, wireless and wired network settings, router MAC address, and firmware version. 1. Log into your router management - TRENDnet TEW-751DR | User's Guide - Page 48
Displays the current 2.4GHz wireless channel your router is operating. • Network Name (SSID): Displays the current 2.4GHz wireless network name assigned to your router. • Wi-Fi Protected Setup: Displays the current 2.4GHz WPS status. • Security: Displays the wireless security type applied to 2.4GHz - TRENDnet TEW-751DR | User's Guide - Page 49
device. • Name: Displays the host name of the LAN client device. TEW-751DR IPv6 Status Status > IPv6 You can view the current IPv6 status on your router. 1. Log into your router management page (see "Access your router management page" on page 25). 2. Click on Administrator, and click on IPv6 - TRENDnet TEW-751DR | User's Guide - Page 50
TRENDnet User's Guide View your router log Status > Log Your router log can be used to obtain activity information on the functionality of your router or for troubleshooting purposes. 1. Log into your router management page (see "Access your router management page" on page 25). 2. Click on Status, - TRENDnet TEW-751DR | User's Guide - Page 51
your email. • SMTP Server Address - Enter the IP address (e.g. 10.10.10.10) or domain name (e.g. mail.trendnet.com) of your e-mail server. • SMTP Server Port - Enter the port used by your e-mail service. (e.g. Default SMTP Server Port: 25) • Enable Authentication - Check this option if your e-mail - TRENDnet TEW-751DR | User's Guide - Page 52
TRENDnet User's Guide 4. To save changes, click Save Settings. Note: If you would like to discard the changes, click Don't Save Settings. TEW-751DR Send router logs to an external log server Tools > Syslog 1. Log into your router management page (see "Access your router management page" on page 25 - TRENDnet TEW-751DR | User's Guide - Page 53
• Port Forwarding • Application Rules • Internet Bandwidth Control • Guest Zone • Advanced Network o UPnP • Parental Control (Domain/URL Filters) © Copyright 2013 TRENDnet. All Rights Reserved. TEW-751DR Tools • Restart o Backup Configuration o Restore Configuration o Restore to Factory Defaults - TRENDnet TEW-751DR | User's Guide - Page 54
GHz Wireless, WPS Power Adapter Input: 100 ~ 240 V, 50~60 Hz, 0.4 A Output: 12 V DC, 1 A external power adapter Power Consumption 10.1 watts (max.) Dimension (L x W x H) 45 x 118 x 164 mm (1.8 x 4.6 x 6.5 in.) Weight 244 g (8.6 oz) © Copyright 2013 TRENDnet. All Rights Reserved. TEW-751DR - TRENDnet TEW-751DR | User's Guide - Page 55
TRENDnet User's Guide Troubleshooting Q: I typed http://tew-751dr in my Internet Browser Address Bar, but an error message says "The page cannot be displayed." How can I access the router management page? Answer: Access the router using the default IP address 192.168.10.1. http://192.168.10.1 Q: I - TRENDnet TEW-751DR | User's Guide - Page 56
en1 is typically the wireless Airport interface. Graphical Method MAC OS 10.6/10.5 1. From the Apple menu, select System Preferences. 2. In System Preferences, from the View menu, select Network. 3. In the Network preference window, click a network port (e.g., Ethernet, AirPort, modem). If you are - TRENDnet TEW-751DR | User's Guide - Page 57
In MAC OS 10.5/10.6, 1. Apple Menu > System Preferences > Network 2. Select Ethernet from the list on the left. 3. Click the Advanced button. 3. On the Ethernet tab, the Ethernet ID is your MAC Address. TEW-751DR How to connect to a wireless network using the built-in Windows utility? Note: Please - TRENDnet TEW-751DR | User's Guide - Page 58
TRENDnet User's Guide accordance with the instructions, may cause Copyright 2013 TRENDnet. All Rights Reserved. TEW-751DR Europe - wireless V1.7.1 : (2006-10) Class B Electromagnetic compatibility ISM band and for supplying public access to telecommunications and/or network services. This device - TRENDnet TEW-751DR | User's Guide - Page 59
TRENDnet User's Guide Česky [Czech] TRENDnet tímto prohlašuje, že tento TEW-751DR je ve shodě se základními požadavky a dalšími příslušnými ustanoveními směrnice 1999/5/ES, 2006/95/ES, a 2009/125/ES. Dansk [Danish] Undertegnede TRENDnet erklærer herved, at følgende udstyr TEW751DR overholder de - TRENDnet TEW-751DR | User's Guide - Page 60
TRENDnet User's Guide Limited Warranty TRENDnet warrants its products against defects in material and workmanship, under normal use and service, for the following lengths of time from the date of purchase. TEW-751DR - 3 Years Warranty AC/DC Power Adapter, Cooling Fan, and Power Supply carry 1 year - TRENDnet TEW-751DR | User's Guide - Page 61
-
 1
1 -
 2
2 -
 3
3 -
 4
4 -
 5
5 -
 6
6 -
 7
7 -
8
-
9
-
10
-
11
-
12
-
13
-
14
-
15
-
16
-
17
-
18
-
19
-
20
-
21
-
22
-
23
-
24
-
25
-
26
-
27
-
28
-
29
-
30
-
31
-
32
-
33
-
34
-
35
-
36
-
37
-
38
-
39
-
40
-
41
-
42
-
43
-
44
-
45
-
46
-
47
-
48
-
49
-
50
-
51
-
52
-
53
-
54
-
55
-
56
-
57
-
58
-
59
-
60
-
61
 |
 |

TRENDnet User’s Guide
Cover Page