TRENDnet TEW-751DR User's Guide - Page 18
Basic wireless settings, Enable Auto Channel Scan
 |
View all TRENDnet TEW-751DR manuals
Add to My Manuals
Save this manual to your list of manuals |
Page 18 highlights
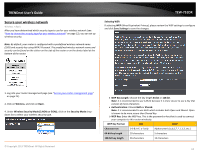
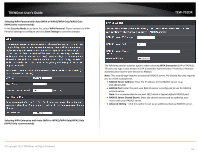
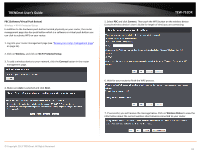
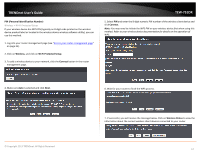
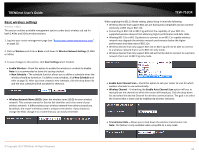
TRENDnet User's Guide Basic wireless settings Wireless > Basic This section outlines available management options under basic wireless sub tab for both 2.4GHz and 5GHz wireless sections. 1. Log into your router management page (see "Access your router management page" on page 25). 2. Click on Wireless and click on Basic scroll down to Wireless Network Settings (2.4GHz or 5GHz) 3. To save changes to this section, click Save Settings when finished. • Enable Wireless - Check the option to enable the wireless or uncheck to disable. Note: It is recommended to leave this setting checked. o New Schedule - The schedule function allows you to define a schedule when the wireless should be turned on. To define a new schedule, click New Schedule and refer to page 35. After you have created a new schedule, click the drop-down list and the new schedule will be available for selection. • Wireless Network Name (SSID): Enter the wireless name (SSID) for your wireless network. This acronym stands for Service Set Identifier and is the name of your wireless network. It differentiates your wireless network from others around you. By default, the router's wireless name is unique to the device. If you choose to change the SSID, change it to a name that you can easily remember. TEW-751DR When applying the 802.11 Mode setting, please keep in mind the following: • Wireless devices that support 802.11n are backwards compatible and can connect wirelessly at 802.11g or 802.11b. • Connecting at 802.11b or 802.11g will limit the capability of your 802.11n supported wireless devices from obtaining higher performance and data rates. • Allowing 802.11b or 802.11g devices to connect to an 802.11n capable wireless network may degrade the wireless network performance below the higher performance and data rates of 802.11n. • Wireless devices that only support 802.11b or 802.11g will not be able to connect to a wireless network that is set to 802.11n only mode. • Wireless devices that only support 802.11b will not be able to connect to a wireless network that is set to 802.11g only mode. • Enable Auto Channel Scan - Check this option to set your router to scan for which wireless channels to use automatically. • Wireless Channel - Unchecking the Enable Auto Channel Scan option will you to manually set the channel on which the router will broadcast. Click the drop-down list and select the desired Channel for wireless communication. The goal is to select the Channel that is least used by neighboring wireless networks. • Transmission Rate - Allows you to lock down the wireless transmission rate. Note: This feature is only available when using 802.11 n only mode. © Copyright 2013 TRENDnet. All Rights Reserved. 18
-
 1
1 -
2
-
3
-
4
-
5
-
6
-
7
-
8
-
9
-
10
-
11
-
12
-
 13
13 -
 14
14 -
 15
15 -
 16
16 -
 17
17 -
 18
18 -
 19
19 -
 20
20 -
 21
21 -
 22
22 -
 23
23 -
24
-
25
-
26
-
27
-
28
-
29
-
30
-
31
-
32
-
33
-
34
-
35
-
36
-
37
-
38
-
39
-
40
-
41
-
42
-
43
-
44
-
45
-
46
-
47
-
48
-
49
-
50
-
51
-
52
-
53
-
54
-
55
-
56
-
57
-
58
-
59
-
60
-
61
 |
 |
