TRENDnet TEW-751DR User's Guide - Page 29
Change your device URL, Enable DNS relay on your router, Change your local domain name
 |
View all TRENDnet TEW-751DR manuals
Add to My Manuals
Save this manual to your list of manuals |
Page 29 highlights
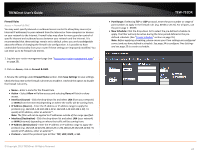
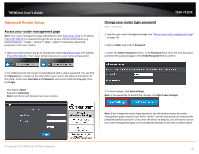
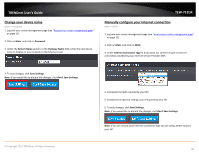
TRENDnet User's Guide Change your device URL Main > LAN 1. Log into your router management page (see "Access your router management page" on page 25). 2. Click on Main, and click on LAN. 3. Next to Host Name, enter the new name used to access your router management page. (e.g. "myrouter" will use http://myrouter to access the router management page.) Note: Even if the LAN IP address of the router is changed, the device URL will still allow to use the name as reference to log into the router management page. 4. To save changes, click Save Settings. Enable DNS relay on your router Network > LAN Setting DNS (Domain Name System) is protocol used for resolving IP addresses to domain names such as www.trendnet.com. In order for computers to be able to access domain names, your computer requires a DNS server or directory IP addresses to domain names. Your router can be used as a DNS relay server to an actual DNS server available on the Internet. This can improve the speed in which your computer is able to resolve these domain names by acting as a relay instead of your computer having to communicate directly with an Internet DNS server. Your router uses the WAN DNS servers issues or assigned by your ISP as the outside DNS server. It is recommended to leave this setting enabled. 1. Log into your router management page (see "Access your router management page" on page 25). 2. Click on Main, and click on LAN. 3. Next to Enable DNS Relay, check the option to enable or uncheck to disable. 4. To save changes, click Save Settings. © Copyright 2013 TRENDnet. All Rights Reserved. TEW-751DR Change your local domain name Main > LAN DNS (Domain Name System) is protocol used for resolving IP addresses to domain names such as www.trendnet.com. In order for computers to be able to access domain names, your computer requires a DNS server or directory IP addresses to domain names. Your router can be to provide your LAN computers with local domain information such as trendnet.com. This is an optional setting and is not required to be configured for basic operation. 1. Log into your router management page (see "Access your router management page" on page 25). 2. Click on Main, and click on LAN. 3. Next to Local Domain Name (Optional), enter the domain name you would like to assign to your local LAN computers. 4. To save changes, click Save Settings. Set up the DHCP server on your router Main > LAN Your router can be used as a DHCP (Dynamic Host Configuration Protocol) server to automatically assign an IP address to each computer or device on your network. The DHCP server is enabled by default on your router. If you already have a DHCP server on your network, or if you do not want to use your router as a DHCP server, you can disable this setting. It is recommended to leave this setting enabled. 1. Log into your router management page (see "Access your router management page" on page 25). 2. Click on Main, and click on LAN. 29
-
 1
1 -
2
-
3
-
4
-
5
-
6
-
7
-
8
-
9
-
10
-
11
-
12
-
13
-
14
-
15
-
16
-
17
-
18
-
19
-
20
-
21
-
22
-
23
-
 24
24 -
 25
25 -
 26
26 -
 27
27 -
 28
28 -
 29
29 -
 30
30 -
 31
31 -
 32
32 -
 33
33 -
 34
34 -
35
-
36
-
37
-
38
-
39
-
40
-
41
-
42
-
43
-
44
-
45
-
46
-
47
-
48
-
49
-
50
-
51
-
52
-
53
-
54
-
55
-
56
-
57
-
58
-
59
-
60
-
61
 |
 |
