TRENDnet TEW-751DR User's Guide - Page 51
Save your router log, Save Log File to Local Hard Drive
 |
View all TRENDnet TEW-751DR manuals
Add to My Manuals
Save this manual to your list of manuals |
Page 51 highlights
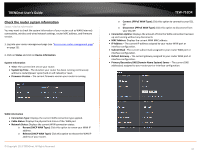
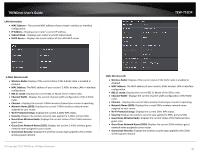
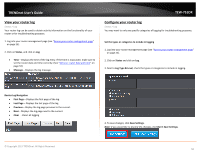
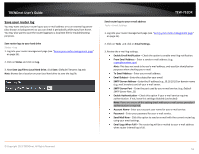
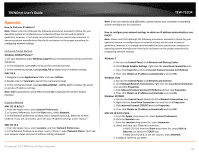
TRENDnet User's Guide Save your router log You may want send your router log to your e-mail address or to an external log server (also known as Syslog server) so you can check it periodically while away from home. You may also want to save the router logging to a local text file for troubleshooting purposes. Save router logs to your hard drive Status > Log 1. Log into your router management page (see "Access your router management page" on page 25). 2. Click on Status and click on Log. 3. Next Save Log File to Local Hard Drive, click Save. (Default Filename: log.txt) Note: Browse for a location on your local hard drive to save the log file. TEW-751DR Send router logs to your e-mail address Tools > Email Settings 1. Log into your router management page (see "Access your router management page" on page 25). 2. Click on Tools and click on Email Settings. 3. Review the e-mail log settings. • Enable Email Notification - Check the option to enable email log notification. • From Email Address - Enter a sender e-mail address. (e.g. [email protected]) Note: This does not need to be real e-mail address, only used for identification purposes when checking your e-mail. • To Email Address - Enter your e-mail address. • Email Subject - Enter the subject for your email. • SMTP Server Address - Enter the IP address (e.g. 10.10.10.10) or domain name (e.g. mail.trendnet.com) of your e-mail server. • SMTP Server Port - Enter the port used by your e-mail service. (e.g. Default SMTP Server Port: 25) • Enable Authentication - Check this option if your e-mail service requires authentication. If not, leave this settings disabled (unchecked) Note: If you are unsure of this setting check with your e-mail service provider if authentication is required. • Account Name- Enter your account user name for your e-mail service. • Password - Enter your password for your e-mail service. • Send Mail Now - Click this option to send an e-mail with the current router log using your email settings. • Email Logs When Fulll - The router log will be e-mailed to your e-mail address when router internal log is full. © Copyright 2013 TRENDnet. All Rights Reserved. 51
-
 1
1 -
2
-
3
-
4
-
5
-
6
-
7
-
8
-
9
-
10
-
11
-
12
-
13
-
14
-
15
-
16
-
17
-
18
-
19
-
20
-
21
-
22
-
23
-
24
-
25
-
26
-
27
-
28
-
29
-
30
-
31
-
32
-
33
-
34
-
35
-
36
-
37
-
38
-
39
-
40
-
41
-
42
-
43
-
44
-
45
-
 46
46 -
 47
47 -
 48
48 -
 49
49 -
 50
50 -
 51
51 -
 52
52 -
 53
53 -
 54
54 -
 55
55 -
 56
56 -
57
-
58
-
59
-
60
-
61
 |
 |
