TRENDnet TEW-751DR User's Guide - Page 24
Firewall Rules, TCP, UDP, ICMP
 |
View all TRENDnet TEW-751DR manuals
Add to My Manuals
Save this manual to your list of manuals |
Page 24 highlights
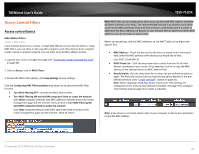
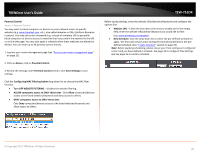
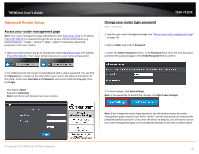
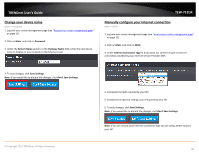
TRENDnet User's Guide Firewall Rules Access > Firewall & DMZ You may want specify inbound or outbound access control to allow/deny sources (or Internet IP addresses) to your network from the Internet or from computers or devices on your network to the Internet. Firewall rules may allow for more granular control of specific inbound and outbound access between your network and the Internet. It is recommended that these settings remain set to default unless you are knowledgeable about the effects of changing the firewall rule configuration. It is possible to have undesirable functionality from your router if these settings are improperly modified. You can enter up to 32 firewall rule entries. 1. Log into your router management page (see "Access your router management page" on page 25). 2. Click on Access, click on Firewall & DMZ. 3. Review the settings under Firewall Rules section. Click Save Settings to save settings. Check the box next to the firewall rule entry to enable it. Uncheck the option to disable the firewall rule entry. • Name - Enter a name for the firewall rule. • Action - Select Allow will allow access and selecting Deny will block or deny access. • Interface (Source) - Click the drop-down list and select LAN (from your network) or WAN (from the Internet) depending on where the traffic will be coming from. • IP Address (Source) - Enter the IP address or IP address range to apply the protocol (e.g. 192.168.1.20-192.168.1.20 or 192.168.1.20-192.168.1.30). To specify all IP address, enter an asterisk * . Note: The filter will not be applied to IP addresses outside of the range specified. • Interface (Destination) - Click the drop-down list and select LAN (your network) or WAN (Internet) depending on where the traffic will be coming from. • IP Address (Destination) - Enter the IP address or IP address range to apply the protocol (e.g. 192.168.10.20-192.168.10.20 or 192.168.10.20-192.168.10.30). To specify all IP address, enter an asterisk * . • Protocol - Select the protocol type to filter. TCP, UDP, ICMP, or All. © Copyright 2013 TRENDnet. All Rights Reserved. TEW-751DR • Port Range: If selecting TCP or UDP protocol, enter the port number or range of port numbers to apply in the firewall rule. (e.g. 80-80 or 20-21). For all ports, use the port range 1 - 65535. • New Schedule: Click the drop-down list to select the pre-defined schedule to apply. The filter will only be active during the time period defined in the predefined schedule. (See "Create Schedule" section on page 35). Note: Before applying scheduling, please ensure your Time settings are configured correct and you have defined a schedule. See page 34 to configure Time Settings and see page 35 to create a schedule. 24
-
 1
1 -
2
-
3
-
4
-
5
-
6
-
7
-
8
-
9
-
10
-
11
-
12
-
13
-
14
-
15
-
16
-
17
-
18
-
 19
19 -
 20
20 -
 21
21 -
 22
22 -
 23
23 -
 24
24 -
 25
25 -
 26
26 -
 27
27 -
 28
28 -
 29
29 -
30
-
31
-
32
-
33
-
34
-
35
-
36
-
37
-
38
-
39
-
40
-
41
-
42
-
43
-
44
-
45
-
46
-
47
-
48
-
49
-
50
-
51
-
52
-
53
-
54
-
55
-
56
-
57
-
58
-
59
-
60
-
61
 |
 |
