Toshiba Excite AT10-A PDA0FC-005002 Users Manual Canada; English - Page 85
Connecting your tablet to the Keyboard Cover, All Apps ->
 |
View all Toshiba Excite AT10-A PDA0FC-005002 manuals
Add to My Manuals
Save this manual to your list of manuals |
Page 85 highlights
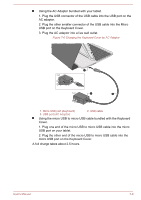
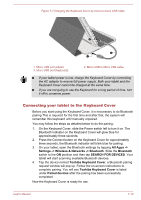
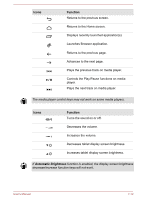
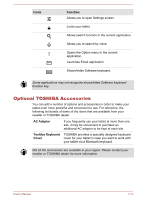
Figure 7-7 Charging the Keyboard Cover by micro to micro USB cable 1 2 3 1. Micro USB port (tablet) 3. Micro USB port (keyboard) 2. Micro USB to Micro USB cable If your tablet power is low, charge the Keyboard Cover by connecting the AC adaptor to ensure full power supply. Both your tablet and the Keyboard Cover cannot be charged at the same time. If you are not going to use the Keyboard for a long period of time, turn it off to conserve power. Connecting your tablet to the Keyboard Cover Before you start using the Keyboard Cover, it is neccessary to do Bluetooth pairing.This is required for the first time and after that, the system will remember this keyboard until manually unpaired. You may follow the steps as detailed below to do the pairing: 1. On the Keyboard Cover, slide the Power switch left to turn it on. The Bluetooth indicator on the Keyboard Cover will glow blue for approximately three seconds. 2. Press the Connect button on the Keyboard Cover for approximately three seconds, the Bluetooth indicator will blink blue for pairing. 3. On your tablet, open the Bluetooth settings by tapping All Apps -> Settings -> Wireless & Networks -> Bluetooth. Slide the Bluetooth switch to the ON position and then tap SEARCH FOR DEVICES. Your tablet will start scanning available Bluetooth devices. 4. Tap the device named Toshiba Keyboard Cover, a Bluetooth pairing request window will pop up. Follow the on-screen instructions to complete pairing. You will see Toshiba Keyboard Cover is listed under Paired devices after the pairing has been successfully completed. Now the Keyboard Cover is ready for use. User's Manual 7-10
-
 1
1 -
2
-
3
-
4
-
5
-
6
-
7
-
8
-
9
-
10
-
11
-
12
-
13
-
14
-
15
-
16
-
17
-
18
-
19
-
20
-
21
-
22
-
23
-
24
-
25
-
26
-
27
-
28
-
29
-
30
-
31
-
32
-
33
-
34
-
35
-
36
-
37
-
38
-
39
-
40
-
41
-
42
-
43
-
44
-
45
-
46
-
47
-
48
-
49
-
50
-
51
-
52
-
53
-
54
-
55
-
56
-
57
-
58
-
59
-
60
-
61
-
62
-
63
-
64
-
65
-
66
-
67
-
68
-
69
-
70
-
71
-
72
-
73
-
74
-
75
-
76
-
77
-
78
-
79
-
 80
80 -
 81
81 -
 82
82 -
 83
83 -
 84
84 -
 85
85 -
 86
86 -
 87
87 -
 88
88 -
 89
89 -
 90
90 -
91
-
92
-
93
-
94
-
95
-
96
-
97
-
98
-
99
-
100
 |
 |
