Toshiba SD-V395 Service Manual - Page 14
MP3/WMA/JPEG playback continued, Zooming/Locating desired scene, Marking desired scenes
 |
View all Toshiba SD-V395 manuals
Add to My Manuals
Save this manual to your list of manuals |
Page 14 highlights
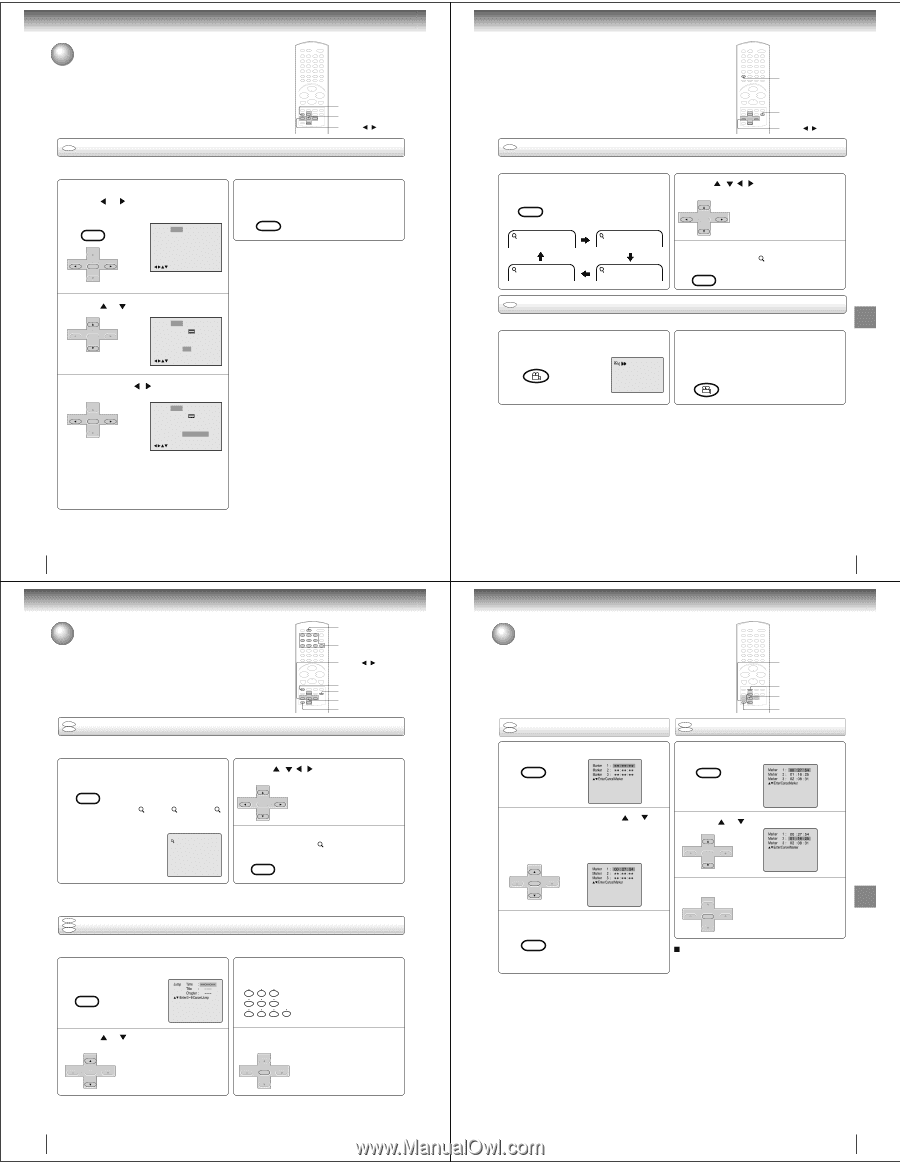
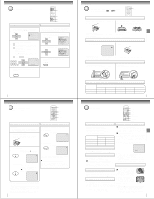
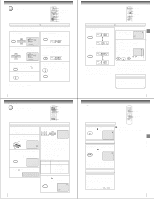
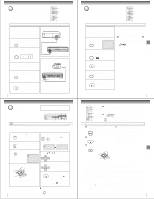
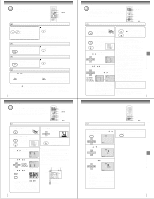
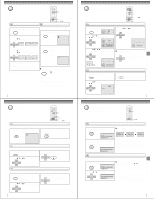
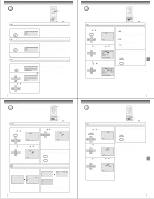
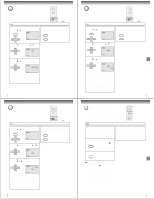
Advanced playback (DVD) MP3/WMA/JPEG playback (continued) SETUP ENTER v/w/ / CD Setting the Select Files When playing back a CD containing a mixture of MP3, WMA and JPEG files, only MP3/WMA or JPEG files can be displayed on the file menu. 1 Press SETUP in the stop mode. Press or to select "Picture", then press ENTER. VCR MENU SETUP Language Picture Sound Parental Other 4 To make SETUP screen disappear, press SETUP. VCR MENU SETUP CH - SET + ENTER SET - CH + /Enter/Setup/Return 2 Press SET + CH - ENTER SET - or CH + to select "Select Files". Language Picture Sound Parental Other Tv Screen 4:3 Display On JPEG Interval Off Select Files All /Enter/Setup/Return 3 Press ENTER or / to select your desired file type. CH - SET + ENTER SET - CH + Language Picture Sound Parental Other Tv Screen 4:3 Display On JPEG Interval Off Select Files Pictures Only /Enter/Setup/Return All: Displays all files. Music Only: Displays only MP3/WMA files. Pictures Only: Displays only JPEG files. 48 Advanced playback (DVD) Zooming/Locating desired scene DISPLAY 0-9 v/w/ / JUMP ZOOM ENTER CANCEL DVD VCD Zooming This unit will allow you to zoom in on the frame image. You can then make selections by switching the position of the frame. 1 Press ZOOM during playback. CM SKIP ZOOM The centre part of the image will be zoomed in. Each press of ZOOM will change the ZOOM 1 (x 1.3), 2 (x 1.5) and 3 (x 2.0). 2 Press / frame. SET + CH - ENTER SET - CH + / / to view a different part of the You may move the frame from the centre position to UP, DOWN, LEFT or RIGHT direction. 1 3 In the zoom mode press ZOOM repeatedly to return to a 1:1 view ( Off). CM SKIP ZOOM Notes: • You can select the Pause, Slow or Search playback in the zoom mode. • Some discs may not respond to zoom feature. DVD VCD Locating desired scene CD Use the title, chapter and time recorded on the disc to locate the desired point to play back. To check the title, chapter and time, press DISPLAY. 1 Press JUMP during playback or stop mode. ZERO RETURN JUMP Jump Time Title Chapter /Enter/0 9/Cancel/Jump 3 Press Numbered buttons (0-9) to change the number. 123 456 • If you input a wrong number, press CANCEL. • Refer to the package supplied with 7 8 9 0 the disc to check the numbers. 2 Press or "Chapter". SET + CH - ENTER SET - CH + to select the "Time", "Title" or 4 CH - Press ENTER. Playback starts. SET + • When you change the title, playback starts from Chapter 1 ENTER CH + of the selected title. SET - • Some discs may not work in the above operation. Note: In case of the Video-CD playback with PBC, the JUMP does not work. 50 ANGLE ZOOM v/w/ / CD Zooming (JPEG CD) This unit will allow you to zoom in on the JPEG image. 1 Press ZOOM during playback. CM SKIP ZOOM Enlarged JPEG images are displayed. You can make the images even larger by repeatedly pressing ZOOM. 1 2 Off 3 2 Press / frame. SET + CH - ENTER SET - CH + / / to view a different part of the You may move the frame from the centre position to UP, DOWN, LEFT or RIGHT direction. 3 In the zoom mode press ZOOM repeatedly to return to a 1:1 view ( Off). CM SKIP ZOOM CD Changing angles (JPEG CD) You can display JPEG images rotating at 90 degree intervals. 1 Press ANGLE during playback. Images are rotated 90 degrees to the right. COUNTER RESET ANGLE 2 Press ANGLE repeatedly until the desired angle is selected. Pressing ANGLE four times returns the image to its original angle. COUNTER RESET ANGLE • Images are displayed at the same angle until the disc is removed. 49 Marking desired scenes The unit stores the points that you want to watch again up to 3 points. You can resume playback from each scene. v/w DVD VCD Marking the Scenes 1 Press MARKER during playback. MARKER Marker 1 Marker 2 Marker 3 /Enter/Cancel/Marker MARKER ENTER CANCEL DVD VCD Returning to the Scenes 1 Press MARKER during playback or stop mode. MARKER Marker 1 00 27 54 Marker 2 01 16 25 Marker 3 02 08 31 /Enter/CancelMarker 2 Select the blank Marker using or . Then press ENTER at the desired scene. • Repeat this procedure to set the other 2 scenes. CH - SET + ENTER SET - CH + Marker 1 00 27 54 Marker 2 Marker 3 /Enter/Cancel/Marker 3 Press MARKER to remove this display. MARKER 2 Press or SET + CH - ENTER SET - CH + to select the Marker 1-3. Marker 1 00 27 54 Marker 2 01 16 25 Marker 3 02 08 31 /Enter/Cancel/Marker 3 Press ENTER. SET + Playback starts from the marked CH - CH + scene. ENTER SET - To cancel the Marker Follow the above steps 1~2, then press CANCEL. Notes: • Some discs may not work with the marking operation. • The marking is canceled when you open the disc tray or turn the power off. • Some subtitles recorded around the marker may fail to appear. 51 Advanced playback (DVD) Basic playback (DVD) Advanced playback (DVD) Basic playback (DVD)
-
 1
1 -
2
-
3
-
4
-
5
-
6
-
7
-
8
-
 9
9 -
 10
10 -
 11
11 -
 12
12 -
 13
13 -
 14
14 -
 15
15 -
 16
16 -
 17
17 -
 18
18 -
 19
19 -
20
-
21
-
22
-
23
-
24
-
25
-
26
-
27
-
28
-
29
-
30
-
31
-
32
-
33
-
34
-
35
-
36
-
37
-
38
-
39
-
40
-
41
-
42
-
43
-
44
-
45
-
46
-
47
-
48
-
49
-
50
-
51
-
52
-
53
-
54
-
55
-
56
-
57
-
58
-
59
-
60
-
61
-
62
-
63
-
64
-
65
-
66
-
67
-
68
-
69
-
70
-
71
-
72
-
73
-
74
-
75
-
76
-
77
-
78
-
79
-
80
-
81
-
82
-
83
-
84
-
85
-
86
-
87
-
88
-
89
-
90
-
91
-
92
-
93
-
94
-
95
-
96
-
97
-
98
-
99
-
100
-
101
-
102
-
103
-
104
-
105
-
106
-
107
-
108
-
109
-
110
-
111
-
112
-
113
-
114
-
115
-
116
-
117
-
118
-
119
-
120
-
121
-
122
-
123
-
124
-
125
-
126
-
127
-
128
-
129
-
130
-
131
-
132
-
133
-
134
-
135
-
136
-
137
-
138
-
139
-
140
-
141
-
142
-
143
-
144
 |
 |