Toshiba SD-V395 Service Manual - Page 49
Service Mode List, Set Key, Operations, Standard Time, seconds, Method, Remocon Key
 |
View all Toshiba SD-V395 manuals
Add to My Manuals
Save this manual to your list of manuals |
Page 49 highlights
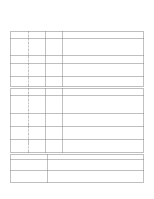
SERVICE MODE LIST This unit provided with the following SERVICE MODES so you can repair, examine and adjust easily. To enter to the SERVICE MODE function, press and hold both buttons simultaneously on the main unit or on the main unit and on the remote control for more than a standard time (second). Set Key Set Key Standard Time (seconds) Operations CH UP FF PLAY/REC total hours are displayed on the screen. Refer to the "PREVENTIVE CHECKS AND SERVICE INTERVALS" 2 (CONFIRMATION OF HOURS USED). Can be checked of the INITIAL DATA of MEMORY IC. Refer to the "WHEN REPLACING EEPROM (MEMORY) IC". CH UP STOP 2 Adjust the PG SHIFTER automatically. Refer to the "ELECTRICAL ADJUSTMENT" (PG SHIFTER). CH UP PLAY Initialization of the factory on VCR. NOTE: Do not use this for the normal servicing. 2 If you set a factory initialization, the memories are reset such as the clock setting, the channel setting, and PLAY/REC total hours. CH DOWN POWER VCR operation mode at no connection of DVD. 2 Refer to the "PREPARATION FOR SERVICING" NOTE: Although the DVD is connected, the DVD mode cannot be selected. Set Key REC REC STOP STOP Remocon Key Standard Time (seconds) Operations Initialization of the factory on DVD. NOTE: Do not use this for the normal servicing. 4 2 The function will only work without the setting of DVD disc at DVD mode. While pressing the Remocon Key for more than the Standard Time, press the Set Key simultaneously. DVD Write mode. 6 2 Refer to the "RE-WRITE FOR DVD FIRMWARE". NOTE: Do not use this for the normal servicing. The function will only work at the DVD stop mode. Check for the firmware version. 1 3 Refer to the "RE-WRITE FOR DVD FIRMWARE". NOTE: Do not use this for the normal servicing. The function will only work at the DVD stop mode. Releasing of PARENTAL LOCK. 7 3 Refer to the "PARENTAL CONTROL - RATING LEVEL". NOTE: The function will only work without the setting of DVD disc at DVD mode. Method Press the ATR button on the remote control for more than 2 seconds during PLAY. Make the short circuit between the test point of SERVICE and the GND. Operations Adjusting of the Tracking to the center position. Refer to the "MECHANICAL ADJUSTMENT" (GUIDE ROLLER) and "ELECTRICAL ADJUSTMENT" (PG SHIFTER). The BOT, EOT, and the Reel Sensor do not work and the VCR deck can be operated without a cassette tape. Refer to the "PREPARATION FOR SERVICING" C2-1
-
 1
1 -
2
-
3
-
4
-
5
-
6
-
7
-
8
-
9
-
10
-
11
-
12
-
13
-
14
-
15
-
16
-
17
-
18
-
19
-
20
-
21
-
22
-
23
-
24
-
25
-
26
-
27
-
28
-
29
-
30
-
31
-
32
-
33
-
34
-
35
-
36
-
37
-
38
-
39
-
40
-
41
-
42
-
43
-
 44
44 -
 45
45 -
 46
46 -
 47
47 -
 48
48 -
 49
49 -
 50
50 -
 51
51 -
 52
52 -
 53
53 -
 54
54 -
55
-
56
-
57
-
58
-
59
-
60
-
61
-
62
-
63
-
64
-
65
-
66
-
67
-
68
-
69
-
70
-
71
-
72
-
73
-
74
-
75
-
76
-
77
-
78
-
79
-
80
-
81
-
82
-
83
-
84
-
85
-
86
-
87
-
88
-
89
-
90
-
91
-
92
-
93
-
94
-
95
-
96
-
97
-
98
-
99
-
100
-
101
-
102
-
103
-
104
-
105
-
106
-
107
-
108
-
109
-
110
-
111
-
112
-
113
-
114
-
115
-
116
-
117
-
118
-
119
-
120
-
121
-
122
-
123
-
124
-
125
-
126
-
127
-
128
-
129
-
130
-
131
-
132
-
133
-
134
-
135
-
136
-
137
-
138
-
139
-
140
-
141
-
142
-
143
-
144
 |
 |