Toshiba SD-V395 Service Manual - Page 5
Identification of Controls continued, Antenna connections, Remote control
 |
View all Toshiba SD-V395 manuals
Add to My Manuals
Save this manual to your list of manuals |
Page 5 highlights
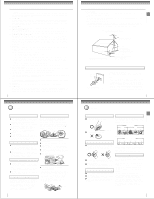
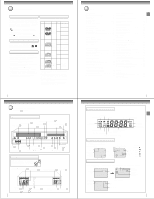
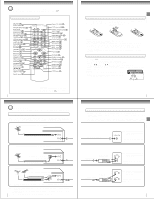
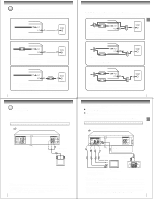
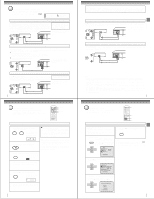
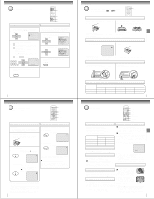
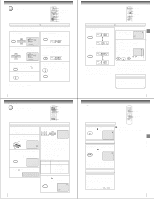
Introduction Identification of Controls (continued) The instructions in this manual describe the functions on the remote control. See the page in for details. Remote control 24 CALL button 58 DISPLAY button 22 VCR DVD selector button Direct channel 28 selection buttons 45 Number buttons 40 INPUT SELECT button 67 PROGRESSIVE button 22 TV/VCR button 32 COUNTER RESET button 54 ANGLE button 34 SP/SLP button 52 PLAY MODE button 34 REC button 36 OTR button 37 TIMER REC button 30 PLAY button 30 REW button 31 SLOW button 51 MARKER button 32 ZERO RETURN button 50 JUMP button 23 VCR MENU button 47 SETUP button 45 Direction buttons (///) 23 SET +/- buttons 34 Channel +/Ð buttons 37 CANCEL button VCR CALL DVD DISPLAY EJECT 123 OPEN/CLOSE 456 7 INPUT SELECT PROGRESSIVE 890 AUDIO SELECT ATR TV/VCR AUDIO SUBTITLE COUNTER RESET SP/SLP ANGLE PLAY MODE A-B RPT CLOCK/COUNTER REC/OTR TIMER REC ÐINSDKEIPX INDEX SKIP + PLAY REW FWD SLOW STOP PAUSE/STILL ZERO RETURN JUMP MARKER TOP MENU RETURN VCR MENU SETUP SET + MENU CM SKIP ZOOM CH Ð ENTER CH + CANCEL SET Ð Power ( 22 ) button 29 EJECT button (VCR) 42 OPEN/CLOSE button (DVD) 31 ATR button 56 SUBTITLE button 39 AUDIO SELECT button 55 AUDIO button 33 CLOCK/COUNTER button 33 INDEX + button 44 SKIP button 52 A-B RPT button 33 INDEX Ð button 44 SKIP button 30 FWD button 30 STOP button 31 PAUSE/STILL button 54 TOP MENU button 57 RETURN button 31 CM SKIP button 50 ZOOM button 54 *MENU button 23 ENTER button 12 * MENU button Use the MENU button to display the menu included on many DVD video discs. To operate a menu, follow the instructions in "DVD Menu." 54 Connections Antenna connections If you are using an antenna system, follow these instructions. If you are a cable (CATV) subscriber, skip ahead to page 16 for the proper connections. Antenna to DVD/VCR connection The DVD/VCR must be connected "between" the antenna and the TV. First, disconnect the antenna from the TV and connect it to the DVD/VCR. Then connect the DVD/VCR to the TV. Below are 3 common methods of connecting an antenna system to a DVD/VCR. Find the type of antenna system you are using and follow the connection diagram. 1 Combination VHF/UHF Antenna with 75 ohm Coaxial Cable DVD/VCR 75 ohm Coaxial Cable IN (ANT) OUT (TV) 2 Combination VHF/UHF Antenna with 300 ohm Twin Lead (Flat) Wire DVD/VCR Matching Transformer 300 ohm Input 75 ohm output (not supplied) 300 ohm Twin Lead (Flat) Wire IN (ANT) OUT (TV) 3 Separate VHF and UHF Antennas VHF UHF Combiner 75/300 ohm Inputs 75 ohm output (not supplied) 300 ohm Twin Lead (Flat) Wire DVD/VCR IN (ANT) OUT (TV) 75 ohm Coaxial Cable Note: If both VHF and UHF antennas have 300 ohm twin lead (flat) wires, use a combiner having two 300 ohm inputs and one 75 ohm output. Notes: • A clear picture will not be obtained by the DVD/VCR unless the antenna signal is good. Connect the antenna to the DVD/VCR properly. • For better quality recording, an indoor antenna or a telescopic antenna is not recommended. The use of an outdoor type antenna is required. 14 • If you are not sure about the connection, please refer to qualified service personnel. Inserting Batteries 1 Slide the battery compartment cover in the direction of the arrow. 2 Install two "AAA" batteries (supplied), paying attention to the polarity diagram in the battery compartment. 3 Replace the compartment cover. Battery precautions The precautions below should be followed when using batteries in this device: 1. Use only the size and type of batteries specified. 2. Be sure to follow the correct polarity when installing the batteries as indicated in the battery compartment. Re- versed batteries may cause damage to the device. To avoid a potential short circuit, insert the "-" end first. 3. Do not mix different types of batteries together (e.g. Alkaline and Carbon-zinc) or old batteries with fresh ones. 4. If the device is not to be used for a long period of time, remove the batteries to prevent damage or injury from possible battery leakage. 5. Do not try to recharge batteries not intended to be recharged; they can overheat and rupture. (Follow battery manufacturer's directions.) Remote control basics • Press POWER ( ) to turn the DVD VCR on or off. • Select your desired operating mode (DVD or VCR) using VCR DVD. (DVD or VCR indicator on the front panel will show you which mode is selected.) • Press CH + or CH - to move through the channels one channel at a time. • The CH +/- ( / ) and SET +/- ( / ) are also used to navigate on-screen menu system. • You can directly access specific channels using Number buttons. • Each press of VCR DVD on the remote control, switches the screen between the VCR screen (VCR mode) and the DVD screen (DVD mode). Operation • Aim the remote control at the remote sensor and press control buttons to operate. • Operate the remote control within 30° angle on either side of the remote sensor, up to a distance of Approx. 7 meters. Approx. 7 meters 13 DVD/VCR to TV connection After you have connected the antenna to the DVD/VCR, you must connect the DVD/VCR to the TV. Below are 3 common methods of connecting your DVD/VCR to a TV. Find the type of TV you are using and follow the connection diagram. This DVD/VCR has a single 75 ohm output for connection to a TV. If your TV has separate VHF and UHF antenna inputs (numbers 2 and 3 below), use a splitter to connect the DVD/VCR to the TV for VHF and UHF reception. 75 ohm Coaxial Cable (supplied) TV VHF/UHF IN Note: If a VHF or UHF antenna is used, set the TV/CATV menu option to the "TV" mode. TV with single 75 ohm VHF/UHF antenna input 75 ohm Coaxial Cable (supplied) Splitter 75 ohm Input 75/300 ohm outputs (not supplied) 75 ohm Coaxial Cable (supplied) Splitter 75 ohm Input 300 ohm outputs (not supplied) TV 70. 80. Note: If a VHF or UHF antenna is used, set the TV/CATV menu option to the "TV" mode. TV with 300 ohm UHF and 75 ohm VHF antenna inputs TV 70. 80. Note: If a VHF or UHF antenna is used, set the TV/CATV menu option to the "TV" mode. TV with 300 ohm UHF and 300 ohm VHF antenna inputs 15 Connections Introduction
-
 1
1 -
 2
2 -
 3
3 -
 4
4 -
 5
5 -
 6
6 -
 7
7 -
 8
8 -
 9
9 -
 10
10 -
 11
11 -
12
-
13
-
14
-
15
-
16
-
17
-
18
-
19
-
20
-
21
-
22
-
23
-
24
-
25
-
26
-
27
-
28
-
29
-
30
-
31
-
32
-
33
-
34
-
35
-
36
-
37
-
38
-
39
-
40
-
41
-
42
-
43
-
44
-
45
-
46
-
47
-
48
-
49
-
50
-
51
-
52
-
53
-
54
-
55
-
56
-
57
-
58
-
59
-
60
-
61
-
62
-
63
-
64
-
65
-
66
-
67
-
68
-
69
-
70
-
71
-
72
-
73
-
74
-
75
-
76
-
77
-
78
-
79
-
80
-
81
-
82
-
83
-
84
-
85
-
86
-
87
-
88
-
89
-
90
-
91
-
92
-
93
-
94
-
95
-
96
-
97
-
98
-
99
-
100
-
101
-
102
-
103
-
104
-
105
-
106
-
107
-
108
-
109
-
110
-
111
-
112
-
113
-
114
-
115
-
116
-
117
-
118
-
119
-
120
-
121
-
122
-
123
-
124
-
125
-
126
-
127
-
128
-
129
-
130
-
131
-
132
-
133
-
134
-
135
-
136
-
137
-
138
-
139
-
140
-
141
-
142
-
143
-
144
 |
 |
