Toshiba SD-V395 Service Manual - Page 7
Connecting to optional equipment, Setting the video channel, Setting the language
 |
View all Toshiba SD-V395 manuals
Add to My Manuals
Save this manual to your list of manuals |
Page 7 highlights
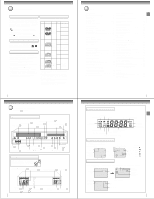
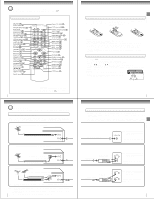
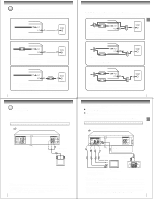
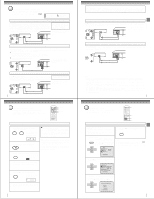
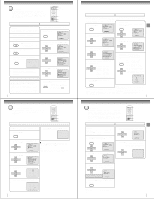
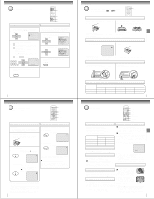
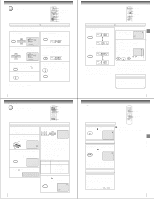
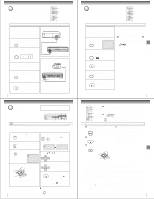
Connections Connecting to optional equipment You can enjoy high quality dynamic sounds of DVD video discs or audio CDs by connecting the DVD/VCR to optional audio equipment. For connection to your TV, see "Connecting to a TV" 18 19 . : Front speaker : Rear speaker : Sub woofer : Center speaker : Signal flow Connecting to an amplifier equipped with a Dolby Digital decoder Dolby Digital Dolby Digital is the surround sound technology used in theaters showing the latest movies, and is now available to reproduce this realistic effect in the home. You can enjoy motion picture and live concert DVD video discs with this dynamic realistic sound by connecting the DVD/VCR to a 6 channel amplifier equipped with a Dolby Digital decoder or Dolby Digital processor. If you have a Dolby Pro Logic Surround decoder, you will obtain the full benefit of Pro Logic from the same DVD movies that provide full 5.1-channel Dolby Digital soundtracks, as well as from titles with the Dolby Surround mark. Amplifier equipped with a Dolby Digital decoder Manufactured under license from Dolby Laboratories. "Dolby" "Pro Logic" and the double-D symbol are trademarks of Dolby Laboratories. Confidential unpublished works. ©1992-1997 Dolby Laboratories. All rights reserved. • Use DVD video discs encoded via the Dolby Digital recording system. To COAXIAL type digital audio input To OPTICAL type digital audio input Optical digital cable 75 Ω coaxial cable Connect either. Connecting to an amplifier equipped with Dolby Surround Pro Logic Dolby Surround Pro Logic You can enjoy the dynamic realistic sound of Dolby Surround Pro Logic by connecting an amplifier and speaker system (right and left front speakers, a center speaker, and one or two rear speakers). With an amplifier equipped with Dolby Digital Connect the equipment the same way as described in "Connecting to an amplifier equipped with a Dolby Digital decoder." Refer to that amplifier's owner's manual and set the amplifier so you can enjoy Dolby Surround Pro Logic sound. With an amplifier not equipped with Dolby Digital Connect the equipment as follows. * Amplifier equipped with Dolby Surround Pro Logic * Connect one or two rear speakers. The output sound from the rear speakers will be monaural even if you connect two rear speakers. To audio input Audio cable To ANALOG AUDIO OUT Connecting to an amplifier equipped with a DTS decoder Digital Theater Systems (DTS) DTS is a high quality surround technology used in theaters and now available for home use, on DVD video discs or audio CDs. If you have a DTS decoder or processor, you can obtain the full benefit of 5.1 channel DTS encoded sound tracks on DVD video discs or audio CDs. Amplifier equipped with a DTS decoder "DTS" and "DTS Digital Surround" are trademarks of Digital Theater Systems, Inc. • Use DVD video discs or audio CDs encoded via the DTS recording system. To COAXIAL type digital audio input To OPTICAL type digital audio input Optical digital cable 75 Ω coaxial cable Connect either. 20 Basic setup Setting the video channel When a TV is connected with the 75 ohm coaxial cable only. To view playback of a recorded tape or DVD disc, or to watch a program selected by the VCR's channel selector, the TV must be set to channel 3 or 4 (video channel). POWER 3 4 TV/VCR VCR DVD Setting the video channel 1 Press and hold 3 or 4 on the remote for 3 seconds in standby mode. 3 OR 4 The video channel will start to flash for 3 seconds in the display window. 2 Press POWER to turn on the DVD/VCR. For a push-button TV tuner If CH 3 or 4 corresponding to the video channel cannot be tuned on your TV, proceed as follows: set the VCR 3/4 channel selector and the TV to CH 3 or 4, play back a prerecorded tape and tune the TV to receive a sharp color picture from the video cassette recorder. Refer to your TV owner's manual for details. Notes: • If the unit does not operate properly, or No key operation (by the unit and/or the remote control): Static electricity, etc., may affect the player's operation. Disconnect the AC power cord once, then connect it again. • During the DVD playback if you change the operating mode from DVD to VCR, the DVD will continue to play back the disc and stop after about 5 minutes. 3 Press VCR DVD selector to select the VCR mode. VCR DVD The VCR indicator on the front panel will light. 4 Turn ON the TV and set to CH 3 or 4 to correspond with the channel selected in step 1. 5 Press TV/VCR to select the VCR position. TV/VCR The VCR indicator will appear in the display window. 6 Select any channel to receive a TV station in your area. The channel number will appear on the screen for about 4 seconds. 22 Warning When playing DTS-encoded discs (audio CDs), excessive noise may be output from the analog stereo jacks. To avoid possible damage to the audio system, you should take proper precautions when the ANALOG AUDIO OUT (L/R) jacks of the DVD/VCR are connected to an amplification system. To enjoy DTS Digital Surround™ playback, an external 5.1 channel DTS Digital Surround™ decoder system must be connected to the BITSTREAM/PCM AUDIO OUT jack of the DVD/VCR. Connecting to an amplifier equipped with an MPEG2 audio decoder MPEG2 sound You can enjoy motion picture and live concert DVD video discs with dynamic realistic sound by connecting an amplifier equipped with an MPEG2 audio decoder or MPEG2 audio processor. Amplifier equipped with an MPEG2 audio decoder • Use DVD video discs encoded via the MPEG2 recording system. To COAXIAL type digital audio input To OPTICAL type digital audio input Optical digital cable 75 Ω coaxial cable Connect either. Connecting to an amplifier equipped with a digital audio input 2 channel digital stereo You can enjoy the dynamic sound of 2 channel digital stereo by connecting an amplifier equipped with a digital audio input and speaker system (right and left front speakers). Amplifier equipped with a digital audio input To COAXIAL type digital audio input To OPTICAL type digital audio input Optical digital cable 75 Ω coaxial cable Connect either. Notes: • DO NOT connect the BITSTREAM/PCM AUDIO OUT jack of the DVD/VCR to the AC-3 RF input of a Dolby Digital Receiver. This input on your A/V Receiver is reserved for Laserdisc use only and is incompatible with the BITSTREAM/PCM AUDIO OUT jack of the DVD/VCR. • Connect the BITSTREAM/PCM AUDIO OUT jack of the DVD/VCR to the "OPTICAL" or "COAXIAL" input of a Receiver or Processor. • Refer to the owner's manual of the connected equipment as well. • When you connect the DVD/VCR to other equipment, be sure to turn off the power and unplug all of the equipment from the wall outlet before making any connections. • The output sound of the DVD/VCR has a wide dynamic range. Be sure to adjust the receiver's volume to a moderate listening level. Otherwise, the speakers may be damaged by a sudden high volume sound. • Turn off the amplifier before you connect or disconnect the DVD/VCR's power cord. If you leave the amplifier power on, the speakers may be damaged. 21 Setting the language You can choose from three different languages (English, French and Spanish) for the on-screen displays. VCR DVD 1,4 1-3 1-3 Setting the language Preparation: • Turn ON the TV and select to the corresponding video input. • Press VCR DVD selector to select the VCR mode. (The VCR indicator will light.) 4 Press VCR MENU until the MENU screen is cleared. VCR MENU SETUP 1 Press VCR MENU. The VCR menu screen will appear. Press SET + or - to select "SYSTEM VCR MENU SETUP", then press ENTER. SETUP If you use the unit for the first time and press VCR MENU, instead of the main menu screen the "SYSTEM SETUP" menu screen in step 2 may appear. CH - SET + ENTER SET - CH + MENU TIMER REC SET AUTO REPEAT ON OFF SAP ON OFF CH SETUP SYSTEM SETUP Notes: • Both the VCR and the DVD have their own player menus 57 . • If no buttons are pressed for more than 60 seconds, the VCR MENU screen will return to normal TV-operation automatically. á+/-/ENTER/MENU ñ 2 Press SET + or - to select "LANGUAGE", then press ENTER. CH - SET + ENTER SET - CH + SYSTEM SETUP CLOCK SET LANGUAGE/IDIOMA/LANGUE NO NOISE BACKGROUND ON OFF AUTO CLOCK ON OFF STANDARD TIME DAYLIGHT SAVING TIME á+/-/ENTER/MENU ñ 3 Press SET + or - to select the desired language: English (ENGLISH), Spanish (ESPAÑOL) or French (FRANCAIS), then press ENTER. CH - SET + ENTER SET - CH + á+/-/ENTER/MENU ñ 23 Basic setup Connections
-
 1
1 -
 2
2 -
 3
3 -
 4
4 -
 5
5 -
 6
6 -
 7
7 -
 8
8 -
 9
9 -
 10
10 -
 11
11 -
 12
12 -
13
-
14
-
15
-
16
-
17
-
18
-
19
-
20
-
21
-
22
-
23
-
24
-
25
-
26
-
27
-
28
-
29
-
30
-
31
-
32
-
33
-
34
-
35
-
36
-
37
-
38
-
39
-
40
-
41
-
42
-
43
-
44
-
45
-
46
-
47
-
48
-
49
-
50
-
51
-
52
-
53
-
54
-
55
-
56
-
57
-
58
-
59
-
60
-
61
-
62
-
63
-
64
-
65
-
66
-
67
-
68
-
69
-
70
-
71
-
72
-
73
-
74
-
75
-
76
-
77
-
78
-
79
-
80
-
81
-
82
-
83
-
84
-
85
-
86
-
87
-
88
-
89
-
90
-
91
-
92
-
93
-
94
-
95
-
96
-
97
-
98
-
99
-
100
-
101
-
102
-
103
-
104
-
105
-
106
-
107
-
108
-
109
-
110
-
111
-
112
-
113
-
114
-
115
-
116
-
117
-
118
-
119
-
120
-
121
-
122
-
123
-
124
-
125
-
126
-
127
-
128
-
129
-
130
-
131
-
132
-
133
-
134
-
135
-
136
-
137
-
138
-
139
-
140
-
141
-
142
-
143
-
144
 |
 |
