Toshiba Satellite L15-S1041 User Guide - Page 197
Internet settings, Devices, TCP/IP settings, Profile, Capture, Change Icon, Captured Items
 |
View all Toshiba Satellite L15-S1041 manuals
Add to My Manuals
Save this manual to your list of manuals |
Page 197 highlights
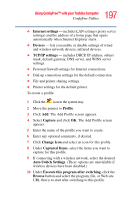
197 Using ConfigFree™ with your Toshiba Computer ConfigFree Utilities ❖ Internet settings - includes LAN settings (proxy server settings) and the address of a home page that opens automatically when Internet Explorer starts. ❖ Devices - lets you enable or disable settings of wired and wireless network devices, infrared devices. ❖ TCP/IP settings - includes DHCP, IP address, subnet mask, default gateway, DNS server, and WINS server settings. ❖ Personal firewall settings for Internet connections. ❖ Dial-up connection settings for the default connection. ❖ File and printer sharing settings. ❖ Printer settings for the default printer. To create a profile: 1 Click the icon in the system tray. 2 Move the pointer to Profile. 3 Click Add. The Add Profile screen appears. 4 Select Capture and click OK. The Add Profile screen appears. 5 Enter the name of the profile you want to create. 6 Enter any optional comments, if desired. 7 Click Change Icon and select an icon for this profile. 8 Under Captured Items, select the items you want to capture for this profile. 9 If connecting with a wireless network, select the desired Auto Switch Settings. (These options are unavailable if wireless devices have been disabled.) 10 Under Execute this program after switching, click the Browse button and select the program, file, or Web site URL that is to start after switching to this profile.
-
 1
1 -
2
-
3
-
4
-
5
-
6
-
7
-
8
-
9
-
10
-
11
-
12
-
13
-
14
-
15
-
16
-
17
-
18
-
19
-
20
-
21
-
22
-
23
-
24
-
25
-
26
-
27
-
28
-
29
-
30
-
31
-
32
-
33
-
34
-
35
-
36
-
37
-
38
-
39
-
40
-
41
-
42
-
43
-
44
-
45
-
46
-
47
-
48
-
49
-
50
-
51
-
52
-
53
-
54
-
55
-
56
-
57
-
58
-
59
-
60
-
61
-
62
-
63
-
64
-
65
-
66
-
67
-
68
-
69
-
70
-
71
-
72
-
73
-
74
-
75
-
76
-
77
-
78
-
79
-
80
-
81
-
82
-
83
-
84
-
85
-
86
-
87
-
88
-
89
-
90
-
91
-
92
-
93
-
94
-
95
-
96
-
97
-
98
-
99
-
100
-
101
-
102
-
103
-
104
-
105
-
106
-
107
-
108
-
109
-
110
-
111
-
112
-
113
-
114
-
115
-
116
-
117
-
118
-
119
-
120
-
121
-
122
-
123
-
124
-
125
-
126
-
127
-
128
-
129
-
130
-
131
-
132
-
133
-
134
-
135
-
136
-
137
-
138
-
139
-
140
-
141
-
142
-
143
-
144
-
145
-
146
-
147
-
148
-
149
-
150
-
151
-
152
-
153
-
154
-
155
-
156
-
157
-
158
-
159
-
160
-
161
-
162
-
163
-
164
-
165
-
166
-
167
-
168
-
169
-
170
-
171
-
172
-
173
-
174
-
175
-
176
-
177
-
178
-
179
-
180
-
181
-
182
-
183
-
184
-
185
-
186
-
187
-
188
-
189
-
190
-
191
-
 192
192 -
 193
193 -
 194
194 -
 195
195 -
 196
196 -
 197
197 -
 198
198 -
 199
199 -
 200
200 -
 201
201 -
 202
202 -
203
-
204
-
205
-
206
-
207
-
208
-
209
-
210
-
211
-
212
-
213
-
214
-
215
-
216
-
217
-
218
-
219
-
220
-
221
-
222
-
223
-
224
-
225
 |
 |
