Uniden SDS200 English Owner Manual - Page 49
Customizing The Display
 |
View all Uniden SDS200 manuals
Add to My Manuals
Save this manual to your list of manuals |
Page 49 highlights
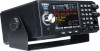
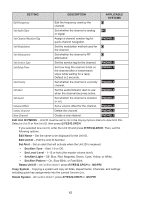
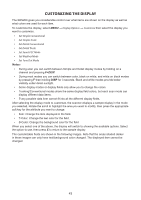
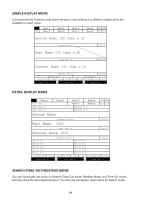
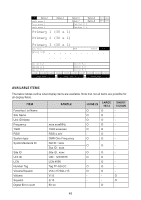
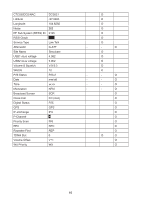
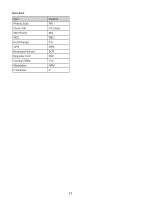
CUSTOMIZING THE DISPLAY The SDS200 gives you considerable control over what items are shown on the display as well as what colors are used for each item. To customize the display, select MENU → Display Options → Customize then select the display you want to customize: • Set Simple Conventional • Set Simple Trunk • Set Detail Conventional • Set Detail Trunk • Set Search/CC Mode • Set Weather Mode • Set Tone Out Mode Notes: • During scan you can switch between Simple and Detail display modes by holding on a channel and pressing F+DISP. • During most modes you can switch between color, black on white, and white on black modes by pressing F then holding DISP for 3 seconds. Black and white modes provide better visibility under direct sunlight. • Some display modes or display fields only allow you to change the colors. • Trunking/Conventional modes share the same display field colors, but each scan mode can display different data items. • Every possible data item cannot fit into all the different display fields. After selecting the display mode to customize, the scanner displays a sample display in the mode you selected. Rotate the scroll to highlight the area you want to modify, then press the appropriate soft key for the attribute you want to change: • Item: Change the item displayed in the field. • T-Color: Change the text color for the field. • B-Color: Change the background color for the field When you select one of the above, the display will switch to showing the available options. Select the option to use, then press E to return to the sample display. The customizable fields are shown in the following images. Note that the areas shaded darker in these images can only have text/background color changed. The displayed item cannot be changed. 43
-
 1
1 -
2
-
3
-
4
-
5
-
6
-
7
-
8
-
9
-
10
-
11
-
12
-
13
-
14
-
15
-
16
-
17
-
18
-
19
-
20
-
21
-
22
-
23
-
24
-
25
-
26
-
27
-
28
-
29
-
30
-
31
-
32
-
33
-
34
-
35
-
36
-
37
-
38
-
39
-
40
-
41
-
42
-
43
-
 44
44 -
 45
45 -
 46
46 -
 47
47 -
 48
48 -
 49
49 -
 50
50 -
 51
51 -
 52
52 -
 53
53 -
 54
54 -
55
-
56
-
57
-
58
-
59
-
60
-
61
-
62
-
63
-
64
-
65
-
66
-
67
-
68
 |
 |