Uniden SDS200 English Owner Manual - Page 54
Using Discovery Mode
 |
View all Uniden SDS200 manuals
Add to My Manuals
Save this manual to your list of manuals |
Page 54 highlights
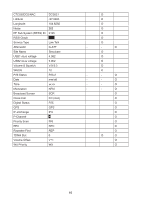
USING DISCOVERY MODE Trunking Discovery mode allows you to monitor a trunked radio system, logging system activity and recording the audio for channel identification. Conventional Discovery mode lets you monitor a range of frequencies, logging frequencies with activity and recording the audio for frequencies that are not already known to be in use in your area so that you can more easily identify the users. This includes frequencies used conventionally as well as in trunked radio systems. In both modes, you also have the option to compare hits to the Database and log all hits or just new hits. If you use the Auto Store option, Discovery will create a new Trunking System for IDs found for each Session or will create a new Conventional System for frequencies found for each Session. You can create and save several sessions with different settings. Every time you start a session you create a Run that can later be reviewed in the scanner or the Sentinel software. RUNNING A DISCOVERY SESSION To start a discovery session: Press MENU → Discovery then select either Trunking Discovery or Conventional Discovery. Select either New Session or an existing session. If you select New Session, you will be prompted to name the session. If you selected Trunking Discovery and this is a new session, you will be prompted to select the trunked system and site to perform discovery on. In order to run trunking discovery, the trunked system and site must be available for scanning (i.e. in and active Favorites List or within the defined location of the Main Database). Select the system and the site. Refer to the following table for Discover options. MENU ITEM Start Discovery DESCRIPTION Start a discovery session using the currently set parameters. Edit Session Name Edit the name of the selected session. Set Limit Frequencies (Conventional Discovery Only) Set the upper and lower limits of the frequency range you want to run discovery on. Set Modulation Set Step Set Delay (Conventional Discovery Only) Set the demodulation method to use. If set to AUTO (default), the scanner will use the default demodulation method for the frequency. (Conventional Discovery Only) Set the frequency step size for the session. If set to AUTO (default), the scanner uses the default frequency step for the frequency. Sets how long the scanner pauses after a transmission waiting for a reply. Set Logging ALL for all hits; NEW for only items that are not yet discovered in this session. Set Compare to Database On compares hits to database and ignores the hit if it is already in the database. Off records all hits. 48
-
 1
1 -
2
-
3
-
4
-
5
-
6
-
7
-
8
-
9
-
10
-
11
-
12
-
13
-
14
-
15
-
16
-
17
-
18
-
19
-
20
-
21
-
22
-
23
-
24
-
25
-
26
-
27
-
28
-
29
-
30
-
31
-
32
-
33
-
34
-
35
-
36
-
37
-
38
-
39
-
40
-
41
-
42
-
43
-
44
-
45
-
46
-
47
-
48
-
 49
49 -
 50
50 -
 51
51 -
 52
52 -
 53
53 -
 54
54 -
 55
55 -
 56
56 -
 57
57 -
 58
58 -
 59
59 -
60
-
61
-
62
-
63
-
64
-
65
-
66
-
67
-
68
 |
 |