Xerox 3635MFP Systems Administrator Guide - Page 42
Dynamic Addressing, Edit Remote Unix lpd Queue Entry]
 |
UPC - 095205741049
View all Xerox 3635MFP manuals
Add to My Manuals
Save this manual to your list of manuals |
Page 42 highlights
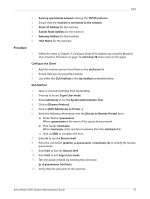
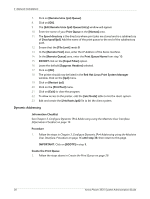
3 Network Installation 7. Click on [Remote Unix (lpd) Queue]. 8. Click on [OK]. 9. The [Edit Remote Unix (lpd) Queue Entry] window will appear. 10. Enter the name of your Print Queue in the [Names] area. 11. The Spool directory is the directory where print jobs are stored and is a subdirectory of [/var/spool/lpd]. Add the name of the print queue to the end of the subdirectory path. 12. Ensure that the [File Limit] reads 0. 13. In the [Remote Host] area, enter the IP Address of the Xerox machine. 14. In the [Remote Queue] area, enter the Print Queue Name from step 10. 15. DO NOT click on the [Input Filter] option. 16. Leave the default [Suppress Headers] selected. 17. Click on [OK]. 18. The printer should now be listed in the Red Hat Linux Print System Manager window. Click on the [lpd] menu. 19. Click on [Restart lpd]. 20. Click on the [PrintTool] menu. 21. Click on [Exit] to close the program. 22. To allow access to the printer, edit the [/etc/hosts] table to list the client system. 23. Edit and create the [/etc/hosts.lpd] file to list the client system. Dynamic Addressing Information Checklist See Chapter 3, Configure Dynamic IPv4 Addressing using the Machine User Interface, Information Checklist on page 15. Procedure 1. Follow the steps in Chapter 3, Configure Dynamic IPv4 Addressing using the Machine User Interface, Procedure on page 16 until step 38, then return to this page. IMPORTANT: Click on [BOOTP] in step 9. Create the Print Queue 2. Follow the steps above in Create the Print Queue on page 29. 30 Xerox Phaser 3635 System Administration Guide
-
 1
1 -
2
-
3
-
4
-
5
-
6
-
7
-
8
-
9
-
10
-
11
-
12
-
13
-
14
-
15
-
16
-
17
-
18
-
19
-
20
-
21
-
22
-
23
-
24
-
25
-
26
-
27
-
28
-
29
-
30
-
31
-
32
-
33
-
34
-
35
-
36
-
 37
37 -
 38
38 -
 39
39 -
 40
40 -
 41
41 -
 42
42 -
 43
43 -
 44
44 -
 45
45 -
 46
46 -
 47
47 -
48
-
49
-
50
-
51
-
52
-
53
-
54
-
55
-
56
-
57
-
58
-
59
-
60
-
61
-
62
-
63
-
64
-
65
-
66
-
67
-
68
-
69
-
70
-
71
-
72
-
73
-
74
-
75
-
76
-
77
-
78
-
79
-
80
-
81
-
82
-
83
-
84
-
85
-
86
-
87
-
88
-
89
-
90
-
91
-
92
-
93
-
94
-
95
-
96
-
97
-
98
-
99
-
100
-
101
-
102
-
103
-
104
-
105
-
106
-
107
-
108
-
109
-
110
-
111
-
112
-
113
-
114
-
115
-
116
-
117
-
118
-
119
-
120
-
121
-
122
-
123
-
124
-
125
-
126
-
127
-
128
-
129
-
130
-
131
-
132
-
133
-
134
-
135
-
136
-
137
-
138
-
139
-
140
-
141
-
142
-
143
-
144
-
145
-
146
-
147
-
148
-
149
-
150
-
151
-
152
-
153
-
154
-
155
-
156
-
157
-
158
-
159
-
160
-
161
-
162
-
163
-
164
-
165
-
166
-
167
-
168
-
169
-
170
-
171
-
172
-
173
-
174
-
175
-
176
-
177
-
178
-
179
-
180
-
181
-
182
-
183
-
184
-
185
-
186
-
187
-
188
-
189
-
190
-
191
-
192
-
193
-
194
-
195
-
196
-
197
-
198
-
199
-
200
-
201
-
202
-
203
-
204
-
205
-
206
-
207
-
208
-
209
-
210
-
211
-
212
 |
 |
