Yamaha 01V96i Owner's Manual - Page 44
Creating a Custom Layer by Combining Channels (User Assignable Layer
 |
View all Yamaha 01V96i manuals
Add to My Manuals
Save this manual to your list of manuals |
Page 44 highlights
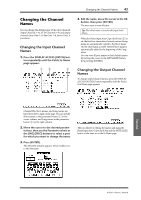
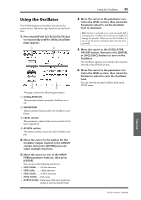
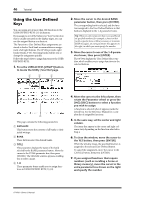
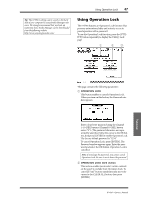
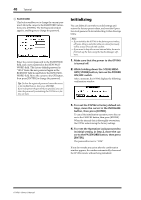
44 Tutorial Creating a Custom Layer by Combining Channels (User Assignable Layer) If you set the Remote Layer target to "USER ASSIGNABLE," you can create a custom layer by combining any 01V96i channels (excluding the Stereo Out). This custom layer is called "User Assignable layer." 1. Press the DISPLAY ACCESS [DIO/SETUP] button repeatedly until the DIO/Setup| Remote page appears. 2. Set the TARGET parameter to USER ASSIGNABLE, then press [ENTER]. A confirmation window appears. 3. Move the cursor to the YES button, then press [ENTER]. The 01V96i displays the page shown below. 1 4. Select the channels you wish to assign to the User Assignable layer using the 1-16 parameter boxes (1). You can store up to four 16-channel setups in four banks by switching Banks 1-4 via the BANK 1-4 buttons. If you press[ENTER] before selecting the channels to assign, you will still be able to select the channels you wish to assign in the User CH Select window. Tip: You can reset the assignment to default by moving the cursor to the CLEAR button and pressing [ENTER]. 5. Use the LAYER [REMOTE] button to assign or recall the User Assignable layer. You can use the faders and [ON] buttons to control the assigned channels. 01V96i-Owner's Manual
-
 1
1 -
2
-
3
-
4
-
5
-
6
-
7
-
8
-
9
-
10
-
11
-
12
-
13
-
14
-
15
-
16
-
17
-
18
-
19
-
20
-
21
-
22
-
23
-
24
-
25
-
26
-
27
-
28
-
29
-
30
-
31
-
32
-
33
-
34
-
35
-
36
-
37
-
38
-
 39
39 -
 40
40 -
 41
41 -
 42
42 -
 43
43 -
 44
44 -
 45
45 -
 46
46 -
 47
47 -
 48
48 -
 49
49 -
50
-
51
-
52
-
53
-
54
-
55
-
56
-
57
-
58
-
59
-
60
-
61
-
62
-
63
-
64
-
65
-
66
-
67
-
68
-
69
-
70
-
71
 |
 |
