Yamaha 01V96i Owner's Manual - Page 46
Using the User Defined Keys, Press the USER ACCESS [UTILITY] button
 |
View all Yamaha 01V96i manuals
Add to My Manuals
Save this manual to your list of manuals |
Page 46 highlights
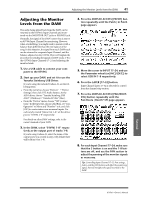
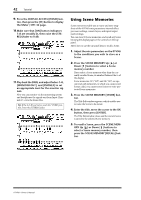
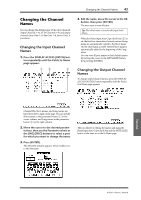
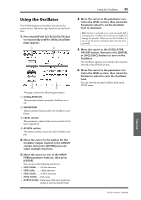
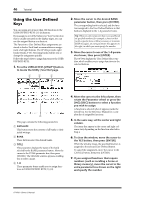
46 Tutorial Using the User Defined Keys You can assign any of more than 160 functions to the USER DEFINED KEYS [1]-[8] buttons. If you assign to one of the buttons (or "keys") a function that is usually executed on the display pages, you can use the assigned button as a shortcut. The Function to User Defined Keys assignments are stored in banks. Each bank accommodates an assignment of all eight buttons. The 01V96i provides eight banks (Banks A-H). Switching banks enables you to change the assignment quickly. Follow the steps below to assign functions to the USER DEFINED KEYS. 1. Press the USER ACCESS [UTILITY] button to locate the Utility | User Def page. 1 3 2 2. Move the cursor to the desired BANK parameter button, then press [ENTER]. The corresponding bank is selected, and the functions assigned to the User Defined buttons in that bank are displayed in the 1-8 parameter boxes. Tip: When you select a function that is executed based on specified numbers (for example, a function that recalls a specific Scene or library memory or transmits MIDI messages), an extra parameter box appears on the right, in which you must specify the number. 3. Move the cursor to one of the 1-8 param- eter boxes, then press [ENTER]. The 01V96i displays the User Define Select window, which enables you to assign functions to the selected buttons. 4 This page contains the following parameters: 1 INITIALIZE This button resets the contents of all banks to their initial settings. 2 BANK These buttons select the desired banks. 3 TITLE This parameter displays the name of the bank selected by the BANK parameter button. Move the cursor to the TITLE parameter box, then press [ENTER]. The Title Edit window appears, enabling you to enter a name. 4 1-8 These parameter boxes enable you to assign functions to USER DEFINED KEYS [1]-[8]. 4. Move the cursor to the left column, then rotate the Parameter wheel or press the [INC]/[DEC] buttons to select a function you wish to assign. A function is selected when it appears inside the dotted box. See the Reference Manual for a complete list of assignable functions. 5. In the same way, set the center and right column. The items that appear in the center and right columns vary depending on the function selected in Step 4. 6. To close the window, move the cursor to the YES button, then press [ENTER]. When the window closes, the specified function is assigned to the selected User Defined button. To cancel the assignment, move the cursor to the CANCEL button, then press [ENTER]. 7. If you assigned functions that require numbers (such as recalling a Scene or library memory), move the cursor to the extra parameter box shown on the right and specify the number. 01V96i-Owner's Manual
-
 1
1 -
2
-
3
-
4
-
5
-
6
-
7
-
8
-
9
-
10
-
11
-
12
-
13
-
14
-
15
-
16
-
17
-
18
-
19
-
20
-
21
-
22
-
23
-
24
-
25
-
26
-
27
-
28
-
29
-
30
-
31
-
32
-
33
-
34
-
35
-
36
-
37
-
38
-
39
-
40
-
 41
41 -
 42
42 -
 43
43 -
 44
44 -
 45
45 -
 46
46 -
 47
47 -
 48
48 -
 49
49 -
 50
50 -
 51
51 -
52
-
53
-
54
-
55
-
56
-
57
-
58
-
59
-
60
-
61
-
62
-
63
-
64
-
65
-
66
-
67
-
68
-
69
-
70
-
71
 |
 |
