ZyXEL P-336M User Guide - Page 19
Hardware Connection and Wizard Setup - usb
 |
View all ZyXEL P-336M manuals
Add to My Manuals
Save this manual to your list of manuals |
Page 19 highlights
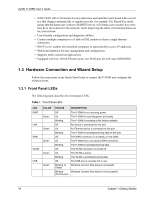
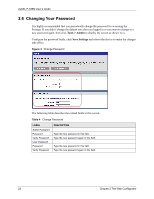
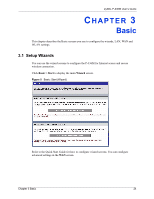
ZyXEL P-336M User's Guide • WPA2/WPA (Wi-Fi Protected Access) authorizes and identifies users based with a secret key that changes automatically at regular intervals, for example: Pre Shared Key mode means that the home user, without a RADIUS server, will obtain a new security key every time he or she connects to the network, vastly improving the safety of communications on the said network. • User-friendly configuration and diagnostic utilities. • Connect multiple computers to a Cable or DSL modem to share a single Internet connection. • DHCP server enables all networked computers to automatically receive IP addresses. • Web-based interface for easy management and configuration. • Supports multi-connection applications. • Equipped with four 10/100 Ethernet ports, one WAN port all with Auto MDI/MDIX. 1.3 Hardware Connection and Wizard Setup Follow the instructions in the Quick Start Guide to connect the P-336M and configure the wizard screens. 1.3.1 Front Panel LEDs The following table describes the front panel LEDs. Table 1 Front Panel LEDs LED PWR LAN WAN WLAN USB COLOR Green Green Green Green Green STATUS DESCRIPTION Off On Blinking Off On Blinking Off On Blinking Off On Blinking Off Blinking (3 Times) Blinking (Continuous) The P-336M is not receiving power. The P-336M is receiving power and ready. The P-336M is resetting to the factory defaults. No device is connected to this port. An Ethernet device is connected to this port. The P-336M is sending/receiving data on this port. The WAN connection is not ready, or has failed. The P-336M has a successful WAN connection. The P-336M is sending/receiving data. The WLAN connection is turned off. The WLAN is active. The WLAN is sending/receiving data. The USB port is currently not in use Windows Connect Now setup is successful. Windows Connect Now setup is not successful. 19 Chapter 1 Getting Started
-
 1
1 -
2
-
3
-
4
-
5
-
6
-
7
-
8
-
9
-
10
-
11
-
12
-
13
-
 14
14 -
 15
15 -
 16
16 -
 17
17 -
 18
18 -
 19
19 -
 20
20 -
 21
21 -
 22
22 -
 23
23 -
 24
24 -
25
-
26
-
27
-
28
-
29
-
30
-
31
-
32
-
33
-
34
-
35
-
36
-
37
-
38
-
39
-
40
-
41
-
42
-
43
-
44
-
45
-
46
-
47
-
48
-
49
-
50
-
51
-
52
-
53
-
54
-
55
-
56
-
57
-
58
-
59
-
60
-
61
-
62
-
63
-
64
-
65
-
66
-
67
-
68
-
69
-
70
-
71
-
72
-
73
-
74
-
75
-
76
-
77
-
78
-
79
-
80
-
81
-
82
-
83
-
84
-
85
-
86
-
87
-
88
-
89
-
90
-
91
-
92
-
93
-
94
-
95
-
96
-
97
-
98
-
99
-
100
-
101
-
102
-
103
 |
 |
