ZyXEL SBG3300-N Series User Guide - Page 107
Table 33, Label, Description
 |
View all ZyXEL SBG3300-N Series manuals
Add to My Manuals
Save this manual to your list of manuals |
Page 107 highlights
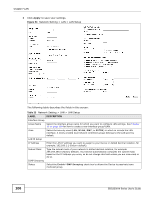
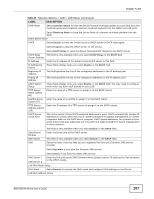
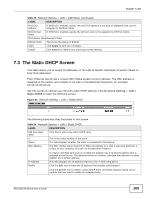
Chapter 7 LAN Table 33 Network Setting > LAN > LAN Setup (continued) LABEL IGMP Mode DESCRIPTION Select Standard Mode to have the Device forward multicast packets to a port that joins the multicast group and broadcast unknown multicast packets from the WAN to all LAN ports. Select Blocking Mode to have the Device block all unknown multicast packets from the WAN. DHCP Server State DHCP Select Enable to have the Device act as a DHCP server or DHCP relay agent. Select Disable to stop the DHCP server on the Device. DHCP Relay Server Address IP Address IP Addressing Values Beginning IP Address Ending IP Address DHCP Option Setup TFTP Server Name (option 66) Bootfile Name (option 67) TFTP Server Address (option 150) DHCP Server Lease Time Select DHCP Relay to have the Device forward DHCP request to the DHCP server. This field is only available when you select DHCP Relay in the DHCP field. Enter the IP address of the actual remote DHCP server in this field. These fields display when you select Enable in the DHCP field. This field specifies the first of the contiguous addresses in the IP address pool. This field specifies the last of the contiguous addresses in the IP address pool. These fields display when you select Enable in the DHCP field. You may need to configure them when you have VoIP phones on your LAN. Enter the name of a TFTP server to assign it to the DHCP clients. Enter the name of a bootfile to assign it to the DHCP clients. Enter the IP address of a TFTP server to assign it to the DHCP clients. This is the period of time DHCP-assigned addresses is used. DHCP automatically assigns IP addresses to clients when they log in. DHCP centralizes IP address management on central computers that run the DHCP server program. DHCP leases addresses, for a period of time, which means that past addresses are "recycled" and made available for future reassignment to other systems. Days/Hours/ Minutes DNS Values DNS This field is only available when you select Enable in the DHCP field. Enter the lease time of the DHCP server. This field is only available when you select Enable in the DHCP field. Select the type of service that you are registered for from your Dynamic DNS service provider. Select Dynamic if you have the Dynamic DNS service. Select Static if you have the Static DNS service. DNS Server 1 DNS Server 2 Enter the first and second DNS (Domain Name System) server IP address the Device passes to the DHCP clients. LAN IPv6 Mode Setup IPv6 State Select Enable to activate the IPv6 mode and configure IPv6 settings on the Device. LAN IPv6 Address Setup SBG3300-N Series User's Guide 107
-
 1
1 -
2
-
3
-
4
-
5
-
6
-
7
-
8
-
9
-
10
-
11
-
12
-
13
-
14
-
15
-
16
-
17
-
18
-
19
-
20
-
21
-
22
-
23
-
24
-
25
-
26
-
27
-
28
-
29
-
30
-
31
-
32
-
33
-
34
-
35
-
36
-
37
-
38
-
39
-
40
-
41
-
42
-
43
-
44
-
45
-
46
-
47
-
48
-
49
-
50
-
51
-
52
-
53
-
54
-
55
-
56
-
57
-
58
-
59
-
60
-
61
-
62
-
63
-
64
-
65
-
66
-
67
-
68
-
69
-
70
-
71
-
72
-
73
-
74
-
75
-
76
-
77
-
78
-
79
-
80
-
81
-
82
-
83
-
84
-
85
-
86
-
87
-
88
-
89
-
90
-
91
-
92
-
93
-
94
-
95
-
96
-
97
-
98
-
99
-
100
-
101
-
 102
102 -
 103
103 -
 104
104 -
 105
105 -
 106
106 -
 107
107 -
 108
108 -
 109
109 -
 110
110 -
 111
111 -
 112
112 -
113
-
114
-
115
-
116
-
117
-
118
-
119
-
120
-
121
-
122
-
123
-
124
-
125
-
126
-
127
-
128
-
129
-
130
-
131
-
132
-
133
-
134
-
135
-
136
-
137
-
138
-
139
-
140
-
141
-
142
-
143
-
144
-
145
-
146
-
147
-
148
-
149
-
150
-
151
-
152
-
153
-
154
-
155
-
156
-
157
-
158
-
159
-
160
-
161
-
162
-
163
-
164
-
165
-
166
-
167
-
168
-
169
-
170
-
171
-
172
-
173
-
174
-
175
-
176
-
177
-
178
-
179
-
180
-
181
-
182
-
183
-
184
-
185
-
186
-
187
-
188
-
189
-
190
-
191
-
192
-
193
-
194
-
195
-
196
-
197
-
198
-
199
-
200
-
201
-
202
-
203
-
204
-
205
-
206
-
207
-
208
-
209
-
210
-
211
-
212
-
213
-
214
-
215
-
216
-
217
-
218
-
219
-
220
-
221
-
222
-
223
-
224
-
225
-
226
-
227
-
228
-
229
-
230
-
231
-
232
-
233
-
234
-
235
-
236
-
237
-
238
-
239
-
240
-
241
-
242
-
243
-
244
-
245
-
246
-
247
-
248
-
249
-
250
-
251
-
252
-
253
-
254
-
255
-
256
-
257
-
258
-
259
-
260
-
261
-
262
-
263
-
264
-
265
-
266
-
267
-
268
-
269
-
270
-
271
-
272
-
273
-
274
-
275
-
276
-
277
-
278
-
279
-
280
-
281
-
282
-
283
-
284
-
285
-
286
-
287
-
288
-
289
-
290
-
291
-
292
-
293
-
294
-
295
-
296
-
297
-
298
-
299
-
300
-
301
-
302
-
303
-
304
-
305
-
306
-
307
-
308
-
309
-
310
-
311
-
312
-
313
-
314
-
315
 |
 |
