Adobe 26001360 Printing Guide - Page 28
Choose New.
 |
UPC - 718659321840
View all Adobe 26001360 manuals
Add to My Manuals
Save this manual to your list of manuals |
Page 28 highlights
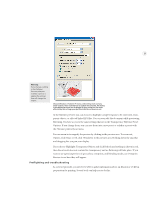
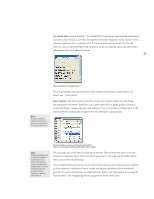
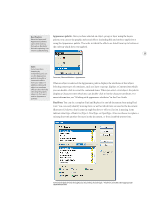
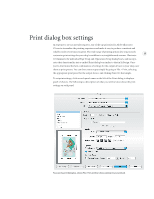
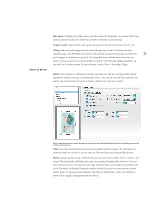
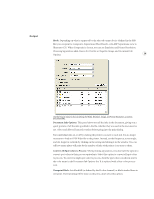
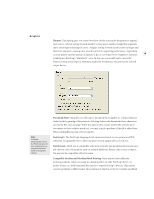
Visible on all Tabs Print preset and save preset: Set up named print preset values for specific devices, saving time and ensuring reliable and consistent print output. A print preset is a group of print set- tings that you can define and save into a platform-specific file. They act like styles, applying the same set of print options to every job. In automated workflows, an AppleScript or Visual Basic script just needs to call the preset name as opposed to defining the many options and 26 values in the print panels. Best Practice: Create print presets to automate the printing process. First, select the settings in the print dialog, then create the preset - Illustrator CS captures all the settings and lets you save the preset. You generally want to set up print presets for each printer, proofer, or output device. You can also have multiple presets per device for different types of output. When you're ready to print, just select the appropriate preset in the Print dialog which populates all the print settings automatically, and hit Print. Once you've set up these presets once, they are ready for all your prepress technicians to use and can be distributed to other computers, shops, customers, or wherever they're needed. To create a print preset: 1. Choose Edit > Print Presets. (Or you can do it directly from the Print dialog.) 2. Choose New. 3. Type in a preset name such as the name of the device. 4. Specify all your print settings appropriate for the given device and output conditions. The print settings are identical to those on the Print dialog. 5. Check the Summary on the last tab to make sure everything is correct. 6. Click OK. The new preset name will be available whenever you print. Note: You cannot open preset files in a text editor and read, view, or edit the settings. To make changes to presets, use the source application. If you want to distribute your print presets, click Export and the preset will be saved to a file with an Illustrator Presets icon. These presets can be distributed and loaded into other computers (although you will have to create separate files for use on Mac OS and Windows.) Click Import to load presets. PostScript files can also be created using print presets. Simply create a new print preset and select Adobe PostScript File from the Printer menu. For the PPD, either choose Device Independent (does not include printer driver or PPD information in the PostScript file, decreasing compatibility problems when used across multiple print workflows) or for a specific device, choose its PPD file. When you're ready to create a PostScript file, simply select this preset when you print. Preview: The preview in the lower left corner of the Print dialog shows how current print settings will interact with your artwork and the selected media, including the current print area, orientation, printer's marks and bleeds. The preview updates dynamically any time you change a setting. It displays the entire imageable area of the selected page, which is defined by the PPD file for the current page size. The printing bounding box is represented as a gray rectangle surrounding the artwork.
-
 1
1 -
2
-
3
-
4
-
5
-
6
-
7
-
8
-
9
-
10
-
11
-
12
-
13
-
14
-
15
-
16
-
17
-
18
-
19
-
20
-
21
-
22
-
 23
23 -
 24
24 -
 25
25 -
 26
26 -
 27
27 -
 28
28 -
 29
29 -
 30
30 -
 31
31 -
 32
32 -
 33
33 -
34
-
35
-
36
 |
 |