Adobe 26001360 Printing Guide - Page 30
Placement, Origin X and Y, Tiling, Marks, Offset, Bleeds
 |
UPC - 718659321840
View all Adobe 26001360 manuals
Add to My Manuals
Save this manual to your list of manuals |
Page 30 highlights
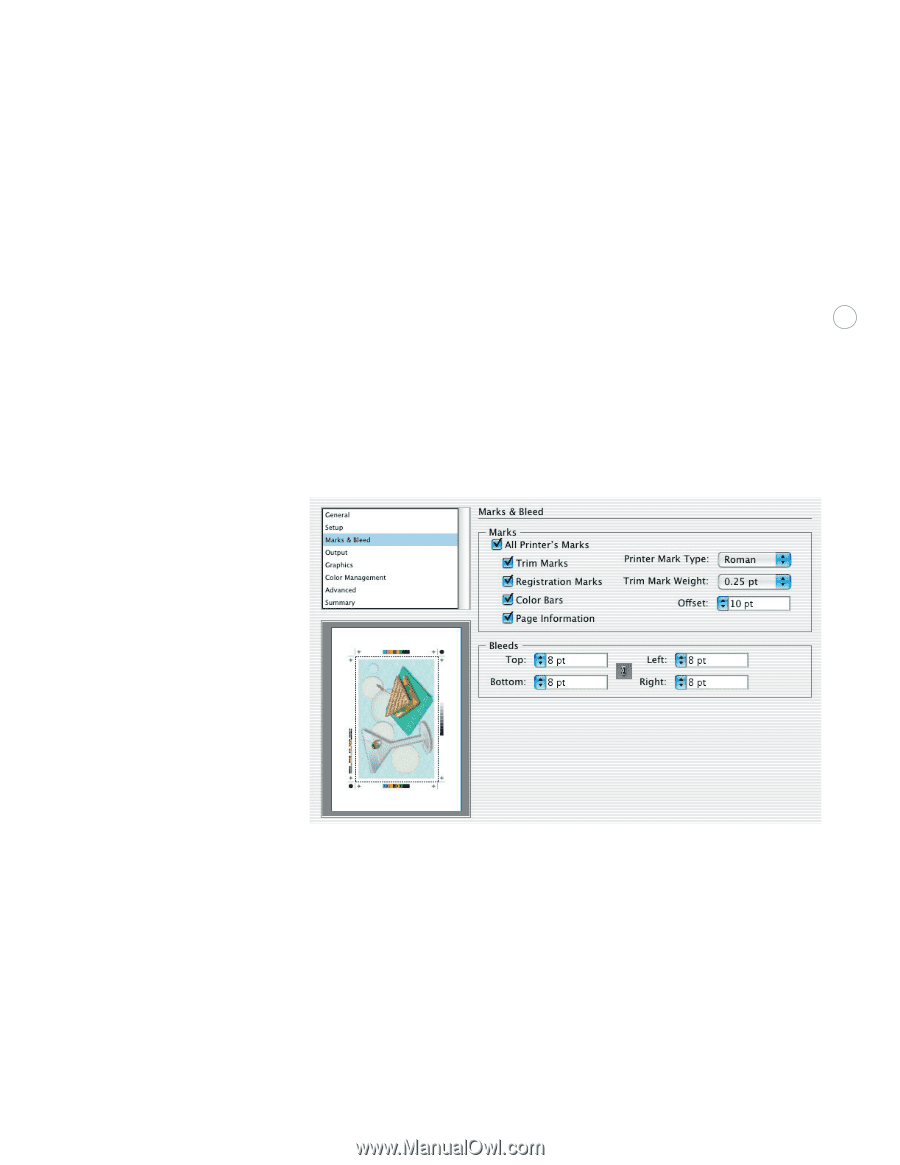
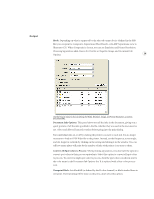
Marks & Bleed Placement: Clicking one of the squares specifies where the imageable area or first tile of your artwork should be placed to adjust the artwork on the film or printed page. Origin X and Y: Specifies the origin point along the horizontal (X) and vertical (Y) axes. Tiling: If the artwork is larger than the selected page size, it can be tiled to print onto multiple pages. Tile Full Pages divides the artboard into as many whole pages as will fit. No 28 partial pages are displayed or printed. Tile Imageable Areas divides the artboard into as many sections as necessary to print all the artwork. To view the page tiling boundaries on the artboard, see the preview. For more details, choose View > Show Page Tiling. Marks: Print whatever combination of trim, registration, color bar, and page information marks you want by selecting each individual choice. You can also specify the weight of trim marks, the offset distance from the artwork, and the type of printer's marks. Select individual printer's marks and bleed settings from the Marks & Bleed tab of the Print dialog, and see the results in the preview. Offset: Specifies the distance between the trim marks and the artwork. To avoid drawing printer's marks on a bleed, be sure to enter an Offset value greater than the Bleed value. Bleeds: Specifying the extent of the bleed moves the trim marks farther from or closer to the image. The trim marks still define the same size printing bounding box, however. You can enter values from 0 to 72 points for each edge. Click the link icon to make them all the same as the Top value. By default, Illustrator applies a bleed of 0 points to roman printer marks and 18 points to Japanese printer marks (which have a double line to show any difference between the original origin point and any offset.)
-
 1
1 -
2
-
3
-
4
-
5
-
6
-
7
-
8
-
9
-
10
-
11
-
12
-
13
-
14
-
15
-
16
-
17
-
18
-
19
-
20
-
21
-
22
-
23
-
24
-
 25
25 -
 26
26 -
 27
27 -
 28
28 -
 29
29 -
 30
30 -
 31
31 -
 32
32 -
 33
33 -
 34
34 -
 35
35 -
36
 |
 |