Adobe 26001360 Printing Guide - Page 31
Document Inks Options, Convert All Spot Colors to Process, Overprint Black
 |
UPC - 718659321840
View all Adobe 26001360 manuals
Add to My Manuals
Save this manual to your list of manuals |
Page 31 highlights
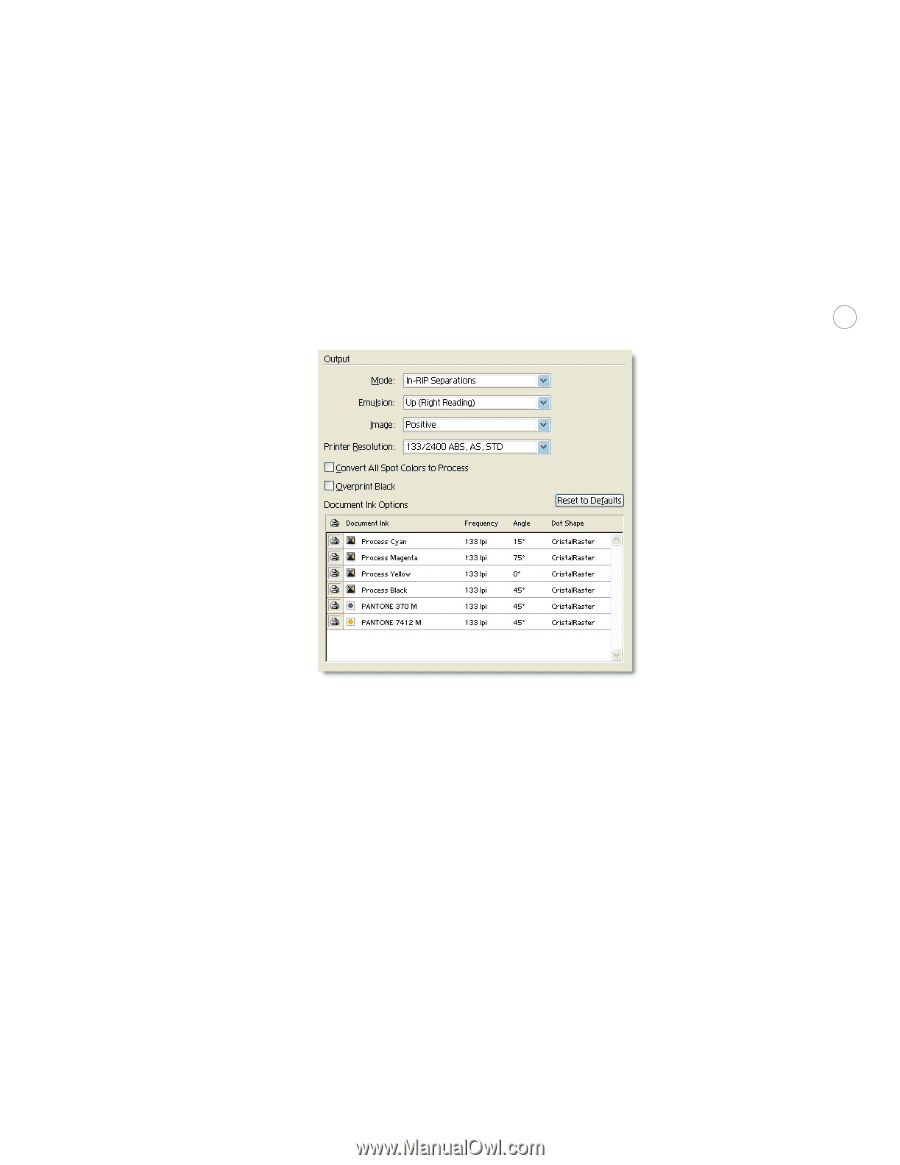
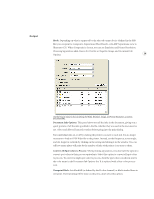
Output Mode: Depending on what is supported by the selected output device (defined in the PPD file) you can print to Composite, Separations (Host-Based), or In-RIP Separations (new to Illustrator CS). When Composite is chosen, you can set Emulsion and Printer Resolution. Choosing Separations adds choices for Positive or Negative Image, and Document Ink Options. 29 Use the Output menu to choose settings for Mode, Emulsion, Image, and Printer Resolution, as well as Document Inks. Document Inks Options: This panel shows you all the inks in the document, giving you a quick preview of all the inks specified in the file, whether they are used in the document or not. Select and delete all unused swatches before going into the print dialog. Turn individual inks on or off by clicking the printer icon next to each ink. It is no longer necessary to load an EPSF Rider file to the printer. Instead, set the frequency, screen angle, and dot shape for each ink by clicking on the setting and editing it in the window. You can tell how many plates will print by the number of inks with printer icons next to them. Convert All Spot Colors to Process: When printing separations, you also have the option to convert spot colors to their process equivalents. Select this option to convert all spot colors to process. To convert a single spot color to process, click the spot color icon shown next to the color name in the Document Ink Options list. It is replaced with a four-color process icon. Overprint Black: Sets black fill (as defined by the K color channel) or black-stroked lines to overprint. If overprinting will be done on the press, don't select this option.
-
 1
1 -
2
-
3
-
4
-
5
-
6
-
7
-
8
-
9
-
10
-
11
-
12
-
13
-
14
-
15
-
16
-
17
-
18
-
19
-
20
-
21
-
22
-
23
-
24
-
25
-
 26
26 -
 27
27 -
 28
28 -
 29
29 -
 30
30 -
 31
31 -
 32
32 -
 33
33 -
 34
34 -
 35
35 -
 36
36
 |
 |