Adobe 26001360 Printing Guide - Page 29
Setup, Print Layers, Scale, Crop Artwork
 |
UPC - 718659321840
View all Adobe 26001360 manuals
Add to My Manuals
Save this manual to your list of manuals |
Page 29 highlights
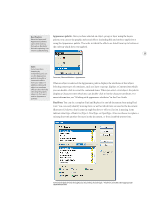
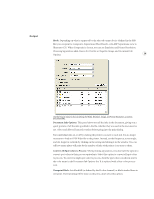
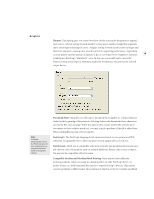
General Setup Setup: The Setup button brings up the operating system printing options. It is recommended that you set all print options in the Illustrator print dialog to get the full print capabilities of Illustrator. Size: The Media Size shows the page sizes available in the selected output device, as listed in 27 the PPD file. Make sure that your page size is large enough to contain your artwork as well as crop marks, registration marks, and other necessary printing information. You can specify a custom page size only if you are using a printer that accommodates unique page sizes. Print Layers: An Illustrator file can contain many layers, each of which typically contains a variety of objects. In the Layers palette, you can select whether a layer is visible, editable, and/or printable. Select whether you want to print Visible & Printable Layers (correspond to the layers that print when creating a composite proof), Visible Layers only, or All Layers. When saving to PDF 1.5 (compatible with Acrobat 6), layers are converted to PDF layers, which can then be selectively turned on and off for viewing and printing in Acrobat 6 Professional. This is very useful when creating different versions of content within a single file (for different language versions for example). Scale: You can now fit oversized artwork onto a single sheet of paper by selecting Fit to Page. The scaling percentage is determined by the imageable area defined in the selected PPD. Or use Custom Scale, in which the width-to-height ratio can be constrained by clicking on the icon. Asymmetric scaling is useful when printing on a flexographic press: If you know in which direction the plate will be mounted on the press drum, scaling can compensate for the 2% to 3% stretching of the plate that usually occurs. The printing bounding box, represented by the gray rectangle around the artwork in the preview, defines the printable boundaries of the artwork and is used to position the crop marks on your document. Crop Artwork to: Select whether artwork will be trimmed to artboard, the bounding box of the entire artwork, or to the defined crop area after it is printed. By default, Illustrator sets the crop area around the artboard.
-
 1
1 -
2
-
3
-
4
-
5
-
6
-
7
-
8
-
9
-
10
-
11
-
12
-
13
-
14
-
15
-
16
-
17
-
18
-
19
-
20
-
21
-
22
-
23
-
 24
24 -
 25
25 -
 26
26 -
 27
27 -
 28
28 -
 29
29 -
 30
30 -
 31
31 -
 32
32 -
 33
33 -
 34
34 -
35
-
36
 |
 |