Brother International DCP-J140W Software Users Manual - English - Page 160
If you want to change between color and black and white scanning, or the file name of scanned
 |
View all Brother International DCP-J140W manuals
Add to My Manuals
Save this manual to your list of manuals |
Page 160 highlights
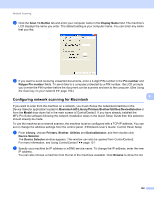
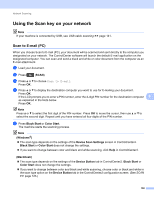
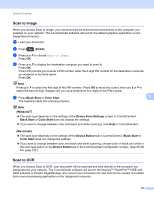
Network Scanning c Press a or b to choose Scan to File. Press OK. d Press a or b to display the destination computer you want to send to. Press OK. If the LCD prompts you to enter a PIN number, enter the 4-digit PIN number for the destination computer as explained in the Note below. Press OK. Note Press a or b to select the first digit of the PIN number. Press OK to move the cursor, then use a or b to select the second digit. Repeat until you have entered all four digits of the PIN number. e Press Black Start or Color Start. The machine starts the scanning process. Note (Windows®) The scan type depends on the settings of the Device Scan Settings screen in ControlCenter4. Black Start or Color Start does not change the settings. If you want to change between color and black and white scanning, or the file name of scanned documents, click Help in ControlCenter4. 9 9 (Macintosh) 9 The scan type depends on the settings of the Device Button tab in ControlCenter2. Black Start or Color Start does not change the settings. If you want to change between color and black and white scanning, choose color or black and white in the scan type option on the Device Button tab in the ControlCenter2 configuration screen. (See SCAN uu page 123.) If you want to change the file name of scanned documents, enter the file name in the File Name section on the Device Button tab in the ControlCenter2 configuration screen. (See SCAN uu page 123.) 153
-
 1
1 -
2
-
3
-
4
-
5
-
6
-
7
-
8
-
9
-
10
-
11
-
12
-
13
-
14
-
15
-
16
-
17
-
18
-
19
-
20
-
21
-
22
-
23
-
24
-
25
-
26
-
27
-
28
-
29
-
30
-
31
-
32
-
33
-
34
-
35
-
36
-
37
-
38
-
39
-
40
-
41
-
42
-
43
-
44
-
45
-
46
-
47
-
48
-
49
-
50
-
51
-
52
-
53
-
54
-
55
-
56
-
57
-
58
-
59
-
60
-
61
-
62
-
63
-
64
-
65
-
66
-
67
-
68
-
69
-
70
-
71
-
72
-
73
-
74
-
75
-
76
-
77
-
78
-
79
-
80
-
81
-
82
-
83
-
84
-
85
-
86
-
87
-
88
-
89
-
90
-
91
-
92
-
93
-
94
-
95
-
96
-
97
-
98
-
99
-
100
-
101
-
102
-
103
-
104
-
105
-
106
-
107
-
108
-
109
-
110
-
111
-
112
-
113
-
114
-
115
-
116
-
117
-
118
-
119
-
120
-
121
-
122
-
123
-
124
-
125
-
126
-
127
-
128
-
129
-
130
-
131
-
132
-
133
-
134
-
135
-
136
-
137
-
138
-
139
-
140
-
141
-
142
-
143
-
144
-
145
-
146
-
147
-
148
-
149
-
150
-
151
-
152
-
153
-
154
-
 155
155 -
 156
156 -
 157
157 -
 158
158 -
 159
159 -
 160
160 -
 161
161 -
 162
162 -
 163
163 -
 164
164 -
 165
165 -
166
 |
 |
