Brother International HL 5030 Service Manual - Page 225
INCORRECT PRINTOUT, The printer prints unexpectedly or it prints garbage.
 |
View all Brother International HL 5030 manuals
Add to My Manuals
Save this manual to your list of manuals |
Page 225 highlights
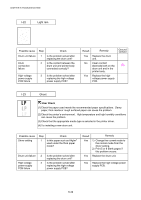
HL-5030/5040/5050/5070N SERVICE MANUAL 8. INCORRECT PRINTOUT When the data is not printed correctly as it is seen on the PC screen, follow the procedures below in the event of a specific error. P-1 The printer prints unexpectedly or it prints garbage. User Check (1) Check if the printer cable is not too long. It is recommended to use a parallel cable of less than 2 meters (6.6 feet) in length. (2) Check that the printer cable is not damaged or broken. Check also that the printer cable is connected to the correct interface connectors of both the printer and PC. (3) If an interface switching device is used, remove it and connect the computer directly to the printer and try again. (4) Check that the appropriate printer driver is selected as 'Set as Default'. Check also that the correct print port is set for the selected printer driver. (5) Check that the printer is not connected to the same port which is also connected to a mass storage device or scanner. Remove all other devices and connect the port to the printer only. Turn off the printer status monitor in the device options tab in the printer driver. (6) If the print port is set as an ECP port, change it to a normal port. (7) Try printing the test page referring to 1.1. 'Test Print Mode' in Chapter 7. (8) Try resetting the factory settings. Possible cause Failure inside the printer Step 1 Check Is it possible to print the test page with the method of 1.1 'Test Print Mode' in Chapter 7? Result No Remedy Identify the error type, then refer to the specified section of this chapter. NOTE: If the printer prints garbage or incorrect fonts, instruct the user to use the 'Troubleshooting for Printer won't print' tool of the self-diagnostics tools. If the problem cannot be solved, instruct user to use the 'Diagnostics' tool described in the Chapter 7 so that you can get a log file to investigate the cause of the problem. For details on the self-diagnostics tools, see 3. 'HOW TO USE SELF-DIAGNOSTICS TOOLS'. in CHAPTER 7 6-45
-
 1
1 -
2
-
3
-
4
-
5
-
6
-
7
-
8
-
9
-
10
-
11
-
12
-
13
-
14
-
15
-
16
-
17
-
18
-
19
-
20
-
21
-
22
-
23
-
24
-
25
-
26
-
27
-
28
-
29
-
30
-
31
-
32
-
33
-
34
-
35
-
36
-
37
-
38
-
39
-
40
-
41
-
42
-
43
-
44
-
45
-
46
-
47
-
48
-
49
-
50
-
51
-
52
-
53
-
54
-
55
-
56
-
57
-
58
-
59
-
60
-
61
-
62
-
63
-
64
-
65
-
66
-
67
-
68
-
69
-
70
-
71
-
72
-
73
-
74
-
75
-
76
-
77
-
78
-
79
-
80
-
81
-
82
-
83
-
84
-
85
-
86
-
87
-
88
-
89
-
90
-
91
-
92
-
93
-
94
-
95
-
96
-
97
-
98
-
99
-
100
-
101
-
102
-
103
-
104
-
105
-
106
-
107
-
108
-
109
-
110
-
111
-
112
-
113
-
114
-
115
-
116
-
117
-
118
-
119
-
120
-
121
-
122
-
123
-
124
-
125
-
126
-
127
-
128
-
129
-
130
-
131
-
132
-
133
-
134
-
135
-
136
-
137
-
138
-
139
-
140
-
141
-
142
-
143
-
144
-
145
-
146
-
147
-
148
-
149
-
150
-
151
-
152
-
153
-
154
-
155
-
156
-
157
-
158
-
159
-
160
-
161
-
162
-
163
-
164
-
165
-
166
-
167
-
168
-
169
-
170
-
171
-
172
-
173
-
174
-
175
-
176
-
177
-
178
-
179
-
180
-
181
-
182
-
183
-
184
-
185
-
186
-
187
-
188
-
189
-
190
-
191
-
192
-
193
-
194
-
195
-
196
-
197
-
198
-
199
-
200
-
201
-
202
-
203
-
204
-
205
-
206
-
207
-
208
-
209
-
210
-
211
-
212
-
213
-
214
-
215
-
216
-
217
-
218
-
219
-
 220
220 -
 221
221 -
 222
222 -
 223
223 -
 224
224 -
 225
225 -
 226
226 -
 227
227 -
 228
228 -
 229
229 -
 230
230 -
231
-
232
-
233
-
234
-
235
-
236
-
237
-
238
-
239
-
240
-
241
-
242
-
243
-
244
-
245
-
246
-
247
-
248
-
249
-
250
-
251
-
252
-
253
-
254
-
255
-
256
-
257
-
258
-
259
-
260
-
261
-
262
-
263
-
264
-
265
 |
 |
