Brother International XR-40 Users Manual - English and Spanish - Page 13
THREADING, MACHINE, Enhebrado, maquina
 |
View all Brother International XR-40 manuals
Add to My Manuals
Save this manual to your list of manuals |
Page 13 highlights
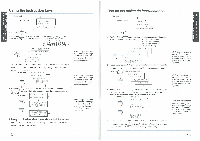
' 0 I # • - SEWING M , 1:13S00 30 vmnovuu ns VOZON00 3NIH0VIN DNINGS I:111OA ONIMONN .1 • a C0N0ZC KN • CD Stitch Width Dial 1 ® Selector de ancho de puntada. NOTE: When you choose the Straight Stitch (2) or the Triple Stretch Stitch (21), you can change the needle position from left to right. NOTA: Al elejir la puntada recta (dibujo No 2) o la triple puntadapespunto(dibujoNo21), esposible cambiar la posicion de la aguja de izquierda a derecha. IiIIIIlIII11111111IIIII1I .00111111iiblr.. gki Reverse Sewing Button To sew in reverse, push the Reverse Sewing Button in as far as possible and hold in that position while pressing lightly on the foot pedal. To sew forward, release the Reverse Sewing Button. The machine will then sew forward. Reverse sewing is used for backtacking and reinforcing seams. Pulsador de retroceso Para coser hacia atras, apriete a fondo el pulsador de retrocesoymantengalo en esa posicionmientras presiona ligeramente el pedal. Para volver a coser hacia adelante, suelte elpulsador. La costura hacia atrasseusapara rematesypara reforzarlascosturas. C) Reverse Sewing Button C) Pulsador de retroceso. THREADING THE MACHINE Winding the bobbin 1. Change the Clutch Release Switch from the needle mark to the bobbin mark. 2. Place a spool of thread onto the horizontal spool pin and firmly hold it with a spool holder so that the spool of thread will not turn. Pass the thread through the thread guide as shown following the dotted line on the machine. 3. Pass the end of the thread through the hole on the bobbin from the inside. C) Clutch Release Switch ® Bobbin winding Enhebrado de la maquina Bobinado de 1. Gamble elconmutadorbobina-aguja de la marca aguje a la marca canilla. 2. Coloque un carrete de hilo en el eje horizontal previsto y mantengalo firmemente con un tope para que no dth vueltas. Pase el hilo por la guia, siguiendo la linea de puntos marcada en la maquina. 3. Pase elextremo delhiloporelorificio de la canilla a partir del nterior. C) Conmutador C) Bobinado de la canilla O 1 0 • • O 19 20
-
 1
1 -
2
-
3
-
4
-
5
-
6
-
7
-
 8
8 -
 9
9 -
 10
10 -
 11
11 -
 12
12 -
 13
13 -
 14
14 -
 15
15 -
 16
16 -
 17
17 -
 18
18 -
19
-
20
-
21
-
22
-
23
-
24
-
25
-
26
-
27
-
28
-
29
-
30
-
31
-
32
-
33
-
34
-
35
 |
 |
