Brother International XR-40 Users Manual - English and Spanish - Page 7
Various, Controls
 |
View all Brother International XR-40 manuals
Add to My Manuals
Save this manual to your list of manuals |
Page 7 highlights
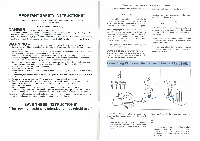
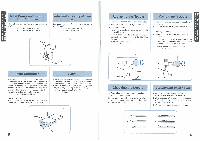
• 1 1 C•N.ZC ' SUM fpUIN KNOWING YOUR SEWING MACHINE ns VOZON00 . fl • Jl JNIM• 1:13S00 30 Changing the Presser Foot It may be necessary to change the presser foot according to your sewing needs. SNAP-ON TYPE 1. Raise the needle to its highest position by turning the balance wheel toward you (counter clockwise) and raise the presser foot lever. 2. Release the foot by raising the lever located at the back of the holder. 3. Place a different presser foot on the needle plate so that the bar on the presser foot is in line with the slot on the shank. 4. Lower the presser foot lever and fix the presser foot onto the shank. If the presser foot is in the correct location, the bar should snap in. Cambio del prensatelas Segan sus necesidades de costura, puede ser necesario cambiar el prensatelas. Tipo de enganche de golpe 1. Levante la aguja a su posicion mas alta, girando la ruedecilla hacia usted (en el sentido contrario al de las manecillas de un reloi) y levante la palanca del prensatelas. 2. Suelte elprensatelas levantando la palanca que hay en la parte trasera del soporte. 3. Coloque otro prensatelas en la placa de agujas de tal forma que la barra del prensatelas quede alineada con la ranura del soporte. 4. Bajelapalanca delprensatelasyfijeelprensatelas enelsoporte. Sielprensatelas esta biencolocado, la barra debe engancharse de golpe. 0 0 0 0 Converting to Free-arm Style Free-arm sewing is convenient for sewing tubular and hard-to-reach areas on a garment. To change your machine to the free-arm style, simply lift out the extension table. 0 Lift up on the extension table. @ Slide the extension table to the left. Conversion en modalidadl de brazo libre 10.7 La costura con brazo libre es practica para coser zonas tubulares y dificiles de acceso en los tejido. Para transformar su maquina en esa modalidad, solohace falta desmontarelsoporte delosaccesorios tirando de el. 0 Levante el soporte. p Deslice el soporte hacia la izquierda. ® Extension table 0 Soporte de accesorios VARIOUS CONTROLS Pattern Selection Dial To select a stitch, simply turn the Pattern Selection Dial, located on the right side of the machine. The Pattern Selection Dial may be turned in either direction. The following page shows the recommended range of stitch lengths and widths. () Pattern Selection Dial Distintos mandos Selector de puntadas Para seleccionar una puntada, solo hace falta girar el disco de seleccion correspondiente, situado en la derecha de la maquina. Este disco sepuede girar en cualquier direccion. En la siguiente pagina, encontrara las combinaciones recomendadas para largos y anchos de puntadas. 0 Selector de puntadas. 2 3 6 7 •,• lin MN n EM /' 8 9 10 11 12 13 14 O 15 16 17 18 19 20 13 8
-
 1
1 -
 2
2 -
 3
3 -
 4
4 -
 5
5 -
 6
6 -
 7
7 -
 8
8 -
 9
9 -
 10
10 -
 11
11 -
 12
12 -
13
-
14
-
15
-
16
-
17
-
18
-
19
-
20
-
21
-
22
-
23
-
24
-
25
-
26
-
27
-
28
-
29
-
30
-
31
-
32
-
33
-
34
-
35
 |
 |
