Brother International XR-40 Users Manual - English and Spanish - Page 23
Patch, Puntada, encima, orilla
 |
View all Brother International XR-40 manuals
Add to My Manuals
Save this manual to your list of manuals |
Page 23 highlights
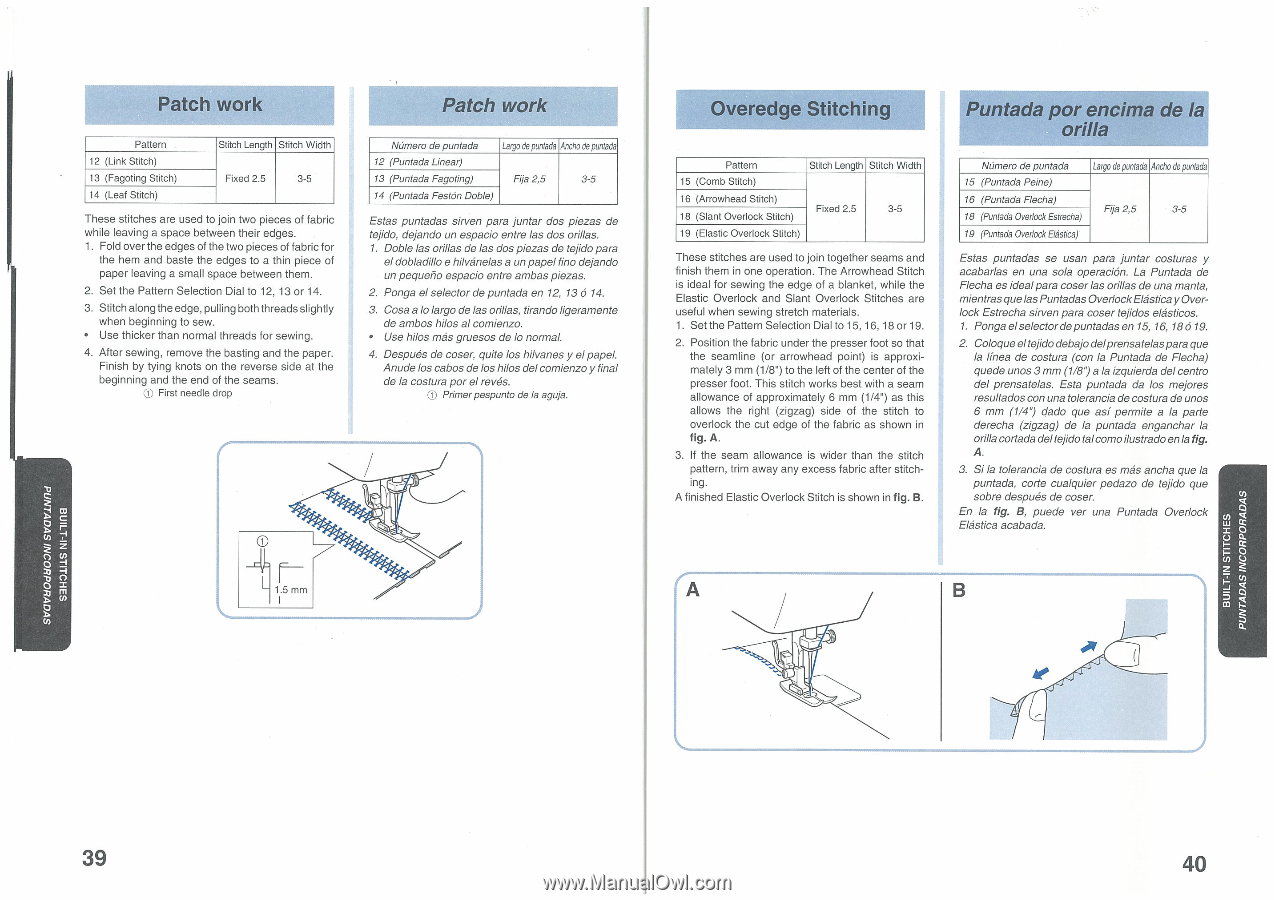
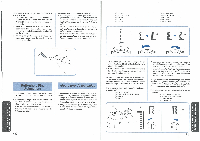
Patch work Pattern 12 (Link Stitch) 13 (Fagoting Stitch) 14 (Leaf Stitch) Stitch Length Stitch Width Fixed 2.5 3-5 These stitches are used to join two pieces of fabric while leaving a space between their edges. 1. Fold over the edges of the two pieces of fabric for the hem and baste the edges to a thin piece of paper leaving a small space between them. 2. Set the Pattern Selection Dial to 12, 13 or 14. 3. Stitch along the edge, pulling both threads slightly when beginning to sew. • Use thicker than normal threads for sewing. 4. After sewing, remove the basting and the paper. Finish by tying knots on the reverse side at the beginning and the end of the seams. Co First needle drop Patch work Niimero de puntada Largo de puntada Ancho de puntada 12 (Puntada Linear) 13 (Puntada Fagoting) Fija 2,5 3-5 14 (Puntada Feston Doble) Estas puntadas sirven para juntar dos piezas de tejido, dejando un espacio entre las dos orillas. 1. Doble las orillas de las dos piezas de tejido para el dobladillo e hilvanelas a un papel fino dejando un pequeno espacio entre ambas piezas. 2. Ponga el selector de puntada en 12, 13 6 14. 3. Cosa a lo largo de las orillas, tirando ligeramente de ambos hilos al comienzo. • Use hilos mas gruesos de lo normal. 4. Despues de coser, quite los hilvanes y elpapel. Anude los cabos de los hilos del comienzo y final de la costura por el roves. ® Primer pespunto de la aguja. Overedge Stitching Pattern Stitch Length Stitch Width 15 (Comb Stitch) 16 (Arrowhead Stitch) Fixed 2.5 3-5 18 (Slant Overlock Stitch) 19 (Elastic Overlock Stitch) These stitches are used to join together seams and finish them in one operation. The Arrowhead Stitch is ideal for sewing the edge of a blanket, while the Elastic Overlock and Slant Overlock Stitches are useful when sewing stretch materials. 1. Set the Pattern Selection Dial to 15, 16, 18 or 19. 2. Position the fabric under the presser foot so that the seamline (or arrowhead point) is approximately 3 mm (1/8") to the left of the center of the presser foot. This stitch works best with a seam allowance of approximately 6 mm (1/4") as this allows the right (zigzag) side of the stitch to overlock the cut edge of the fabric as shown in fig. A. 3. If the seam allowance is wider than the stitch pattern, trim away any excess fabric after stitching. A finished Elastic Overlock Stitch is shown in fig. B. Puntada por encima de la orilla Alumero de puntada Largo de puntada Ancho de puntada 15 (Puntada Peine) 16 (Puntada Flecha) Fija 2,5 3-5 18 (Puntada Overlock Estrecha) 19 (Puntada Overlock Elastica) Estas puntadas se usan para juntar costuras y acabarlas en una sola operacion. La Puntada de Flecha es idealpara coser las orillas de una manta, mientras que las Puntadas Overlock Elastica y Overlock Estrecha sirven para coser tejidos elasticos. 1. Ponga elselector depuntadas en 15, 16, 18 619. 2. Coloque eltejido debajo delprensatelaspara que la linea de costura (con la Puntada de Flecha) quede unos 3 mm (1/8") a la izquierda del centro del prensatelas. Esta puntada da los mejores resultados con una tolerancia de costura de unos 6 mm (1/4") dado que asi permite a la parte derecha (zigzag) de la puntada enganchar la orilla cortada deltejido talcomoilustrado enla fig. A. 3. Si la tolerancia de costura es mas ancha que la puntada, corte cua/quier pedazo de tejido que sobre despues de coser. En la fig. B, puede ver una Puntada Overlock Elastica acabada. [A SVOIrtIOdHOONI SVOVINIld nflIERMIIIIMILLI MlifillMilitECID PUNTADAS INCORPORADAS 39 40
-
 1
1 -
2
-
3
-
4
-
5
-
6
-
7
-
8
-
9
-
10
-
11
-
12
-
13
-
14
-
15
-
16
-
17
-
 18
18 -
 19
19 -
 20
20 -
 21
21 -
 22
22 -
 23
23 -
 24
24 -
 25
25 -
 26
26 -
 27
27 -
 28
28 -
29
-
30
-
31
-
32
-
33
-
34
-
35
 |
 |