Brother International XR-40 Users Manual - English and Spanish - Page 15
Upper, Threading, Using, needle, threader
 |
View all Brother International XR-40 manuals
Add to My Manuals
Save this manual to your list of manuals |
Page 15 highlights
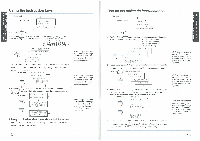
. 0 I 11 • ' SEWING M , •CZ 0C A SUM S 0 1:13S0.9 30 vNinovw nS VOZON0.9 , W ONIM3S . fl • Jl ONIM • NCI KN • Upper Threading 1. Raise the presser foot using the Presser Foot Lever as shown in fig. A below. • 2. Raise the needle to its highest position by turning the balance wheel toward you (counterclockwise). 3. Place a spool of thread on the horizontal spool pin and press a spool holder onto the spool pin to hold the thread spool firmly in place. NOTE: Choose an appropriate spool holder according to the type and diameter of the spool being used. The diameter of the spool holder should be just larger than that of the spool itself as shown below in fig. B. Enhebrado superior 1. Levante el prensatelas con la palanca correspondiente, talComo ilustrado enla fig. A. a continuacion. 2. Levante la aguja a su posicion mas alta, girando la ruedecilla hacia usted (en el sentido contrario al de las manecillas de un reloi). 3. Coloque un carrete de hilo en el portabobinas horizontalprevisto ymantengalo firmemente con el fleje para que no se mueva. NOTA: Escoger un soporte de carrete apropiado dependiendo del tipo y diametro del carrete empleado. El diametro del soporte del carrete debe ser solo un poco mas ancho que el del carrete, tal como ilustra la fig. B. :craccoi I I v t I I 4. Pass the upper thread through the thread guides as shown in fig. C. NOTE: Make sure to guide the thread through the thread take-up lever from the right to the left. Thread the needle from front to back and pull out about 15 cm (6") of thread. ® Thread take-up lever 4. Pase el hilo superior en las guias correspondientes, tal como se indica en la fig. C. NOTA: Asegurese de guiar elhiloporla palanca tirahilos de la derecha a la izquierda. Enhebre la aguja de delante hacia atras y tire unos 15 cm (6') de hilo. C) Palanca tirahilos Using needle threader (When the machine is equipped with a needle threader) The needle threader can be used to thread the needle more easily. 1. Lower the presser foot lever. Lower the threader slightly and position the thread under the guide. ® Needle threader ® Guide 2. Move the threader to its lowest position and guide the thread under the hook which passes through the eye of the needle. Cg) Hook Uso del enhebrador (Cuando la maquina esta provista de un en hebrador de aguja) Sepuede usar elenhebradorpara enhebrarla aguja mas facilmente. 1. Bajar la palanca de la pata prensatelas. Bajaren enhebradorsuavementeycolocarelhilo bajo la guia. Enhebrador O Guia 2. Mover el enhebradorhasta suposicion mas baja yguiar elhilopor debajo delgancho quepasapor el ojo de la aguja. Gancho 3. Release the threader and the thread at the same time. This causes the threader to deliver the thread through the eye of the needle. 4. Pull out about 5 cm (2 inches) of thread through the needle. NOTE: Some needle/thread combinations will not work with the needle threader. See page 28. 3 3. Soltar el enhebrador y el hilo al mismo tiempo. Esto provocara que el hilo salga por el ojo de la aguja. 4. Sacar unos 5 cm de hilo por la aguja. NOTA: Conalgunas combinaciones dehilo-aguja, nopuede utilizarse el enhebrador. Ver pagina 29. iI I 23 24
-
 1
1 -
2
-
3
-
4
-
5
-
6
-
7
-
8
-
9
-
 10
10 -
 11
11 -
 12
12 -
 13
13 -
 14
14 -
 15
15 -
 16
16 -
 17
17 -
 18
18 -
 19
19 -
 20
20 -
21
-
22
-
23
-
24
-
25
-
26
-
27
-
28
-
29
-
30
-
31
-
32
-
33
-
34
-
35
 |
 |
