Brother International XR-40 Users Manual - English and Spanish - Page 25
Making, Buttonhole
 |
View all Brother International XR-40 manuals
Add to My Manuals
Save this manual to your list of manuals |
Page 25 highlights
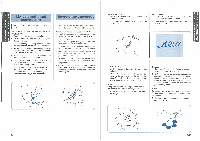
Making a Buttonhole Pattern 1 Stitch Length Stitch Width Foot F-1.5 3-5 Buttonhole foot NOTE: 1. It is recommended to practice making a button- hole on a scrap piece of fabric before attempting it on the actual garment. 2. When making buttonholes on soft fabrics, place stabilizer material on the underside of the fabric. One-step automatic buttonhole-making is a simple process that provides reliable results. MAKING A BUTTONHOLE Using tailor's chalk, mark the position of the buttonhole on the fabric. 2. Attach the buttonhole foot and set the Pattern Selection Dial to 1. 3. Draw up the lower thread. 4. Lower the presser foot aligning the marks on the foot with the marks on the fabric as shown in fig. A. The front bar tack will be sewn first. 5. Open the button plate and insert the button. See fig. B. 6. Lower the buttonhole lever and push it back slightly as in fig. C. 7. While gently holding the upper thread, start the machine. 8. Buttonhole stitching is done in order, 1-4, as shown in fig. D. 9. Stop the machine when the bar tacks are sewn. Para coser ojales Numero de Puntada Largo de puntada Ancho de puntada Prensatelas 1 F-1,5 3-5 Prensatelas para ojales NOTA: 1. Le recomendamos hacer una prueba de costura de ojales en un pedazo de tela antes de empezar a hacerla en el tejido de trabajo. 2. Parahacerojalesenmaterialesmuyfinos, coloque un material estabilizador debajo del tejido. La funcion de costura automatica de ojales en una sola operacion es un proceso simple que ofrece increibles resultados. COSIDO DEL OJAL 1. Con jaboncillo, marque la posicion del ojal en el tejido. 2. lnstale el prensatelas para ojales y ponga el selector de puntadas en 1. 3. Suba el hilo inferior. 4. Baje elprensatelas para alinearlas marcas de la pata con las marcas del tejido, tal como se indica en la fig. A. Se va a coser primero el remate de la parte delantera del ojal. 5. Abra la placa para botones e instale el boton. Vease fig. B. 6. Baje la palanca de la pata para ojales y vuelva a empujarla suavemente tal como ilustra la fig. C. 7. Sujete ligeramente el hilo superior y empiece a coser. 8. El cosido del ojal se hace por orden, de 1a 4, tal como aparece en la fig. D. 9. Pare la maquina cuando todos los remates esten terminados. ® Align the marks on the foot and on the fabric. ® Starting mark on the fabric ® Marks on the foot ® Button plate ® Alinee lasmarcas delprensatelas conlas del tejido. C) Marca de inicio en el tejido C) Marcas en el prensatelas. ® Placa para botones. B 4 2 3 111111111111111111111111111111111111111 111111111111111111111111111111111111111 D 0 0 0 pus° 0 •T••NES • , LES YC•STU' , 1 : UTT • NH • LE , N 9 : UTT • N SEWING : " 4 N , 31 • HN • S3N0108 30 vtuusoo A S3711r0 • 43 44
-
 1
1 -
2
-
3
-
4
-
5
-
6
-
7
-
8
-
9
-
10
-
11
-
12
-
13
-
14
-
15
-
16
-
17
-
18
-
19
-
 20
20 -
 21
21 -
 22
22 -
 23
23 -
 24
24 -
 25
25 -
 26
26 -
 27
27 -
 28
28 -
 29
29 -
 30
30 -
31
-
32
-
33
-
34
-
35
 |
 |
