Brother International XR-40 Users Manual - English and Spanish - Page 29
Monogramming, Embroidering, Monogramas, bordados
 |
View all Brother International XR-40 manuals
Add to My Manuals
Save this manual to your list of manuals |
Page 29 highlights
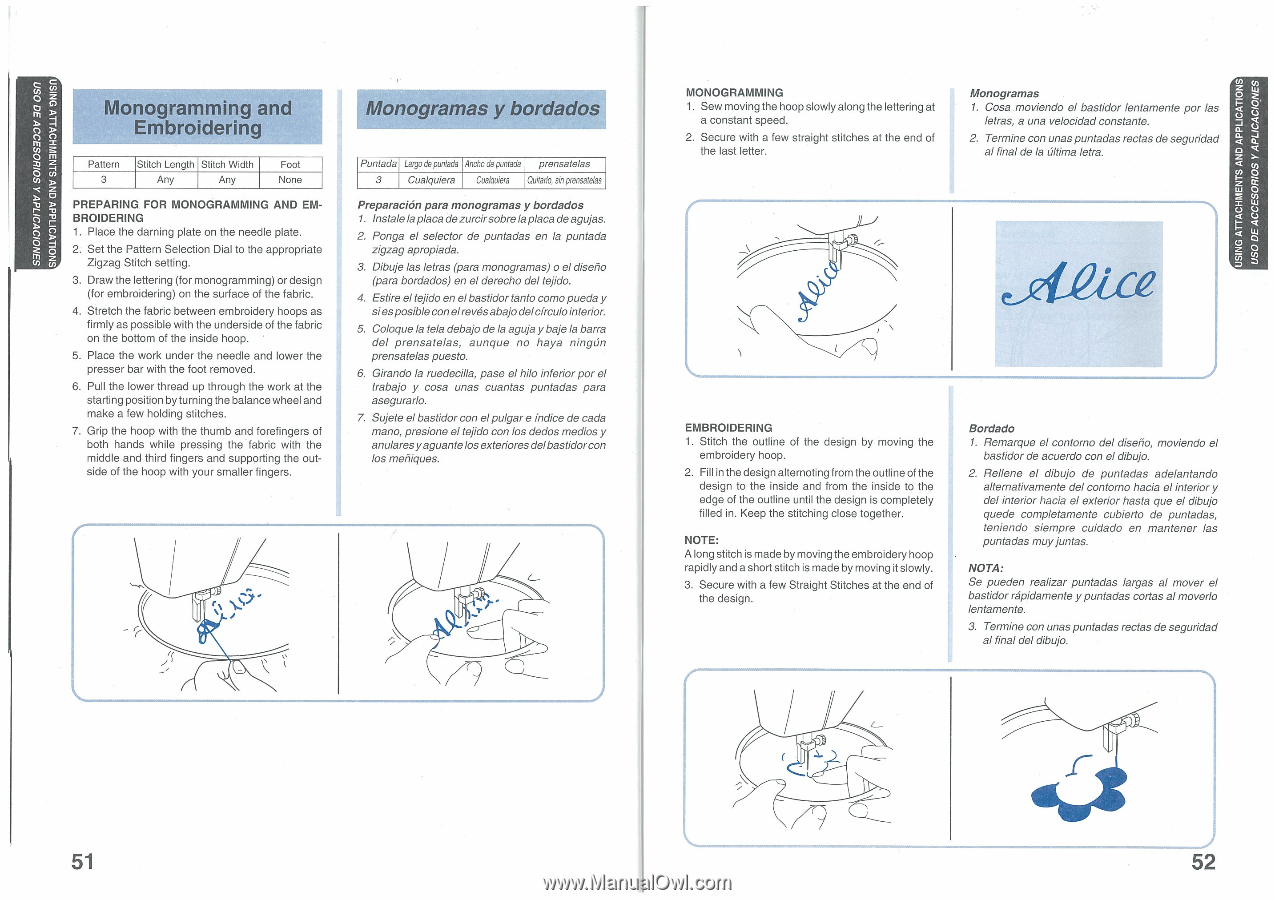
S3NO1011017d11A SOIHOS30DV 30 OSl1 SNOLLV3IlddV GNV SIN3lillH0VLLV own USING ATTACHMENTS AND APPLICATIONS US0 DEACCESORIOS Y APLICACIONES Monogramming and Embroidering Pattern Stitch Length Stitch Width 3 Any Any Foot None PREPARING FOR MONOGRAMMING AND EMBROIDERING 1 Place the darning plate on the needle plate. 2. Set the Pattern Selection Dial to the appropriate Zigzag Stitch setting. 3. Draw the lettering (for monogramming) or design (for embroidering) on the surface of the fabric. 4. Stretch the fabric between embroidery hoops as firmly as possible with the underside of the fabric on the bottom of the inside hoop. • 5. Place the work under the needle and lower the presser bar with the foot removed. 6. Pull the lower thread up through the work at the starting position by turning the balance wheel and make a few holding stitches. 7. Grip the hoop with the thumb and forefingers of both hands while pressing the fabric with the middle and third fingers and supporting the outside of the hoop with your smaller fingers. Monogramas y bordados Puntada Largo de puntada Ancho de puntada prensatelas 3 Cualquiera Cualquiera Quitarlo, sinprensatelas Preparacion para monogramas y bordados 1. Instale la placa de zurcirsobre la placa de agujas. 2. Ponga el selector de puntadas en la puntada zigzag apropiada. 3. Dibuje las letras (para monogramas) o el diselio (para bordados) en el derecho del tejido. 4. Estire el tejido en elbastidor tanto comopueda y siesposible conelrevesabajo delcirculointerior. 5. Coloque la tela debajo de la aguja y baje la barra del prensatelas, aunque no haya ningun prensatelas puesto. 6. Girando la ruedecilla, pase el hilo inferior por el trabajo y cosa unas cuantas puntadas para asegurarlo. 7. Sujete el bastidor con elpulgar e Indice de cada mano, presione el tejido con los dedos medios y anularesyaguantelos exteriores delbastidorcon los meniques. I MONOGRAMMING 1. Sew moving the hoop slowly along the lettering at a constant speed. 2. Secure with a few straight stitches at the end of the last letter. Monogramas 1. Cosa moviendo el bastidor lentamente por las letras, a una velocidad constante. 2. Termine con unas puntadas rectas de seguridad al final de la Ultima letra. EMBROIDERING 1. Stitch the outline of the design by moving the embroidery hoop. 2. Fill in the design alternoting from the outline of the design to the inside and from the inside to the edge of the outline until the design is completely filled in. Keep the stitching close together. NOTE: A long stitch is made by moving the embroidery hoop rapidly and a short stitch is made by moving it slowly. 3. Secure with a few Straight Stitches at the end of the design. Bordado 1. Remarque el contorno del disetio, moviendo el bastidor de acuerdo con el dibujo. 2. Rellene el dibujo de puntadas adelantando alternativamente del contorno hacia el interior y del interior hacia el exterior hasta que el dibujo quede completamente cubierto de puntadas, teniendo siempre cuidado en mantener las puntadas muy juntas. NOTA: Se pueden realizar puntadas largas al mover el bastidor rapidamente y puntadas cortas al moverlo lentamente. 3. Termine con unas puntadas rectas de seguridad al final del dibujo. 51 52
-
 1
1 -
2
-
3
-
4
-
5
-
6
-
7
-
8
-
9
-
10
-
11
-
12
-
13
-
14
-
15
-
16
-
17
-
18
-
19
-
20
-
21
-
22
-
23
-
 24
24 -
 25
25 -
 26
26 -
 27
27 -
 28
28 -
 29
29 -
 30
30 -
 31
31 -
 32
32 -
 33
33 -
 34
34 -
35
 |
 |