Brother International XR-40 Users Manual - English and Spanish - Page 14
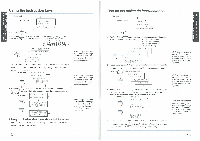
Spring, Ranura, Bobbin, latch, finger, Tension, spring, Metal, Notch, Pestillo, portacanillas, Uneta
 |
View all Brother International XR-40 manuals
Add to My Manuals
Save this manual to your list of manuals |
Page 14 highlights
a t 0 # r * r 'OZ.N.3 , - fl • A JNIM • NCI 4. Place the bobbin onto the bobbin winder shaft and slide the bobbin winder shaft to the right. Turn the bobbin clockwise, by hand, until the spring on the shaft slides into the slit on the bobbin. 5. While holding the end of the thread, gently depress the foot controller to wind the thread around the bobbin a few times. Then stop the machine. 6. Trim the excess thread above the bobbin. Continue winding the thread onto the bobbin by depressing the foot controller. NOTE: The machine stops automatically when the bobbin is full. 7. Cut the thread, push the shaft to the left and remove the full bobbin from the shaft. 8. Return the Clutch Release Switch back to the needle mark. ® Spring ® Slit 4. Coloque la canilla en el eje de bobinado correspondiente y deslice dicho eje hacia la derecha. Gire la canilla en el sentido de las manecillas de un reloj, con la mano, hasta que el muelle impulsor del eje se deslice dentro de la ranura de la canilla. 5. Sujetando el extremo del hilo, presione suavemente elpedalpara que elhilo de vueltas alrededor de la canilla. Luego pare la maquina. 6. Deshaga el exceso de hilo arriba de la canilla. Siga bobinando el hilo en la canilla presionando el pedal. NOTA: La maquina se para autometicamente cuando la canilla este Ilena. 7. Code el hilo, empuje el eje hacia la izquierda y retire la canilla Ilene. 8. Vuelva a colocar el conmutador en la marca aguja. ® Muelle ® Ranura 4 ef, 3 21 1. Raise the needle to its highest position by turning the balance wheel toward you (counterclockwise) and raise the presser foot lever. 2. Open the shuttle cover behind the extension table on the front of the machine and remove the bobbin case by pulling its latch toward you and pulling it out from the shuttle race toward you (fig. A). 3. Unwind about 10 cm (4") from a full bobbin and insert the bobbin into the bobbin case. Pull the trailing thread into the slot, down and to the left, as shown in fig. B below, until it enters the delivery eye under the tension spring. 4. Holding the bobbin case by the latch, fully insert the bobbin case into the shuttle race and release the latch. Make sure the metal finger fits into the notch at the top of the race as shown in fig. C below. NOTE: If the bobbin case is not properly placed back into the machine, it will fall out from the shuttle immediately after starting to sew. (J) Bobbin case latch ® Bobbin case finger 0 Tension spring ® Metal finger ® Notch B-1 1. Levante la aguja a su posicion dies alta, girando la ruedecilla hacia usted (en el sentido contrario al de las manecillas de un reloj) y levante la palanca delprensatelas. 2. Abra la tapa del porta accesorios de la mesa extensible, en la parte delantera de la ,maquina, y retire el portacanillas de la maquina, tirando la una metelica (pestillo) hacia usted y sacendola de su alojamiento (fig. A). 3. Tire unos 10 cm (4') de hilo de una canilla Ilene e inserte la canilla en su alojamiento. Tire del hilo suelto y peselo por la hendidura, abajo y hacia la izquierda, tal como se indica a continuacion en la fig.B, hasta que quepa dentro delojo de entrega, debajo del resorte tensor. 4. Sujetando el portacanillas por la tine metelica, introduzca todo el conjunto en el alojamiento y suelte el pestillo. Asegurese de que la uneta metelica se encaje en la ranura arriba talcomo se indica en la fig. C a continuacion. NOTA: Sielportacanillas no se encuentra bien colocado en la maquina, se saldre de su alojamiento inmediatamente despues de empezar a coser. C) Pestillo del portacanillas ® Uneta del portacanillas C) Resorte tensor ® Uneta metalica QQ Hendidura B-2 0 0 2 B-3 3 0 4 5 0 22 KN • • - SEWING M . •CZ •C 0 SUM I 0 ' ' • '
-
 1
1 -
2
-
3
-
4
-
5
-
6
-
7
-
8
-
 9
9 -
 10
10 -
 11
11 -
 12
12 -
 13
13 -
 14
14 -
 15
15 -
 16
16 -
 17
17 -
 18
18 -
 19
19 -
20
-
21
-
22
-
23
-
24
-
25
-
26
-
27
-
28
-
29
-
30
-
31
-
32
-
33
-
34
-
35
 |
 |
