Brother International XR-40 Users Manual - English and Spanish - Page 27
Sewing, Zipper, Insertion
 |
View all Brother International XR-40 manuals
Add to My Manuals
Save this manual to your list of manuals |
Page 27 highlights
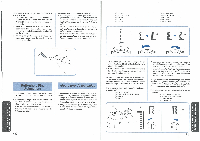
Button Sewing Pattern 3 Stitch Length Stitch Width Foot F Any Button Sewing Foot 1. Measure the distance between the holes and set the appropriate stitch width using the Stitch Width Dial. For example, if the distance between the holes is 1.5 mm, set the stitch width to 1.5. 2. Change the foot to the button sewing foot. 3. Place the darning plate on the needle plate. 4. Place a button between the foot and the fabric and make sure that the needle enters the holes without hitting the button. If it hits see step 1. 5. At a slow speed, sew approximately 10 stitches. 6. Remove the material from the machine. Cut the upper and lower threads and tie both threads at the back of the material. Costura de botones Puntada 3 Largo de puntada Ancho de puntada Prensatelas F cualquiera rensatelas para botones 1. Mida la distancia entre los distintos agujeros del bot6nyseleccione elancho depuntada apropiado mediante el selector de ancho de puntada. Por ejemplo, si la distancia entre los agujeros es de 1,5 mm, ponga el ancho de puntada en 1,5. 2. Cambie elprensatelas por uno para botones. 3. Coloque la placa de zurcir sobre la placa de agujas. 4. Coloque un boton entre elprensatelas y el tejido yasegarese de quela agujapaseporlosagujeros sin picar el bot6n. Si golpea el botOn, vease el punto 1. 5. Cosa unas 10 puntadas a baja velocidad. 6. Retire el tejido de la maquina. Corte los hilos inferior y superior y haga un nudo con ambos en el reties del tejido. J ' ' • • : II , S3N010830 VklILLSOD A S37Vr0 0 47 • Zipper Insertion Pattern 2 Stitch Length 2-3 . Foot Zipper Foot The zipper foot is used to sew various types of zippers and can easily be positioned to the right or left side of the needle. When sewing the right side of the zipper, attach the shank to the left pin of the zipper foot. When sewing the left side of the zipper, attach the shank to the right pin of the zipper foot. See fig. A. 1. Set the Pattern Selection Dial to 2. Set the Stitch Length between 2 and 3. 2. Lower the presser foot lever and fix either the left or right pin of the zipper foot onto the shank. 3. Fold the edge of the material 2 cm (3/4") and place the zipper under the folded portion. 4. Lower the needle into the notch located either on the left or right side of the zipper foot. 5. Sew from the bottom of the zipper toward the top on both sides. The needle should be positioned on the zipper side of the foot for best results. See fig. B. 6. To sew the opposite side of the zipper, release the foot by pressing the button located at the back of the presser foot, install the zipper foot on the other side of the zipper and continue sewing using the other side notch. 0) Zipper foot ® Right pin for sewing the left side of the zipper ® Left pin for sewing the right side of the zipper InserciOn de cremalleras Puntada 2 Largo de puntada Prensatelas 2-3 Pata de cremalleras La pata de cremalleras sirve para coser varios tipos de cremalleras y puede colocarse facilmente hacia la izquierda o derecha de la aguja. Cuando la cremallera se cose por el lado derecho, instalelapata deslizandolahacialaizquierda. Cuando se cose la cremallera por ellado izquierdo, instale la pata deslizandola hacia la derecha, tal como lo muestra la fig. A. 1. Ponga el selector de puntadas en 2. Ajuste el largo de puntada entre 2 y 3. 2. Baje la palanca del prensatelas y coloque el eje izquierdo o derecho de la pata de cremalleras en la zanca. 3. Doble la orilla del tejido a 2 cm (3/4') y coloque la cremallera debajo de la parte doblada. 4. Bajela aguja enla hendidura situada a la izquierda o derecha de la pata de cremalleras. 5. Cuesa a partir de la parte inferior de la cremallera hacia la parte superior, por ambos lados. Para mejores resultados, se debe colocar la aguja del lado de la pata y de la cremallera. Vease fig. B para mayores detalles. 6. Para coser el lado opuesto de la cremallera, suelte la pata al apretar el boton situado en su parte posterior, instale la pata en el otro lado de la cremallera y siga cosiendo, pasando la aguja por la hendidura del otro lado. ® Pata de cremalleras ® Eje derecho para coser la parte izquierda de la cremallera Eje izquierdopara coserla parte derecha de la cremallera. 1 2 0 3 0 48 USING ATTACHMENTS AND APPLICATIONS USO DEACCESORIOS Y APLICACIONES
-
 1
1 -
2
-
3
-
4
-
5
-
6
-
7
-
8
-
9
-
10
-
11
-
12
-
13
-
14
-
15
-
16
-
17
-
18
-
19
-
20
-
21
-
 22
22 -
 23
23 -
 24
24 -
 25
25 -
 26
26 -
 27
27 -
 28
28 -
 29
29 -
 30
30 -
 31
31 -
 32
32 -
33
-
34
-
35
 |
 |
