Canon PIXMA MP160 User's Guide - Page 104
Parts Of Image Missing Or Surrounded By Extra White Areas, Trouble scanning with Multi-Scan or Multi - specifications
 |
View all Canon PIXMA MP160 manuals
Add to My Manuals
Save this manual to your list of manuals |
Page 104 highlights
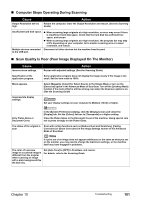
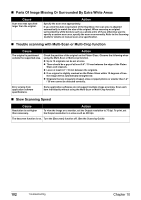
„ Parts Of Image Missing Or Surrounded By Extra White Areas Cause Scan area was specified larger than the original. Action Specify the scan area appropriately. If you click the Auto crop button of the ScanGear, the scan area is adjusted automatically to match the size of the original. When scanning an original surrounded by white borders such as a photo print, of if you otherwise want to specify a custom scan area, specify the scan area manually. Refer to the Scanning Guide for details on manual scan area specification. „ Trouble scanning with Multi-Scan or Multi-Crop function Cause The original is positioned outside the supported area. Action Check the position of the original on the Platen Glass. Observe the following when using the Multi-Scan or Multi-crop function. z Up to 10 originals can be set at once. z There should be a gap of at least 0.4" / 10 mm between the edge of the Platen Glass and originals. z Leave at least 0.4" / 10 mm between the originals. z If an original is slightly crooked on the Platen Glass within 10 degrees of true- the image will be automatically straightened. z Originals that are irregularly shaped, close-cropped photos or smaller than 1.2" / 30 mm cannot be detected correctly. Error arising from application software specifications. Some application softwares do not support multiple image scanning. Scan each item individually without using the Multi-Scan or Multi-Crop function. „ Slow Scanning Speed Cause Resolution is set higher than necessary. Action To view the image on a monitor, set the Output resolution to 75 dpi. To print, set the Output resolution to a value such as 300 dpi. The descreen function is on. Turn the [Descreen] function off. (See the Scanning Guide) 102 Troubleshooting Chapter 10
-
 1
1 -
2
-
3
-
4
-
5
-
6
-
7
-
8
-
9
-
10
-
11
-
12
-
13
-
14
-
15
-
16
-
17
-
18
-
19
-
20
-
21
-
22
-
23
-
24
-
25
-
26
-
27
-
28
-
29
-
30
-
31
-
32
-
33
-
34
-
35
-
36
-
37
-
38
-
39
-
40
-
41
-
42
-
43
-
44
-
45
-
46
-
47
-
48
-
49
-
50
-
51
-
52
-
53
-
54
-
55
-
56
-
57
-
58
-
59
-
60
-
61
-
62
-
63
-
64
-
65
-
66
-
67
-
68
-
69
-
70
-
71
-
72
-
73
-
74
-
75
-
76
-
77
-
78
-
79
-
80
-
81
-
82
-
83
-
84
-
85
-
86
-
87
-
88
-
89
-
90
-
91
-
92
-
93
-
94
-
95
-
96
-
97
-
98
-
 99
99 -
 100
100 -
 101
101 -
 102
102 -
 103
103 -
 104
104 -
 105
105 -
 106
106 -
 107
107 -
 108
108 -
 109
109 -
110
-
111
-
112
-
113
-
114
-
115
-
116
-
117
-
118
-
119
-
120
-
121
-
122
-
123
-
124
-
125
-
126
-
127
-
128
 |
 |
