Canon PIXMA MP800R User's Guide - Page 68
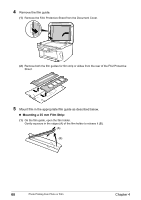
Slowly close the Document Cover and press [OK].
 |
View all Canon PIXMA MP800R manuals
Add to My Manuals
Save this manual to your list of manuals |
Page 68 highlights
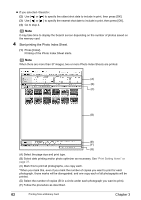
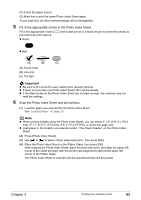
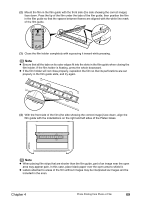
Note z Place the photograph(s) at least 0.4" / 10 mm away from and in square with the edges of the Platen Glass. z The Skew Correction function automatically compensates for photographs placed at a slant of up to approximately 10 degrees. If the slant is too large and the photograph fails to scan in, will be displayed on the preview screen. Reset the photos, and scan them again. z When setting two or more photographs at the same time, place them at least 0.4" / 10 mm apart from each other. If photographs are placed closer, they may be scanned as a single image. z Slanted photographs with a long edge of 7.1" / 180 mm or more cannot be corrected. z Photographs smaller than approx. 1" / 25 mm square will not be scanned properly. z The types of photographs listed below may not be scanned properly. - Non-rectangular or irregular shaped (such as cut out photos) - Photographs that are entirely white z The borders of bordered photographs may not be scanned properly. Perform trimming if necessary. 4 Slowly close the Document Cover and press [OK]. The photograph is scanned. Note z The photo or film is rescanned before printing starts. Do not open the Document Cover or remove the photo or film from the Platen Glass until printing is complete. z Press [PHOTO/FILM] when loading the other photos. If appears on the LCD, select , press [OK] to delete the previous image data, then go to main step 2. 66 Photo Printing from Photo or Film Chapter 4
-
 1
1 -
2
-
3
-
4
-
5
-
6
-
7
-
8
-
9
-
10
-
11
-
12
-
13
-
14
-
15
-
16
-
17
-
18
-
19
-
20
-
21
-
22
-
23
-
24
-
25
-
26
-
27
-
28
-
29
-
30
-
31
-
32
-
33
-
34
-
35
-
36
-
37
-
38
-
39
-
40
-
41
-
42
-
43
-
44
-
45
-
46
-
47
-
48
-
49
-
50
-
51
-
52
-
53
-
54
-
55
-
56
-
57
-
58
-
59
-
60
-
61
-
62
-
 63
63 -
 64
64 -
 65
65 -
 66
66 -
 67
67 -
 68
68 -
 69
69 -
 70
70 -
 71
71 -
 72
72 -
 73
73 -
74
-
75
-
76
-
77
-
78
-
79
-
80
-
81
-
82
-
83
-
84
-
85
-
86
-
87
-
88
-
89
-
90
-
91
-
92
-
93
-
94
-
95
-
96
-
97
-
98
-
99
-
100
-
101
-
102
-
103
-
104
-
105
-
106
-
107
-
108
-
109
-
110
-
111
-
112
-
113
-
114
-
115
-
116
-
117
-
118
-
119
-
120
-
121
-
122
-
123
-
124
-
125
-
126
-
127
-
128
-
129
-
130
-
131
-
132
-
133
-
134
-
135
-
136
-
137
-
138
-
139
-
140
-
141
-
142
-
143
-
144
-
145
-
146
-
147
-
148
-
149
-
150
-
151
-
152
-
153
-
154
-
155
-
156
-
157
-
158
-
159
-
160
-
161
-
162
-
163
-
164
-
165
-
166
-
167
-
168
-
169
-
170
-
171
-
172
-
173
-
174
-
175
-
176
-
177
-
178
-
179
-
180
-
181
-
182
-
183
-
184
-
185
-
186
-
187
-
188
 |
 |
