Canon PIXMA MP800R User's Guide - Page 73
Printing Photographs
 |
View all Canon PIXMA MP800R manuals
Add to My Manuals
Save this manual to your list of manuals |
Page 73 highlights
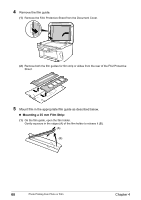
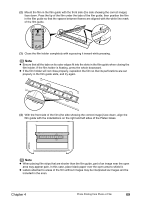
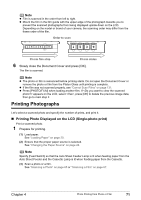
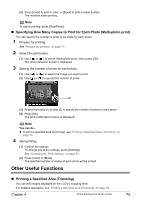
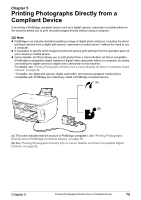
Note z Film is scanned in the order from left to right. z Mount the film in the film guide with the upper edge of the photograph towards you to prevent the scanned photographs from being displayed upside down on the LCD. Depending on the model or brand of your camera, the scanning order may differ from the frame order of the film. Order to scan 35 mm film strip 35 mm slides 6 Slowly close the Document Cover and press [OK]. The film is scanned. Note z The photo or film is rescanned before printing starts. Do not open the Document Cover or remove the photo or film from the Platen Glass until printing is complete. z If the film was not scanned properly, see "Cannot Scan Films" on page 131. z Press [PHOTO/FILM] when loading another film. If appears on the LCD, select , press [OK] to delete the previous image data, then go to main step 2. Printing Photographs Let's select a scanned photo and specify the number of prints, and print it. „ Printing Photo Displayed on the LCD (Single-photo print) Print a scanned photo. 1 Prepare for printing. (1) Load paper. See "Loading Paper" on page 20. (2) Ensure that the proper paper source is selected. See "Changing the Paper Source" on page 24. Note Specify [Feed Switch] so that the Auto Sheet Feeder Lamp is lit when feeding paper from the Auto Sheet Feeder and the Cassette Lamp is lit when feeding paper from the Cassette. (3) Scan a photo or a film. See "Scanning a Photo" on page 65 or "Scanning a Film" on page 67. Chapter 4 Photo Printing from Photo or Film 71
-
 1
1 -
2
-
3
-
4
-
5
-
6
-
7
-
8
-
9
-
10
-
11
-
12
-
13
-
14
-
15
-
16
-
17
-
18
-
19
-
20
-
21
-
22
-
23
-
24
-
25
-
26
-
27
-
28
-
29
-
30
-
31
-
32
-
33
-
34
-
35
-
36
-
37
-
38
-
39
-
40
-
41
-
42
-
43
-
44
-
45
-
46
-
47
-
48
-
49
-
50
-
51
-
52
-
53
-
54
-
55
-
56
-
57
-
58
-
59
-
60
-
61
-
62
-
63
-
64
-
65
-
66
-
67
-
 68
68 -
 69
69 -
 70
70 -
 71
71 -
 72
72 -
 73
73 -
 74
74 -
 75
75 -
 76
76 -
 77
77 -
 78
78 -
79
-
80
-
81
-
82
-
83
-
84
-
85
-
86
-
87
-
88
-
89
-
90
-
91
-
92
-
93
-
94
-
95
-
96
-
97
-
98
-
99
-
100
-
101
-
102
-
103
-
104
-
105
-
106
-
107
-
108
-
109
-
110
-
111
-
112
-
113
-
114
-
115
-
116
-
117
-
118
-
119
-
120
-
121
-
122
-
123
-
124
-
125
-
126
-
127
-
128
-
129
-
130
-
131
-
132
-
133
-
134
-
135
-
136
-
137
-
138
-
139
-
140
-
141
-
142
-
143
-
144
-
145
-
146
-
147
-
148
-
149
-
150
-
151
-
152
-
153
-
154
-
155
-
156
-
157
-
158
-
159
-
160
-
161
-
162
-
163
-
164
-
165
-
166
-
167
-
168
-
169
-
170
-
171
-
172
-
173
-
174
-
175
-
176
-
177
-
178
-
179
-
180
-
181
-
182
-
183
-
184
-
185
-
186
-
187
-
188
 |
 |
