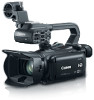
Canon XA20 Instruction Manual - Page 145
Playback Setup
 |
View all Canon XA20 manuals
Add to My Manuals
Save this manual to your list of manuals |
Page 145 highlights
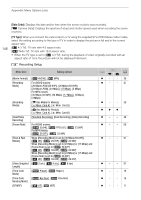
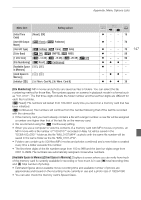
Appendix: Menu Options Lists [Auto Slow Shutter]: The camcorder automatically uses slow shutter speeds to obtain brighter recordings in places with insufficient lighting. • Minimum shutter speed used: 1/30; 1/15 when the frame rate is set to PF29.97 or 29.97P; 1/12 when the frame rate is set to 23.98P. • The auto slow shutter can be activated only during mode, when the recording program is set to [' Programmed AE] or during infrared mode. • If a trailing afterimage appears, set the slow shutter to [j Off]. • If > (camcorder shake warning) appears, we recommend stabilizing the camcorder, for example, by mounting it on a tripod. [ND Filter]: Available in any recording program other than the Special Scene recording programs. When set to [k Automatic], ND filter settings will be available when the aperture value is F4.0. [Conversion Lens]: When you attach to the camcorder the optional TL-H58 Tele-converter or WA-H58 Wide Attachment, set the appropriate conversion lens setting. The camcorder will then optimize the image stabilization and adjust the minimum object distance. The minimum object distance throughout the entire zoom range will be 130 cm (4 ft. 3 in.) for the Tele-converter and about 60 cm (2 ft.) for the Wide Attachment. When you select [¿ WA-H58] and you zoom in, the zoom position marker will stop before reaching the end of the zoom bar. • This Wide Attachment decreases the focal length by a factor of 0.75. • When you select a setting other than [j Off], the AF mode is automatically set to [@ Normal AF]. • The approximate subject distance displayed on the screen will change depending on the setting. If you are not using an optional lens, select [j Off]. [Onscreen Markers]: You can display a grid or a horizontal line at the center of the screen. Use the markers as a reference to make sure your subject is framed correctly (vertically and/or horizontally). • Using the onscreen markers will not affect the recordings. [IR Light]: Turns the infrared light on and off. The light is located on the handle unit so make sure you attach it to the camcorder in advance. • If set to [i On], the infrared light is always on when the camcorder is in infrared mode. [INPUT 1/2 Limiter]: If set to [i On], the limiter will limit the amplitude of audio signals to prevent audio distortions. 145 s / Playback Setup Menu item [Data Code] [TV Type] [Wi-Fi] Setting options A y} For AVCHD movies: [j Off], [% Date], [& Time], [' Date and Time], [( Camera Data] For MP4 movies: [j Off], [% Date] zz - [+ 4:3 TV], [, Wide TV] zz - [Movie Uploader], [Playback via Browser], [Media Server], z [FTP Transfer], [Smartphone Connection], [Access Point Connection], [FTP Server Settings] - 121
-
 1
1 -
2
-
3
-
4
-
5
-
6
-
7
-
8
-
9
-
10
-
11
-
12
-
13
-
14
-
15
-
16
-
17
-
18
-
19
-
20
-
21
-
22
-
23
-
24
-
25
-
26
-
27
-
28
-
29
-
30
-
31
-
32
-
33
-
34
-
35
-
36
-
37
-
38
-
39
-
40
-
41
-
42
-
43
-
44
-
45
-
46
-
47
-
48
-
49
-
50
-
51
-
52
-
53
-
54
-
55
-
56
-
57
-
58
-
59
-
60
-
61
-
62
-
63
-
64
-
65
-
66
-
67
-
68
-
69
-
70
-
71
-
72
-
73
-
74
-
75
-
76
-
77
-
78
-
79
-
80
-
81
-
82
-
83
-
84
-
85
-
86
-
87
-
88
-
89
-
90
-
91
-
92
-
93
-
94
-
95
-
96
-
97
-
98
-
99
-
100
-
101
-
102
-
103
-
104
-
105
-
106
-
107
-
108
-
109
-
110
-
111
-
112
-
113
-
114
-
115
-
116
-
117
-
118
-
119
-
120
-
121
-
122
-
123
-
124
-
125
-
126
-
127
-
128
-
129
-
130
-
131
-
132
-
133
-
134
-
135
-
136
-
137
-
138
-
139
-
 140
140 -
 141
141 -
 142
142 -
 143
143 -
 144
144 -
 145
145 -
 146
146 -
 147
147 -
 148
148 -
 149
149 -
 150
150 -
151
-
152
-
153
-
154
-
155
-
156
-
157
-
158
-
159
-
160
-
161
-
162
-
163
-
164
-
165
-
166
-
167
-
168
-
169
-
170
-
171
-
172
-
173
-
174
-
175
-
176
-
177
-
178
-
179
-
180
-
181
-
182
-
183
-
184
-
185
-
186
-
187
 |
 |
