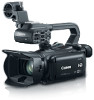
Canon XA20 Instruction Manual - Page 83
Wind Screen Built-in Microphone, Microphone Attenuator Built-in Microphone
 |
View all Canon XA20 manuals
Add to My Manuals
Save this manual to your list of manuals |
Page 83 highlights
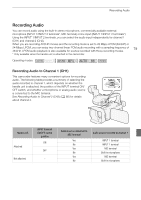
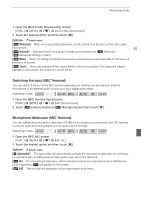
Recording Audio To display the audio level indicator Usually, the audio level indicator will be displayed only after activating the manual adjustment of the audio recording level. You can choose to display it also when the audio level is adjusted automatically. 1 Open the automatic audio recording level screen. [FUNC.] > [ä Mic Level] > [m] (automatic) 2 Touch [Audio Level Indicator] and then touch [X]. 83 NOTES • When the audio level meter reaches the red point (0 dB), the sound may be distorted. • We recommend using headphones to check the sound level while adjusting the audio recording level or when the microphone attenuator is activated. Wind Screen (Built-in Microphone) The camcorder automatically reduces the background sound of wind when recording outdoors. You can select from two levels or turn off the auto wind screen. Operating modes: POINTS TO CHECK • Set [- Audio Scene] to [„ Custom Setting] (A 81). 1 Open the [Built-in Mic Wind Screen] screen. [FUNC.] > [MENU] > p > [Built-in Mic Wind Screen] 2 Touch the desired option and then touch [X]. Options ( Default value) [H Auto (High)] The camcorder will automatically activate the built-in microphone wind screen at a high level, as necessary. [L Auto (Low) ] The camcorder will automatically activate the built-in microphone wind screen at a low level, as necessary. [j Off à] The built-in microphone wind screen will be deactivated at all times. NOTES • Some low-frequency sounds will be suppressed along with the sound of wind. When recording in surroundings unaffected by wind or if you want to record low-frequency sounds, we recommend setting [Built-in Mic Wind Screen] to [j Off à]. Microphone Attenuator (Built-in Microphone) If the audio level is too high and the audio sounds distorted while recording with the built-in microphone, activate the microphone attenuator (12 dB). Operating modes:
-
 1
1 -
2
-
3
-
4
-
5
-
6
-
7
-
8
-
9
-
10
-
11
-
12
-
13
-
14
-
15
-
16
-
17
-
18
-
19
-
20
-
21
-
22
-
23
-
24
-
25
-
26
-
27
-
28
-
29
-
30
-
31
-
32
-
33
-
34
-
35
-
36
-
37
-
38
-
39
-
40
-
41
-
42
-
43
-
44
-
45
-
46
-
47
-
48
-
49
-
50
-
51
-
52
-
53
-
54
-
55
-
56
-
57
-
58
-
59
-
60
-
61
-
62
-
63
-
64
-
65
-
66
-
67
-
68
-
69
-
70
-
71
-
72
-
73
-
74
-
75
-
76
-
77
-
 78
78 -
 79
79 -
 80
80 -
 81
81 -
 82
82 -
 83
83 -
 84
84 -
 85
85 -
 86
86 -
 87
87 -
 88
88 -
89
-
90
-
91
-
92
-
93
-
94
-
95
-
96
-
97
-
98
-
99
-
100
-
101
-
102
-
103
-
104
-
105
-
106
-
107
-
108
-
109
-
110
-
111
-
112
-
113
-
114
-
115
-
116
-
117
-
118
-
119
-
120
-
121
-
122
-
123
-
124
-
125
-
126
-
127
-
128
-
129
-
130
-
131
-
132
-
133
-
134
-
135
-
136
-
137
-
138
-
139
-
140
-
141
-
142
-
143
-
144
-
145
-
146
-
147
-
148
-
149
-
150
-
151
-
152
-
153
-
154
-
155
-
156
-
157
-
158
-
159
-
160
-
161
-
162
-
163
-
164
-
165
-
166
-
167
-
168
-
169
-
170
-
171
-
172
-
173
-
174
-
175
-
176
-
177
-
178
-
179
-
180
-
181
-
182
-
183
-
184
-
185
-
186
-
187
 |
 |
