Canon imageCLASS MF5770 imageCLASS MF5700 Series Software Guide - Page 124
Simple Mode Toolbar, To Detach and Move the Toolbar
 |
View all Canon imageCLASS MF5770 manuals
Add to My Manuals
Save this manual to your list of manuals |
Page 124 highlights
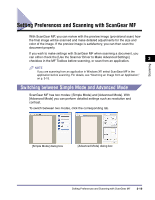
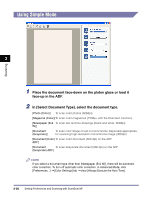
[Output Size Name] [Width] [Height] [Unit] [Add] [Delete] Specifies the output size name you want to register. Specifies the width of the output size. Specifies the height of the output size. Selects the unit of measurement for the output size. Adds the output size to the [Output Size List]. Deletes the selected output size from the [Output Size List]. Simple Mode Toolbar With the Simple Mode Toolbar, you can make adjustments to the preview image 3 and also select a part of the image displayed. Scanning This button is disabled for this model. (Auto Crop) Crops the image border automatically. For details, see "Advanced Mode - Specifying the Parameters of a Scan," on p. 3-25. (Flip) Flips the scanned image horizontally. (Left Rotate) Rotates the scanned image 90 degrees left. (Right Rotate) Rotates the scanned image 90 degrees right. (Information) Lists the scanning information. ■ To Detach and Move the Toolbar To detach the toolbar from the [ScanGear MF] dialog box, click and hold on the edge of the toolbar, then drag the Toolbar. It will return to its original position if you double-click on the title of the toolbar. The toolbar will adhere to a position if you drag it to the left or right of the preview area or the bottom frame. 3-22 Setting Preferences and Scanning with ScanGear MF
-
 1
1 -
2
-
3
-
4
-
5
-
6
-
7
-
8
-
9
-
10
-
11
-
12
-
13
-
14
-
15
-
16
-
17
-
18
-
19
-
20
-
21
-
22
-
23
-
24
-
25
-
26
-
27
-
28
-
29
-
30
-
31
-
32
-
33
-
34
-
35
-
36
-
37
-
38
-
39
-
40
-
41
-
42
-
43
-
44
-
45
-
46
-
47
-
48
-
49
-
50
-
51
-
52
-
53
-
54
-
55
-
56
-
57
-
58
-
59
-
60
-
61
-
62
-
63
-
64
-
65
-
66
-
67
-
68
-
69
-
70
-
71
-
72
-
73
-
74
-
75
-
76
-
77
-
78
-
79
-
80
-
81
-
82
-
83
-
84
-
85
-
86
-
87
-
88
-
89
-
90
-
91
-
92
-
93
-
94
-
95
-
96
-
97
-
98
-
99
-
100
-
101
-
102
-
103
-
104
-
105
-
106
-
107
-
108
-
109
-
110
-
111
-
112
-
113
-
114
-
115
-
116
-
117
-
118
-
 119
119 -
 120
120 -
 121
121 -
 122
122 -
 123
123 -
 124
124 -
 125
125 -
 126
126 -
 127
127 -
 128
128 -
 129
129 -
130
-
131
-
132
-
133
-
134
-
135
-
136
-
137
-
138
-
139
-
140
-
141
-
142
-
143
-
144
-
145
-
146
-
147
-
148
-
149
-
150
-
151
-
152
-
153
-
154
-
155
-
156
-
157
-
158
-
159
-
160
-
161
-
162
-
163
-
164
-
165
-
166
-
167
-
168
-
169
-
170
-
171
-
172
-
173
-
174
-
175
-
176
-
177
-
178
-
179
-
180
-
181
-
182
-
183
-
184
-
185
-
186
-
187
-
188
-
189
-
190
-
191
-
192
-
193
-
194
-
195
-
196
-
197
-
198
-
199
-
200
-
201
-
202
-
203
-
204
-
205
-
206
-
207
-
208
-
209
-
210
-
211
-
212
-
213
-
214
-
215
-
216
-
217
-
218
-
219
-
220
-
221
-
222
-
223
-
224
-
225
-
226
-
227
-
228
-
229
-
230
-
231
-
232
-
233
-
234
-
235
-
236
-
237
-
238
-
239
-
240
-
241
-
242
-
243
-
244
-
245
-
246
-
247
-
248
-
249
-
250
-
251
-
252
-
253
-
254
-
255
 |
 |
