Casio EX Z85 Owners Manual - Page 30
To change Auto Shutter trigger sensitivity (Sensitivity)
 |
UPC - 079767624071
View all Casio EX Z85 manuals
Add to My Manuals
Save this manual to your list of manuals |
Page 30 highlights
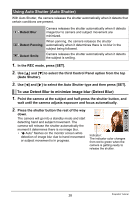
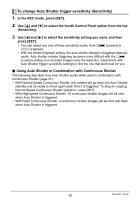
To change Auto Shutter trigger sensitivity (Sensitivity) 1. In the REC mode, press [SET]. 2. Use [8] and [2] to select the fourth Control Panel option from the top (Sensitivity). 3. Use [4] and [6] to select the sensitivity setting you want, and then press [SET]. • You can select any one of three sensitivity levels, from ø (Lowest) to œ (Highest). • With the œ (Highest) setting, the auto shutter release is triggered relatively easily. Auto shutter release triggering becomes more difficult with the ø (Lowest) setting, but recorded images have the least blur. Experiment with Auto Shutter trigger sensitivity settings to find the one that work best for you. . Using Auto Shutter in Combination with Continuous Shutter The following describes how Auto Shutter works while used in combination with Continuous Shutter (page 37). • With Normal Speed Continuous Shutter, the camera will go back into Auto Shutter standby and be ready to shoot again each time it is triggered. To stop an ongoing Normal Speed Continuous Shutter operation, press [SET]. • With High-speed Continuous Shutter, 10 continuous shutter images will be shot when Auto Shutter is triggered. • With Flash Continuous Shutter, 3 continuous shutter images will be shot with flash when Auto Shutter is triggered. 30 Snapshot Tutorial
-
 1
1 -
2
-
3
-
4
-
5
-
6
-
7
-
8
-
9
-
10
-
11
-
12
-
13
-
14
-
15
-
16
-
17
-
18
-
19
-
20
-
21
-
22
-
23
-
24
-
 25
25 -
 26
26 -
 27
27 -
 28
28 -
 29
29 -
 30
30 -
 31
31 -
 32
32 -
 33
33 -
 34
34 -
 35
35 -
36
-
37
-
38
-
39
-
40
-
41
-
42
-
43
-
44
-
45
-
46
-
47
-
48
-
49
-
50
-
51
-
52
-
53
-
54
-
55
-
56
-
57
-
58
-
59
-
60
-
61
-
62
-
63
-
64
-
65
-
66
-
67
-
68
-
69
-
70
-
71
-
72
-
73
-
74
-
75
-
76
-
77
-
78
-
79
-
80
-
81
-
82
-
83
-
84
-
85
-
86
-
87
-
88
-
89
-
90
-
91
-
92
-
93
-
94
-
95
-
96
-
97
-
98
-
99
-
100
-
101
-
102
-
103
-
104
-
105
-
106
-
107
-
108
-
109
-
110
-
111
-
112
-
113
-
114
-
115
-
116
-
117
-
118
-
119
-
120
-
121
-
122
-
123
-
124
-
125
-
126
-
127
-
128
-
129
-
130
-
131
-
132
-
133
-
134
-
135
-
136
-
137
-
138
-
139
-
140
-
141
-
142
-
143
-
144
-
145
-
146
-
147
-
148
-
149
-
150
-
151
-
152
-
153
-
154
-
155
-
156
-
157
-
158
-
159
-
160
-
161
-
162
-
163
 |
 |
