Casio EX Z85 Owners Manual - Page 78
Viewing Snapshots and Movies on a TV Screen, PLAY to turn on the camera. - usb cable
 |
UPC - 079767624071
View all Casio EX Z85 manuals
Add to My Manuals
Save this manual to your list of manuals |
Page 78 highlights
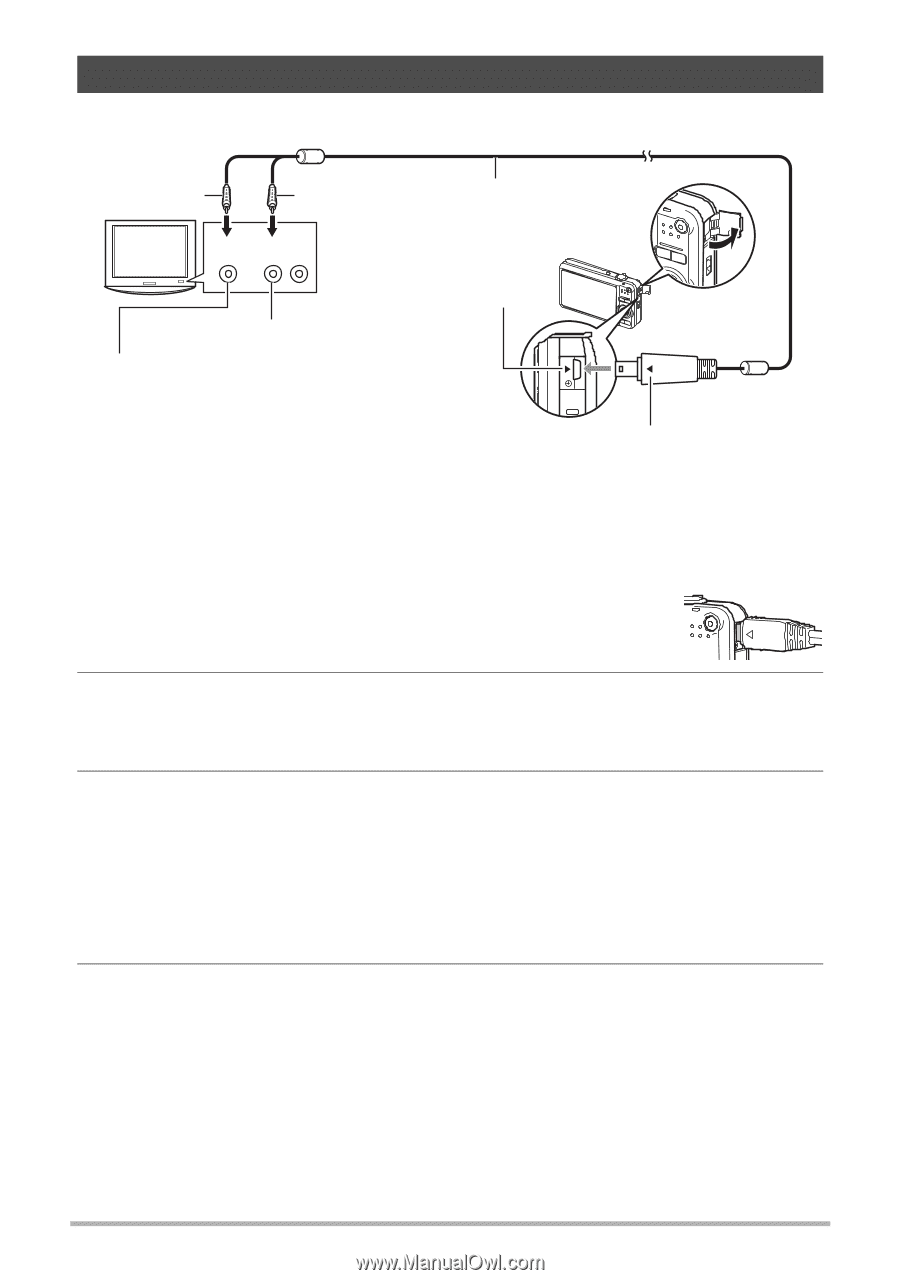
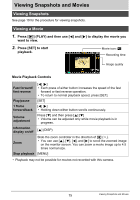
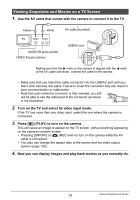
Viewing Snapshots and Movies on a TV Screen 1. Use the AV cable that comes with the camera to connect it to the TV. Yellow White AV cable (bundled) TV Video Audio AUDIO IN jacks (white) VIDEO IN jack (yellow) USB/AV port Making sure that the 6 mark on the camera is aligned with the 4 mark of the AV cable connector, connect the cable to the camera. • Make sure that you insert the cable connector into the USB/AV port until you feel it click securely into place. Failure to insert the connector fully can result in poor communication or malfunction. • Note that even while the connector is fully inserted, you still will be able to see the metal part of the connector as shown in the illustration. 2. Turn on the TV and select its video input mode. If the TV has more than one video input, select the one where the camera is connected. 3. Press [p] (PLAY) to turn on the camera. This will cause an image to appear on the TV screen, without anything appearing on the camera's monitor screen. • Pressing [ON/OFF] or [r] (REC) will not turn on the camera while the AV cable is connected. • You also can change the aspect ratio of the screen and the video output system (page 128). 4. Now you can display images and play back movies as you normally do. 78 Viewing Snapshots and Movies
-
 1
1 -
2
-
3
-
4
-
5
-
6
-
7
-
8
-
9
-
10
-
11
-
12
-
13
-
14
-
15
-
16
-
17
-
18
-
19
-
20
-
21
-
22
-
23
-
24
-
25
-
26
-
27
-
28
-
29
-
30
-
31
-
32
-
33
-
34
-
35
-
36
-
37
-
38
-
39
-
40
-
41
-
42
-
43
-
44
-
45
-
46
-
47
-
48
-
49
-
50
-
51
-
52
-
53
-
54
-
55
-
56
-
57
-
58
-
59
-
60
-
61
-
62
-
63
-
64
-
65
-
66
-
67
-
68
-
69
-
70
-
71
-
72
-
 73
73 -
 74
74 -
 75
75 -
 76
76 -
 77
77 -
 78
78 -
 79
79 -
 80
80 -
 81
81 -
 82
82 -
 83
83 -
84
-
85
-
86
-
87
-
88
-
89
-
90
-
91
-
92
-
93
-
94
-
95
-
96
-
97
-
98
-
99
-
100
-
101
-
102
-
103
-
104
-
105
-
106
-
107
-
108
-
109
-
110
-
111
-
112
-
113
-
114
-
115
-
116
-
117
-
118
-
119
-
120
-
121
-
122
-
123
-
124
-
125
-
126
-
127
-
128
-
129
-
130
-
131
-
132
-
133
-
134
-
135
-
136
-
137
-
138
-
139
-
140
-
141
-
142
-
143
-
144
-
145
-
146
-
147
-
148
-
149
-
150
-
151
-
152
-
153
-
154
-
155
-
156
-
157
-
158
-
159
-
160
-
161
-
162
-
163
 |
 |